Skip to content
Parallax Learn

Parallax Learn

  • Welcome
  • Tutorials
        • Tutorial Series head tag

          Tutorial Series
        • Tutorial Series

          The special, classroom-ready series pages are organized collections of tutorials for our most popular hardware and/or languages. The tutorials for each topic are conveniently accessible from a single page, shown in the order it is recommended that they be completed.
        • Robotics Series Head tag

          Robotics Series
        • Robotics Series

          • Artificial Intelligence
          • Cybersecurity: Radio Data tutorialCybersecurity
          • cyber:bot + Python
          • cyber:bot + MakeCode
          • Boe-Bot Tutorial SeriesBoe-Bot
          • Arduino Shield-Bot
          • ActivityBot with C TutorialsActivityBot + C
          • ActivityBot with BlocklyProp Tutorial SeriesActivityBot + BlocklyProp
          • Scribbler 3 Tutorial SeriesScribbler 3
        • Electronics & Programming Series Head tag

          Electronics & Programming Series
          • BS2 Board of Education Tutorial SeriesBS2 Board of Education
          • Propeller C-Language BasicsPropeller C Basics
          • FLiP Try-It Kit C Tutorial SeriesFLiP Try-It Kit + C
          • FLiP Try-It Kit BlocklyProp TutorialsFLiP Try-It Kit + BlocklyProp
          • Badge WX Tutorial SeriesBadge WX
          • Propeller BlocklyProp Basics and ProjectsPropeller BlocklyProp Basics
          • View All Tutorial Series »
        • Browse Tutorials
        • Browse Tutorials

          Individual tutorials sorted by robot or kit, and language.
        • By Robot or Kit
          • ActivityBot
          • SumoBot WX
          • Boe-Bot
          • Shield-Bot
          • cyber:bot
          • Badge WX
          • ELEV-8
          • ARLO
        • By Language
        • By Language

          • Propeller C
          • Arduino
          • BlocklyProp
          • PBASIC
          • Python
          • MakeCode
          • View All Tutorials »
  • Educators
  • Reference
  • Downloads
  • Home
  • All Courses

BlocklyProp Robotics with the ActivityBot 360°

Curriculum

  • 1 Section
  • 41 Lessons
  • Lifetime
Expand all sectionsCollapse all sections
  • BlocklyProp Robotics with the ActivityBot 360°
    41
    • 1.1
      Build the ActivityBot 360°
    • 1.2
      Hardware Check
    • 1.3
      Step 1 – Prepare Wheels
    • 1.4
      Step 2 – Prepare Chassis
    • 1.5
      Step 3 – Prepare Servos
    • 1.6
      Step 4 – Mount Right Servo
    • 1.7
      Step 5 – Mount Left Servo
    • 1.8
      Step 6 – Mount Battery Pack
    • 1.9
      Step 7 – Mount Tail Wheel
    • 1.10
      Step 8 – Mount Drive Wheels
    • 1.11
      Step 9 – Mount the Activity Board WX
    • 1.12
      Electrical Connections
    • 1.13
      Software and Coding Check
    • 1.14
      ActivityBot 360° Circuits
    • 1.15
      Power & Connect Circuits
    • 1.16
      Blink Lights
    • 1.17
      Make a Beep
    • 1.18
      Navigation Basics
    • 1.19
      Feedback 360° Servo Test
    • 1.20
      Feedback 360° Encoder Calibration
    • 1.21
      Driving Distances
    • 1.22
      Driving Speeds
    • 1.23
      Taking Turns
    • 1.24
      Acceleration & Speed Limits
    • 1.25
      Navigate by Touch
    • 1.26
      Build the Whisker Switches
    • 1.27
      Test the Whisker Switches
    • 1.28
      Whisker-Wheel Response
    • 1.29
      Roaming with Whiskers
    • 1.30
      Navigate by Ultrasound
    • 1.31
      Build & Test the Ping))) Sensor Circuit
    • 1.32
      Roaming with Ultrasound
    • 1.33
      Maintain Distance with Ultrasound
    • 1.34
      Navigate by Visible Light
    • 1.35
      Build the Light Sensor Circuits
    • 1.36
      Make the Light Measurements Useful
    • 1.37
      Roaming with Light Sensors
    • 1.38
      Navigate by Infrared Flashlights
    • 1.39
      Build the IR Sensor Circuits
    • 1.40
      Test the IR Sensor Circuits
    • 1.41
      Roaming with Infrared Flashlights

Step 7 – Mount Tail Wheel

Mount the Tail Wheel Ball

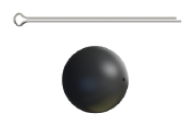
Parts needed for this step:

  • (1) Cotter pin (#700-00023)
  • (1) Tail wheel ball (#700-00009)
  • needle-nose pliers – optional, not included


CAUTION – the ends of the cotter pin may be sharp! If you have needle-nose pliers, you can bend the cotter pin ends into a circle to tuck away the points. But be aware that this makes the cotter pin more difficult to remove in the future if you ever want to do that.

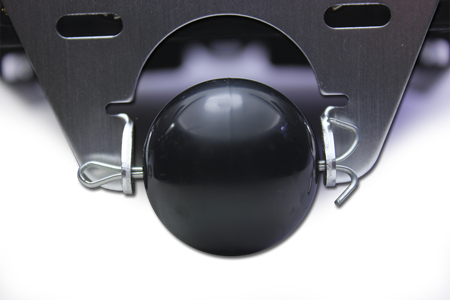
  • Position the tail wheel ball in the arch in the back of the chassis so that its holes line up with the holes in the little tabs.
  • Insert the cotter pin through the chassis mounting tab hole, through the tail wheel ball, and then through the other tab.

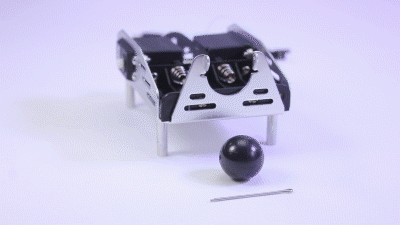
  • Bend the ends of the cotter pins outwards to secure it in place.


Printer-friendly version
Step 6 – Mount Battery Pack
Prev
Step 8 – Mount Drive Wheels
Next

DISCUSSION FORUMS | PARALLAX INC. STORE

About | Terms of Use | Feedback: learn@parallax.com | Copyright©Parallax Inc. 2024

© 2026 Parallax Learn • Built with GeneratePress