Blink Lights
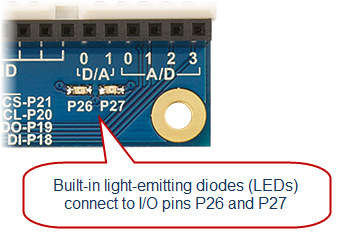
Your Activity Board has two built-in light-emitting diodes (LEDs) near the bottom-right corner of the board. They are already electrically connected to Propeller I/O pins P26 and P27. These LEDs are helpful when developing applications that use sensors. The idea is to build a program that turns on an LED when a sensor is activated. Then you, the roboticist, can get a quick visual cue that the sensor is actually detecting something.
I/O Pins
The Propeller microcontroller has 32 input/output pins, or I/O pins, labeled P0 through P31. The Propeller can interact with other circuits connected to these I/O pins, through programs that use these labels. A Propeller I/O pin can do three things:
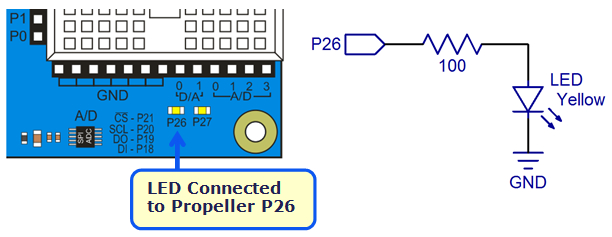
- Connect a circuit to 3.3 V supply, as shown below left. This is known as setting the pin to “output high.”
- Connect a circuit to 0 V, that is, ground, as shown below right. This is setting the pin to “output low.”
- Just monitor a circuit to see if it is already connected to 0 V, or 3.3 V. This is called setting the pin to an “input”
We’ll experiment with the “O” (output) feature of an I/O pin by programming the Propeller to turn a light on and off. The light circuit, which includes a small LED and resistor, is already built into the Propeller Activity Board (original or WX) or the Propeller Board of Education.
Built-in LEDs
- Locate the small LED light on your board. It’s a small part just above the P26 label in the lower-right corner of the Propeller Board of Education.
Test Code
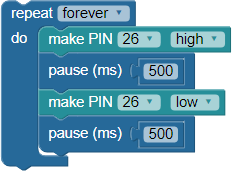
In BlocklyProp, you can turn an LED on or off with a single block: the Pin states category’s make PIN block.
- Log into your BlocklyProp account, connect your board to your computer, and make sure the BlocklyProp Client is running.
- Start a new project for your board, and build the project shown above in the workspace.
- Save your project, and click the Run Once button.
- Verify that the P26 light turns on for half a second, then off for half a second, over and over again.
How it Works
The first make PIN block sets the Propeller chip’s P26 I/O pin to output-high, which connects the pin to its 3.3 V supply. The pin applies 3.3 V of electrical pressure to the LED circuit, causing electric current to pass through it and the light to turn on. After that, pause(500) makes the program do nothing for 500 ms, which keeps the light on for half of a second.
Next, low(26) sets P26 to output-low, which connects the pin to its 0 V ground supply voltage instead. This takes away the electrical pressure, so the current stops flowing through the circuit and the light turns off. Another pause(500) makes the light stay off for half of a second.
Did You Know?
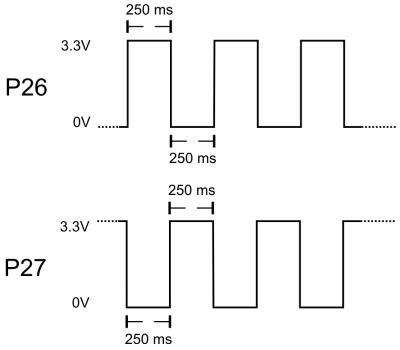
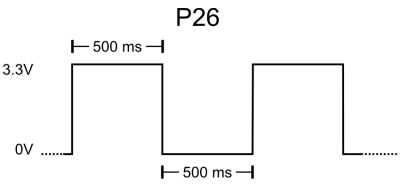
The picture below is called a timing diagram. It is a graph with voltage on the vertical axis, and time on the horizontal axis. Timing diagrams are often used to describe the electrical interaction between microcontrollers and circuits or other devices. This timing diagram shows the output of I/O pin P26 from the test code above.
Try This
You can make the light blink faster or slower by changing the value in the pause block. You can also make the on-time different from the off-time by using different values in the two pause blocks.
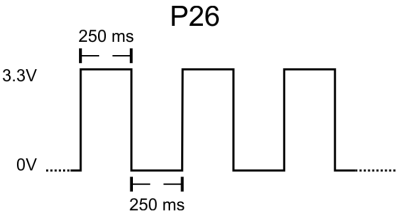
- Modify the program so the LED blinks twice as fast, as shown by the example code and timing diagram below. What happened to the pause values?

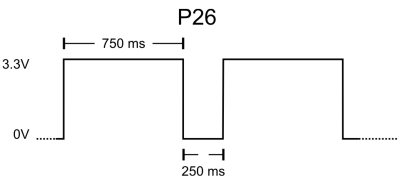
- Modify the program so the LED is on three times as long as it is off. What happened to the pause values?

Your Turn
Try controlling the P27 light along with the P26 light, according to the timing diagrams below.
- Add blocks to your program so that the P27 light turns on and off at about the same time as the P26 light.

- Modify the program so that whenever the P26 light is on, the P27 light is off, and vice versa.