Skip to content
Parallax Learn

Parallax Learn

  • Welcome
  • Tutorials
        • Tutorial Series head tag

          Tutorial Series
        • Tutorial Series

          The special, classroom-ready series pages are organized collections of tutorials for our most popular hardware and/or languages. The tutorials for each topic are conveniently accessible from a single page, shown in the order it is recommended that they be completed.
        • Robotics Series Head tag

          Robotics Series
        • Robotics Series

          • Artificial Intelligence
          • Cybersecurity: Radio Data tutorialCybersecurity
          • cyber:bot + Python
          • cyber:bot + MakeCode
          • Boe-Bot Tutorial SeriesBoe-Bot
          • Arduino Shield-Bot
          • ActivityBot with C TutorialsActivityBot + C
          • ActivityBot with BlocklyProp Tutorial SeriesActivityBot + BlocklyProp
          • Scribbler 3 Tutorial SeriesScribbler 3
        • Electronics & Programming Series Head tag

          Electronics & Programming Series
          • BS2 Board of Education Tutorial SeriesBS2 Board of Education
          • Propeller C-Language BasicsPropeller C Basics
          • FLiP Try-It Kit C Tutorial SeriesFLiP Try-It Kit + C
          • FLiP Try-It Kit BlocklyProp TutorialsFLiP Try-It Kit + BlocklyProp
          • Badge WX Tutorial SeriesBadge WX
          • Propeller BlocklyProp Basics and ProjectsPropeller BlocklyProp Basics
          • View All Tutorial Series »
        • Browse Tutorials
        • Browse Tutorials

          Individual tutorials sorted by robot or kit, and language.
        • By Robot or Kit
          • ActivityBot
          • SumoBot WX
          • Boe-Bot
          • Shield-Bot
          • cyber:bot
          • Badge WX
          • ELEV-8
          • ARLO
        • By Language
        • By Language

          • Propeller C
          • Arduino
          • BlocklyProp
          • PBASIC
          • Python
          • MakeCode
          • View All Tutorials »
  • Educators
  • Reference
  • Downloads
  • Home
  • All Courses
  • BlocklyProp Robotics with the ActivityBot (Legacy Version)

BlocklyProp Robotics with the ActivityBot (Legacy Version)

Build the IR Sensor Circuits

In this activity, you will build and test the infrared object sensor system to make sure they detect objects in front of the ActivityBot. Just like the whisker circuits, there is one on the right and one on the left so the ActivityBot can determine which way to turn in relation to the obstacle. 

In this case, each side needs two electronic components: an LED that rapidly flashes infrared light, and an infrared receiver to detect a reflection of that infrared light bouncing off of objects nearby.

Circuit

Parts Required

(2) IR LEDs
(2) IR receivers
(2) 1 k-ohm resistors (brown-black-red)
(2) 220-ohm resistors (red-red-brown)

  • Find the two IR LEDs in your kit — they are the clear ones with dome-shaped (not flat) tops.

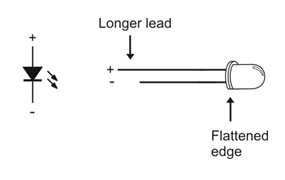
To direct the IR LED’s light, just like a flashlight beam, you will use an IR LED standoff (longer tube) and shield (shorter tube). 

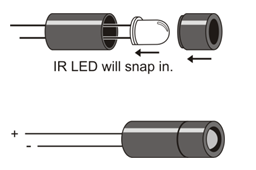
  • Insert the IR LED’s leads into the standoff tube, and out through the two holes at the bottom of the standoff. 
  • Press firmly and the IR LED should snap into place.  If it doesn’t, then pull it out, give it a half turn, and try again.
  • Fit the LED shield onto the standoff.

Although the shield friction-fits into the standoff, it can be helpful to place a small piece of clear tape around the tube where they meet to hold them together securely.  Make sure the tape does not extend beyond the end of the tube or cover the IR LED.

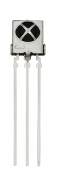
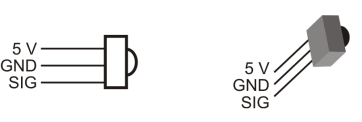
  • Find the IR receivers in your kit. If you have two different kinds, use the ones with the silver metal cases for this activity.


The IR LED’s cathodes are connected to D/A0 and D/A1.  For object detection, the D/A outputs are set to 0 V = GND.  Their voltage can be increased to make the IR LEDs dimmer, for closer range detection.  (They can even be tested at different voltages, or levels of dimness, to get a rough idea of the object’s distance, but that’s for another activity.)

  • Use this wiring diagram and schematic to build the infrared detectors. 
  • Make sure the longer IR LED anode pins are plugged into the rows shown in the wiring diagram.
  • Make sure your IR receivers are the silver ones with metal cases and not the black plastic ones.

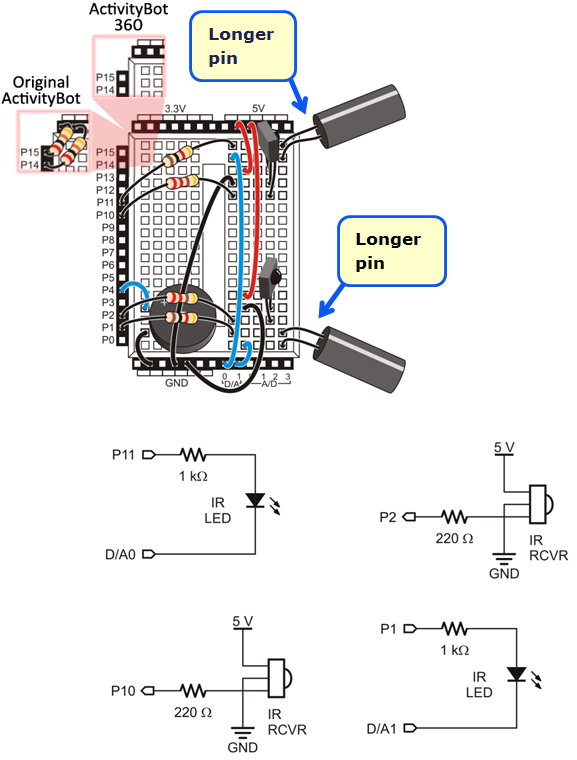
*P14/P15 resistors are needed only for ActivityBot kits using External Encoders (#32500).


Printer-friendly version
Navigate with Infrared Flashlights
Prev
Test the IR Sensor Circuits
Next

DISCUSSION FORUMS | PARALLAX INC. STORE

About | Terms of Use | Feedback: learn@parallax.com | Copyright©Parallax Inc. 2024

© 2025 Parallax Learn • Built with GeneratePress