Skip to content
Parallax Learn

Parallax Learn

  • Welcome
  • Tutorials
        • Tutorial Series head tag

          Tutorial Series
        • Tutorial Series

          The special, classroom-ready series pages are organized collections of tutorials for our most popular hardware and/or languages. The tutorials for each topic are conveniently accessible from a single page, shown in the order it is recommended that they be completed.
        • Robotics Series Head tag

          Robotics Series
        • Robotics Series

          • Artificial Intelligence
          • Cybersecurity: Radio Data tutorialCybersecurity
          • cyber:bot + Python
          • cyber:bot + MakeCode
          • Boe-Bot Tutorial SeriesBoe-Bot
          • Arduino Shield-Bot
          • ActivityBot with C TutorialsActivityBot + C
          • ActivityBot with BlocklyProp Tutorial SeriesActivityBot + BlocklyProp
          • Scribbler 3 Tutorial SeriesScribbler 3
        • Electronics & Programming Series Head tag

          Electronics & Programming Series
          • BS2 Board of Education Tutorial SeriesBS2 Board of Education
          • Propeller C-Language BasicsPropeller C Basics
          • FLiP Try-It Kit C Tutorial SeriesFLiP Try-It Kit + C
          • FLiP Try-It Kit BlocklyProp TutorialsFLiP Try-It Kit + BlocklyProp
          • Badge WX Tutorial SeriesBadge WX
          • Propeller BlocklyProp Basics and ProjectsPropeller BlocklyProp Basics
          • View All Tutorial Series »
        • Browse Tutorials
        • Browse Tutorials

          Individual tutorials sorted by robot or kit, and language.
        • By Robot or Kit
          • ActivityBot
          • SumoBot WX
          • Boe-Bot
          • Shield-Bot
          • cyber:bot
          • Badge WX
          • ELEV-8
          • ARLO
        • By Language
        • By Language

          • Propeller C
          • Arduino
          • BlocklyProp
          • PBASIC
          • Python
          • MakeCode
          • View All Tutorials »
  • Educators
  • Reference
  • Downloads
  • Home
  • All Courses
  • Boe-Bot Navigation with Incline Sensing Project

Boe-Bot Navigation with Incline Sensing Project

Getting Started with Tilt

Schematics and Building the Circuits

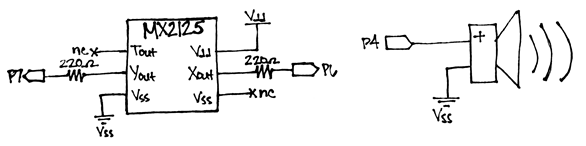
The image below shows the schematic for the Boe-Bot with the accelerometer circuit.  The servo and piezo speaker connections are from Robotics with the Boe-Bot (#28125).  The connections for the accelerometer are featured in Chapter 3 of Smart Sensors and Applications.

Figure 3 – Schematic for Boe-Bot with Accelerometer


Tilt Axes on the Boe-Bot

It’s important to get a feel for how the Boe-Bot’s forward/backward and left/right tilt axes relate to the accelerometer’s X and Y axes.

  • Enter, save, and run BoeBotTiltTest.bs2, and keep an eye on the Debug Terminal as you tilt your Boe-Bot.
  • Verify that the piezospeaker beeped for two seconds before the program continued.  If not, double-check your program and wiring.
  • Try tilting your Boe-Bot to the left and right.  Verify that the x-axis values range from -625 to 625, and that they are negative when you tilt the Boe-Bot to the left and positive when you tilt it to the right.
  • Next tilt the Boe-Bot as though it is driving downhill, then uphill.  Verify that the y-axis values range from -625 to 625, and that they are positive when the Boe-Bot is tilted downhill and negative when the Boe-Bot is tilted uphill.

Example Program – Boe-BotTiltTest.bs2

' BoeBotTiltTest.bs2
' Test accelerometer readings.
 
'{$STAMP BS2}
'{$PBASIC 2.5}
 
x              VAR     Word                  ' Left/right tilt
y              VAR     Word                  ' Forward/backward tilt
 
DEBUG "Beep!!!"                              ' Test piezospeaker
FREQOUT 4, 2000, 3000
DEBUG CLS, "  x     y", CR                   ' Axis headings
 
DO                                           ' Begin main routine
 
  PULSIN 6, 1, x                             ' Get X-axis tilt
  PULSIN 7, 1, y                             ' Get Y-axis tilt
 
  ' Instead of measurements that range from 1875 to 3125 with 2500 = no tilt,
  ' These two statements shift the tilt measurements to range from -625 to 625
  ' with 0 = no tilt.
  x = (x MIN 1875 MAX 3125) - 2500
  y = (y MIN 1875 MAX 3125) - 2500
 
  ' Display x and y tilt measurements.
  DEBUG CRSRX, 0, "(", SDEC3 x, ", ", SDEC3 y, ")", CLREOL
 
  PAUSE 100                                  ' Pause 1/10 s
 
LOOP                                         ' Repeat main routine

Printer-friendly version
Ramping in Navigation
Next

DISCUSSION FORUMS | PARALLAX INC. STORE

About | Terms of Use | Feedback: learn@parallax.com | Copyright©Parallax Inc. 2024

© 2025 Parallax Learn • Built with GeneratePress