Skip to content
Parallax Learn

Parallax Learn

  • Welcome
  • Tutorials
        • Tutorial Series head tag

          Tutorial Series
        • Tutorial Series

          The special, classroom-ready series pages are organized collections of tutorials for our most popular hardware and/or languages. The tutorials for each topic are conveniently accessible from a single page, shown in the order it is recommended that they be completed.
        • Robotics Series Head tag

          Robotics Series
        • Robotics Series

          • Artificial Intelligence
          • Cybersecurity: Radio Data tutorialCybersecurity
          • cyber:bot + Python
          • cyber:bot + MakeCode
          • Boe-Bot Tutorial SeriesBoe-Bot
          • Arduino Shield-Bot
          • ActivityBot with C TutorialsActivityBot + C
          • ActivityBot with BlocklyProp Tutorial SeriesActivityBot + BlocklyProp
          • Scribbler 3 Tutorial SeriesScribbler 3
        • Electronics & Programming Series Head tag

          Electronics & Programming Series
          • BS2 Board of Education Tutorial SeriesBS2 Board of Education
          • Propeller C-Language BasicsPropeller C Basics
          • FLiP Try-It Kit C Tutorial SeriesFLiP Try-It Kit + C
          • FLiP Try-It Kit BlocklyProp TutorialsFLiP Try-It Kit + BlocklyProp
          • Badge WX Tutorial SeriesBadge WX
          • Propeller BlocklyProp Basics and ProjectsPropeller BlocklyProp Basics
          • View All Tutorial Series »
        • Browse Tutorials
        • Browse Tutorials

          Individual tutorials sorted by robot or kit, and language.
        • By Robot or Kit
          • ActivityBot
          • SumoBot WX
          • Boe-Bot
          • Shield-Bot
          • cyber:bot
          • Badge WX
          • ELEV-8
          • ARLO
        • By Language
        • By Language

          • Propeller C
          • Arduino
          • BlocklyProp
          • PBASIC
          • Python
          • MakeCode
          • View All Tutorials »
  • Educators
  • Reference
  • Downloads
  • Home
  • All Courses
  • Breadboard Setup and Testing for micro:bit

Breadboard Setup and Testing for micro:bit

CYBERscope Voltmeter

Now let’s try out the CYBERscope page’s voltmeter display.

  • If you do not already have the micro:bit Python Editor open, browse to python.microbit.org in a Google Chrome or Microsoft Edge browser.
  • If the measure_volts script is not currently open in the micro:bit Python Editor, click Open, select, and open measure_volts.hex.
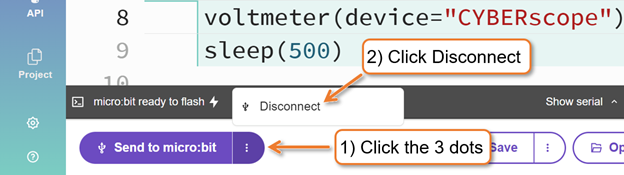
  • In the measure_volts script, change voltmeter(device=”Terminal”) to voltmeter(device=”CYBERscope”).  
  • Use the Send to micro:bit button to flash the modified script into your micro:bit module.
  • Click the Send to micro:bit button’s More menu.  It’s three vertical dots  ⋮  by the Send to micro:bit button.  Select Disconnect.

  • Open a new browser tab and go to cyberscope.parallax.com.  
  • In the CYBERscope tab, click the Connect buttton.  

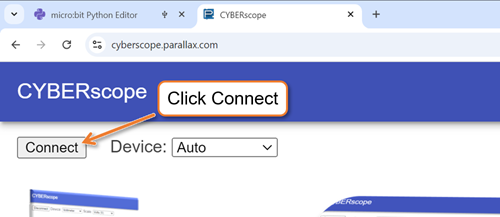
  • In the serial port dialog that appears, click the row with mbed in its name to select it, and then click Connect.

  • Verify that the CYBERscope display resembles this:

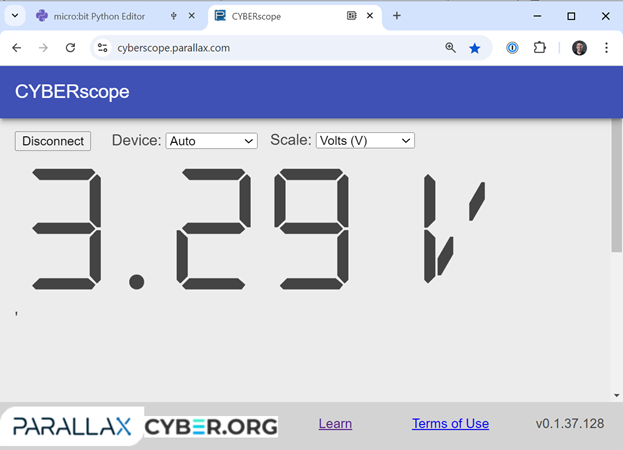
  • Try repeating the measurements from the Tests and Try This sections with this voltmeter display.

Don’t forget to save your work.

  • Change the Script Name to measure_volts_with_cyberscope, then click the Save button.

Printer-friendly version
CYBERscope Setup
Prev
First Breadboard Circuit
Next

DISCUSSION FORUMS | PARALLAX INC. STORE

About | Terms of Use | Feedback: learn@parallax.com | Copyright©Parallax Inc. 2024

© 2025 Parallax Learn • Built with GeneratePress