Skip to content
Parallax Learn

Parallax Learn

  • Welcome
  • Tutorials
        • Tutorial Series head tag

          Tutorial Series
        • Tutorial Series

          The special, classroom-ready series pages are organized collections of tutorials for our most popular hardware and/or languages. The tutorials for each topic are conveniently accessible from a single page, shown in the order it is recommended that they be completed.
        • Robotics Series Head tag

          Robotics Series
        • Robotics Series

          • Artificial Intelligence
          • Cybersecurity: Radio Data tutorialCybersecurity
          • cyber:bot + Python
          • cyber:bot + MakeCode
          • Boe-Bot Tutorial SeriesBoe-Bot
          • Arduino Shield-Bot
          • ActivityBot with C TutorialsActivityBot + C
          • ActivityBot with BlocklyProp Tutorial SeriesActivityBot + BlocklyProp
          • Scribbler 3 Tutorial SeriesScribbler 3
        • Electronics & Programming Series Head tag

          Electronics & Programming Series
          • BS2 Board of Education Tutorial SeriesBS2 Board of Education
          • Propeller C-Language BasicsPropeller C Basics
          • FLiP Try-It Kit C Tutorial SeriesFLiP Try-It Kit + C
          • FLiP Try-It Kit BlocklyProp TutorialsFLiP Try-It Kit + BlocklyProp
          • Badge WX Tutorial SeriesBadge WX
          • Propeller BlocklyProp Basics and ProjectsPropeller BlocklyProp Basics
          • View All Tutorial Series »
        • Browse Tutorials
        • Browse Tutorials

          Individual tutorials sorted by robot or kit, and language.
        • By Robot or Kit
          • ActivityBot
          • SumoBot WX
          • Boe-Bot
          • Shield-Bot
          • cyber:bot
          • Badge WX
          • ELEV-8
          • ARLO
        • By Language
        • By Language

          • Propeller C
          • Arduino
          • BlocklyProp
          • PBASIC
          • Python
          • MakeCode
          • View All Tutorials »
  • Educators
  • Reference
  • Downloads
  • Home
  • All Courses
  • Breadboard Setup and Testing for micro:bit

Breadboard Setup and Testing for micro:bit

Parts & Circuit

Parts

  • Built-up board from First Electrical Connections with a Breadboard
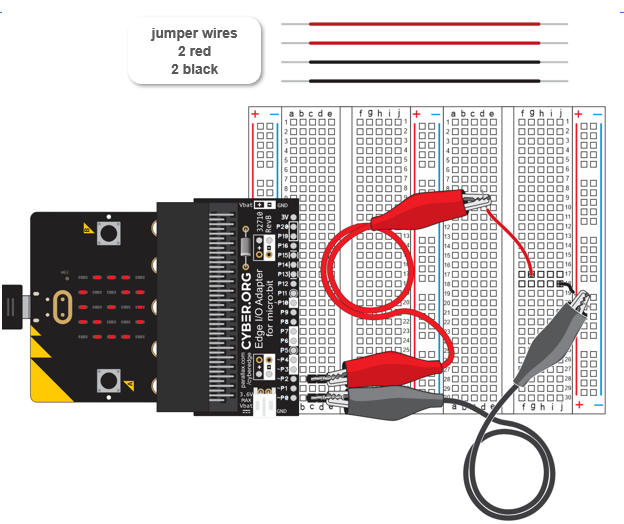
  • 3” Jumper Wires – 2 red and 2 black


Circuit

  • Make sure your micro:bit is still running continuity_tester.hex from First Electrical Connections with a Breadboard.  
  • Unplug the USB cable.
  • Connect the black and red jumper wires exactly as shown here:


  • Use the animation and the instructions below it to double-check your power connections.
  • Optionally, download the mangnify-power-connections.mp4 clip and play and pause it between steps.

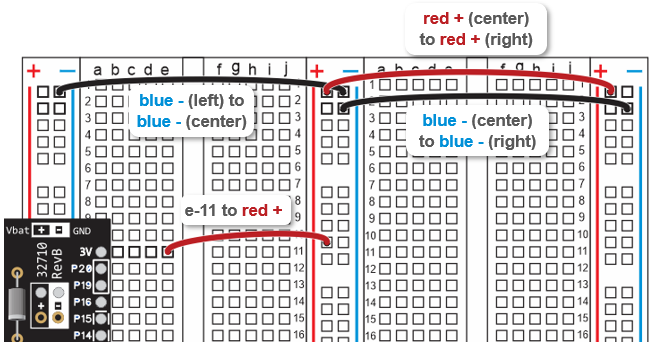
  • Check your connections, and make sure they exactly match the drawing:
    • Top (-) socket in left bus strip connects to top (-) socket in center bus strip, by a black wire.
    • One below top (-) socket in center bus strip connects to one below top (-) socket in right bus strip, by a black wire.
    • (e, 11) socket in left terminal strip connects to (+) socket in center bus strip, by a red wire.
    • Top (+) socket in center bus strip connects to top (+) socket in right bus strip, by a red wire.
  • Reconnect the USB cable, and verify that the LED display shows the circle-slash not connected symbol.  

BLANK? Disconnect power!  If the display is blank, or only displays the symbol briefly before going blank, disconnect power immediately and check your wiring for errors.


Printer-friendly version
Set Power for Circuits
Prev
Script
Next

DISCUSSION FORUMS | PARALLAX INC. STORE

About | Terms of Use | Feedback: learn@parallax.com | Copyright©Parallax Inc. 2024

© 2025 Parallax Learn • Built with GeneratePress