Skip to content
Parallax Learn

Parallax Learn

  • Welcome
  • Tutorials
        • Tutorial Series head tag

          Tutorial Series
        • Tutorial Series

          The special, classroom-ready series pages are organized collections of tutorials for our most popular hardware and/or languages. The tutorials for each topic are conveniently accessible from a single page, shown in the order it is recommended that they be completed.
        • Robotics Series Head tag

          Robotics Series
        • Robotics Series

          • Artificial Intelligence
          • Cybersecurity: Radio Data tutorialCybersecurity
          • cyber:bot + Python
          • cyber:bot + MakeCode
          • Boe-Bot Tutorial SeriesBoe-Bot
          • Arduino Shield-Bot
          • ActivityBot with C TutorialsActivityBot + C
          • ActivityBot with BlocklyProp Tutorial SeriesActivityBot + BlocklyProp
          • Scribbler 3 Tutorial SeriesScribbler 3
        • Electronics & Programming Series Head tag

          Electronics & Programming Series
          • BS2 Board of Education Tutorial SeriesBS2 Board of Education
          • Propeller C-Language BasicsPropeller C Basics
          • FLiP Try-It Kit C Tutorial SeriesFLiP Try-It Kit + C
          • FLiP Try-It Kit BlocklyProp TutorialsFLiP Try-It Kit + BlocklyProp
          • Badge WX Tutorial SeriesBadge WX
          • Propeller BlocklyProp Basics and ProjectsPropeller BlocklyProp Basics
          • View All Tutorial Series »
        • Browse Tutorials
        • Browse Tutorials

          Individual tutorials sorted by robot or kit, and language.
        • By Robot or Kit
          • ActivityBot
          • SumoBot WX
          • Boe-Bot
          • Shield-Bot
          • cyber:bot
          • Badge WX
          • ELEV-8
          • ARLO
        • By Language
        • By Language

          • Propeller C
          • Arduino
          • BlocklyProp
          • PBASIC
          • Python
          • MakeCode
          • View All Tutorials »
  • Educators
  • Reference
  • Downloads
  • Home
  • All Courses
  • Breadboard Setup and Testing for micro:bit

Breadboard Setup and Testing for micro:bit

Test the Supply Rails

Now let’s test the supply rails, first with the Python Editor and then with CYBERscope.  In these tests, you will verify that the rails now have 3.3 V.

  • Use the animation and the instructions below it to connect continuity probes to your breadboard.
  • Optionally, view the full-size bus-strips-verify-v-supply.mp4 clip to play and pause it between steps.
  • Each step will have you plug both probes into the breadboard.  After plugin them in, verify that the voltage shown in the Serial Terminal is about 3.3 V.

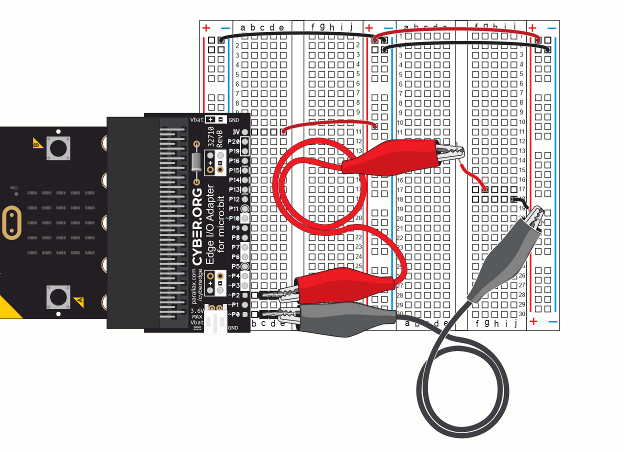
  • Get ready to follow instructions of using the voltmeter’s positive and negative probes.  
    • The positive probe is the one with the red jumper wire that’s connected to the same row as P2 on the micro:bit edge adapter.  
    • The negative probe has the black jumper wire and is connected to the same row as P0 on the micro:bit edge adapter.
  • Connect the voltmeter’s negative probe to the left bus strip’s (-) column.
  • Connect the voltmeter’s positive probe to the left terminal strip’s (c, 11) socket.  
  • Verify that the voltage measured is very close to 3.3 V, preferably in the 3.25 to 3.35 V neighborhood. Examples:
    • 3.27 V is a good measurement
    • -3.27 V might mean you have your probes reversed.
  • Connect the negative probe to one of the sockets in the center bus strip’s negative (-) column.
  • Connect the positive probe to one of the sockets in the center bus strip’s positive (+) columns.
  • Repeat this measurement to verify sockets in the center bus strip’s (+) and (-) columns.


Printer-friendly version
Script
Prev
How the Supply Rail Tests Work
Next

DISCUSSION FORUMS | PARALLAX INC. STORE

About | Terms of Use | Feedback: learn@parallax.com | Copyright©Parallax Inc. 2024

© 2025 Parallax Learn • Built with GeneratePress