Skip to content
Parallax Learn

Parallax Learn

  • Welcome
  • Tutorials
        • Tutorial Series head tag

          Tutorial Series
        • Tutorial Series

          The special, classroom-ready series pages are organized collections of tutorials for our most popular hardware and/or languages. The tutorials for each topic are conveniently accessible from a single page, shown in the order it is recommended that they be completed.
        • Robotics Series Head tag

          Robotics Series
        • Robotics Series

          • Artificial Intelligence
          • Cybersecurity: Radio Data tutorialCybersecurity
          • cyber:bot + Python
          • cyber:bot + MakeCode
          • Boe-Bot Tutorial SeriesBoe-Bot
          • Arduino Shield-Bot
          • ActivityBot with C TutorialsActivityBot + C
          • ActivityBot with BlocklyProp Tutorial SeriesActivityBot + BlocklyProp
          • Scribbler 3 Tutorial SeriesScribbler 3
        • Electronics & Programming Series Head tag

          Electronics & Programming Series
          • BS2 Board of Education Tutorial SeriesBS2 Board of Education
          • Propeller C-Language BasicsPropeller C Basics
          • FLiP Try-It Kit C Tutorial SeriesFLiP Try-It Kit + C
          • FLiP Try-It Kit BlocklyProp TutorialsFLiP Try-It Kit + BlocklyProp
          • Badge WX Tutorial SeriesBadge WX
          • Propeller BlocklyProp Basics and ProjectsPropeller BlocklyProp Basics
          • View All Tutorial Series »
        • Browse Tutorials
        • Browse Tutorials

          Individual tutorials sorted by robot or kit, and language.
        • By Robot or Kit
          • ActivityBot
          • SumoBot WX
          • Boe-Bot
          • Shield-Bot
          • cyber:bot
          • Badge WX
          • ELEV-8
          • ARLO
        • By Language
        • By Language

          • Propeller C
          • Arduino
          • BlocklyProp
          • PBASIC
          • Python
          • MakeCode
          • View All Tutorials »
  • Educators
  • Reference
  • Downloads
  • Home
  • All Courses
  • Breadboard Setup and Testing for micro:bit

Breadboard Setup and Testing for micro:bit

Try This – Probing the Board

Let’s test all the examples from How to Connect Two Wires.  

  • Use the animation and the instructions below it to connect your micro:bit to the breadboard with the Edge I/O Adapter for micro:bit.
  • Optionally, view the full-size continuity-measurements.mp4 clip to play and pause it between steps.
  • Verify that the micro:bit displays a checkmark to indicate that the two sockets being probed are connected, or the NO (circle with slash) symbol to indicate that the sockets are not connected.

Did You Know?

  • Continuity tests should ONLY be performed while power is not applied to the circuit.  
  • A continuity tester is a device to measure if there is electrical continuity between two points.  In other words, a device that tells if current can flow between points where the tester’s probes are connected.
  • Electric current is the flow of electrons that makes lights glow and motors turn.  
  • An electrical connection is one that can conduct electric current.  
  • Common electric conductors are metals like silver, gold, copper, tin, nickel, and lead.  
  • Electric insulation prevents the flow of electric current.  Common insulators include materials like air, plastic, and fiberglass.
  • Terminal strips are normally used for connecting electrical and electronic part leads together to build a circuit.  Bus strips are normally used for keeping power connections close to each row of 5 sockets in the terminal strips.  Since most circuits need some kind of power supply, having power sockets next to each row will make circuits more organized.  
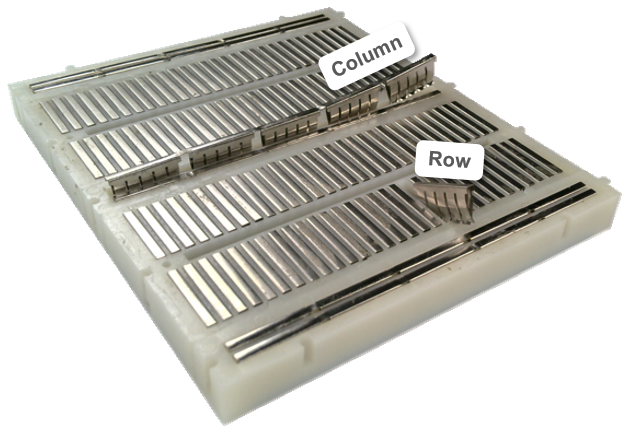
  • A breadboard is made of metal clips separated by plastic.  The metal clips in each terminal strip row has five pairs of springy metal fingers.  Each wire or part lead you plug into a breadboard socket is gripped by a pair of these metal fingers, which makes an electrical connection.  Each bus strip column is 5 clips that are still connected to each other with metal at the base.  They have not been cut apart like the row strips have.  

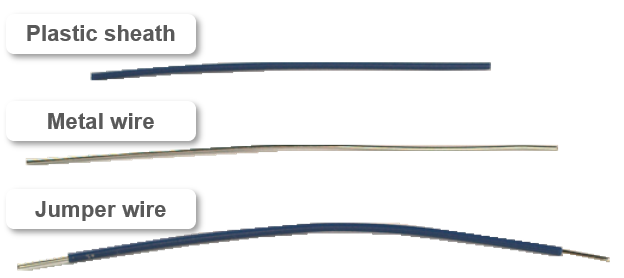
  • A jumper wire is a metal wire conductor that is wrapped in an insulating plastic sheath.


Printer-friendly version
Node Tests
Prev
How it Works
Next

DISCUSSION FORUMS | PARALLAX INC. STORE

About | Terms of Use | Feedback: learn@parallax.com | Copyright©Parallax Inc. 2024

© 2025 Parallax Learn • Built with GeneratePress