Skip to content
Parallax Learn

Parallax Learn

  • Welcome
  • Tutorials
        • Tutorial Series head tag

          Tutorial Series
        • Tutorial Series

          The special, classroom-ready series pages are organized collections of tutorials for our most popular hardware and/or languages. The tutorials for each topic are conveniently accessible from a single page, shown in the order it is recommended that they be completed.
        • Robotics Series Head tag

          Robotics Series
        • Robotics Series

          • Artificial Intelligence
          • Cybersecurity: Radio Data tutorialCybersecurity
          • cyber:bot + Python
          • cyber:bot + MakeCode
          • Boe-Bot Tutorial SeriesBoe-Bot
          • Arduino Shield-Bot
          • ActivityBot with C TutorialsActivityBot + C
          • ActivityBot with BlocklyProp Tutorial SeriesActivityBot + BlocklyProp
          • Scribbler 3 Tutorial SeriesScribbler 3
        • Electronics & Programming Series Head tag

          Electronics & Programming Series
          • BS2 Board of Education Tutorial SeriesBS2 Board of Education
          • Propeller C-Language BasicsPropeller C Basics
          • FLiP Try-It Kit C Tutorial SeriesFLiP Try-It Kit + C
          • FLiP Try-It Kit BlocklyProp TutorialsFLiP Try-It Kit + BlocklyProp
          • Badge WX Tutorial SeriesBadge WX
          • Propeller BlocklyProp Basics and ProjectsPropeller BlocklyProp Basics
          • View All Tutorial Series »
        • Browse Tutorials
        • Browse Tutorials

          Individual tutorials sorted by robot or kit, and language.
        • By Robot or Kit
          • ActivityBot
          • SumoBot WX
          • Boe-Bot
          • Shield-Bot
          • cyber:bot
          • Badge WX
          • ELEV-8
          • ARLO
        • By Language
        • By Language

          • Propeller C
          • Arduino
          • BlocklyProp
          • PBASIC
          • Python
          • MakeCode
          • View All Tutorials »
  • Educators
  • Reference
  • Downloads
  • Home
  • All Courses
  • Circuits on the cyber:bot

Circuits on the cyber:bot

Get Ready to Build

Building and controlling circuits with the cyber:bot board is a great way to learn about electricity, and to experiment with making your own inventions.  Building experimental circuits to design your own projects is called prototyping, and it is a real-world engineering skill.

Before you start your cyber:bot prototyping, there are three important Reference pages you should have handy, especially if you have never built circuits on a breadboard before. Just click on each link and the page will open in a new tab or window.

  • Open the Breadboard Basics page, and watch the video if you can.
  • Open the Schematic Symbols page, and look up the symbols for resistor, light-emitting diode, pushbutton, and microcontroller input and output pins.
  • Open the Resistor Color Codes page (we’ll use it soon).
  • Now, keep reading below to learn about the breadboard on the cyber:bot.


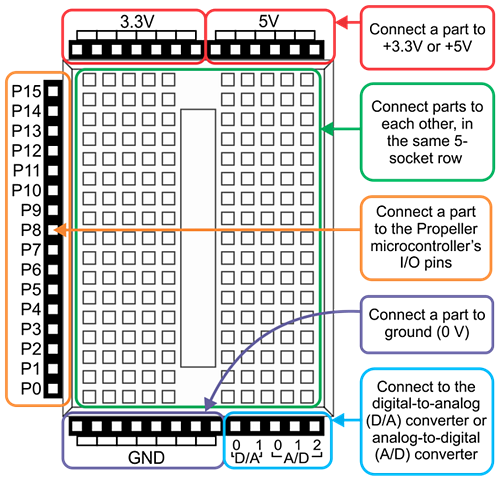
The Breadboard on the cyber:bot

The cyber:bot Board has a solderless breadboard mounted on it. The breadboard lets you connect common electronic components together to build your own circuits.

The cyber:bot’s breadboard is surrounded on three sides by black sockets. These make it convenient to connect circuits on the breadboard to power, ground, and the Propeller I/O pins.  There are also sockets to connect to a digital-to-analog converter signal from the Propeller chip,  and to an analog-to-digital converter on the micro:bit.

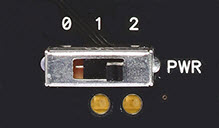
Remember the 3-Position Switch Guidelines!

Before you build circuits on the breadboard, let’s review:

  • Position 0: ALWAYS use 0 for building or modifying circuits; also good for flashing scripts. Position 0 turns off power to the whole cyber:bot board. If the micro:bit is plugged into USB, you can still flash and run non-robot scripts.
  • Position 1: Good for flashing scripts and powering breadboard circuits.  Position 1 powers the Propeller system and sockets along the breadboard, but not the 3-pin/Servo ports, so your cyber:bot won’t roll away the moment you program it. Position 1 also powers the micro:bit independent of its USB port.  
  • Position 2: ONLY use 2 when you are ready for your robot to move. NOT good for flashing scripts. Position 2 powers all the circuits on the board, including the 3-pin servo ports, and also the micro:bit independent of its USB port.


Printer-friendly version
Blink a Light
Prev
Build LED Circuits
Next

DISCUSSION FORUMS | PARALLAX INC. STORE

About | Terms of Use | Feedback: learn@parallax.com | Copyright©Parallax Inc. 2024

© 2025 Parallax Learn • Built with GeneratePress