Setup, Sampling, and Programming
Setting up the Coin Acceptor
- Locate the NC/NO switch on the back of the coin acceptor. Make sure it is set to NO.
- Locate the FAST/MEDIUM/SLOW switch on the back of the coin acceptor. Make sure it is set to FAST.
- Power the coin acceptor by
- Turning the switch to position 2 if using an Activity Board, or
- Supplying 12V to the coin acceptor (FLiP)
Setting the Coin Acceptor’s Parameters
- Press and hold the ADD and MINUS buttons at the same time for at least 3 seconds. The letter “A” will appear on the display.
- Press the SETUP button once, and the letter “E” will appear.
- Use the ADD and MINUS buttons to set how many different kinds of coins you’d like to accept. Press SETUP again to set the value.
- For each type of coin:
- The letter “H” and a number will appear on the display.
- Use the ADD and MINUS buttons to set the number of sample coins you will use. Press SETUP to set the value. You can simply press SET to use the default value of 20.
- The letter “P” and a number will appear on the display.
- Use the ADD and MINUS buttons to set the number of pulses this type of coin will output to the Propeller. This value should be different for each type of coin.
- Press SETUP to set this value.
- The letter “F” and a number will appear on the display. This is the accuracy can can be set from 1 (most accurate) to 30 (least accurate). Values between 5-10 are typical.
- Press SETUP to set the value.
- This completes setup for one type of coin – repeat this section for each type of coin.
- When each coin type is setup, the letter “E” will appear again on the screen.
- Disconnect or turn off power to the coin acceptor.
Sampling coins
- Power the coin acceptor by turning the switch to position 2 (ActivityBoard) or by supplying 12V to the coin acceptor (FLiP)
- It is recommended that you use 20 coins of each type. This affects the overall accuracy of the coin acceptor.
- Press SETUP. The letter “A” will appear on the screen.
- Press SETUP again. The letter “A” will be followed by a number.
- Begin inserting one type of coin. Keep inserting coins until the lights flash and the number increases.
- After the number on the display increases, begin inserting the next type of coin.
- Repeat this process until all coin types have been sampled.
Programming the ActivityBoard or FLiP
The coin acceptor connects to the Propeller very similarly to a pushbutton switch:
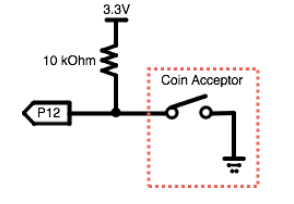
The coin acceptor “tells” the Propeller what type of coin was inserted by closing the circuit a specific number of times. Because these are basically pulses, the Propeller can simply wait for the circuit to close, and then count how many pulses it receives.
The following program will work for a coin acceptor that has been set up to send 5 pulses for a US quarter ($0.25), 4 pulses for a US dime ($0.10), and 3 pulses for a US nickel ($0.05):
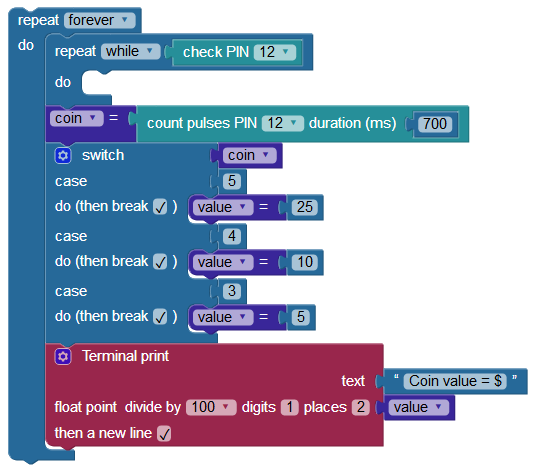
- Build the program above.
- If necessary, modify the program to match how you set the parameters for your coin acceptor.
- Load your program to the Activity Board or FLiP module’s EEPROM.
When you insert a coin into the coin acceptor, it will display the value for that coin:

Your Turn
- The program above can be placed in a function and run in its own cog using the new processor block. This will allow you to run a monitor for the coin acceptor inside of your program.
- Try integrating the coin acceptor into your own invention.