Skip to content
Parallax Learn

Parallax Learn

  • Welcome
  • Tutorials
        • Tutorial Series head tag

          Tutorial Series
        • Tutorial Series

          The special, classroom-ready series pages are organized collections of tutorials for our most popular hardware and/or languages. The tutorials for each topic are conveniently accessible from a single page, shown in the order it is recommended that they be completed.
        • Robotics Series Head tag

          Robotics Series
        • Robotics Series

          • Artificial Intelligence
          • Cybersecurity: Radio Data tutorialCybersecurity
          • cyber:bot + Python
          • cyber:bot + MakeCode
          • Boe-Bot Tutorial SeriesBoe-Bot
          • Arduino Shield-Bot
          • ActivityBot with C TutorialsActivityBot + C
          • ActivityBot with BlocklyProp Tutorial SeriesActivityBot + BlocklyProp
          • Scribbler 3 Tutorial SeriesScribbler 3
        • Electronics & Programming Series Head tag

          Electronics & Programming Series
          • BS2 Board of Education Tutorial SeriesBS2 Board of Education
          • Propeller C-Language BasicsPropeller C Basics
          • FLiP Try-It Kit C Tutorial SeriesFLiP Try-It Kit + C
          • FLiP Try-It Kit BlocklyProp TutorialsFLiP Try-It Kit + BlocklyProp
          • Badge WX Tutorial SeriesBadge WX
          • Propeller BlocklyProp Basics and ProjectsPropeller BlocklyProp Basics
          • View All Tutorial Series »
        • Browse Tutorials
        • Browse Tutorials

          Individual tutorials sorted by robot or kit, and language.
        • By Robot or Kit
          • ActivityBot
          • SumoBot WX
          • Boe-Bot
          • Shield-Bot
          • cyber:bot
          • Badge WX
          • ELEV-8
          • ARLO
        • By Language
        • By Language

          • Propeller C
          • Arduino
          • BlocklyProp
          • PBASIC
          • Python
          • MakeCode
          • View All Tutorials »
  • Educators
  • Reference
  • Downloads
  • Home
  • All Courses
  • Control your cyber:bot with an Infrared TV Remote

Control your cyber:bot with an Infrared TV Remote

Add Obstacle Detection

The script IR_Remote_Control.py makes your cyber:bot drive in whatever direction you send it — even into walls. If you have a Ping))) sensor, you can give your ’bot a bit of self-preservation behavior.

Additional parts needed:

  • Ping))) Ultrasonic Distance Sensor (#28015)
  • 2.2 k-ohm resistor from your robot’s Electronic Component Pack
  • Jumper wires

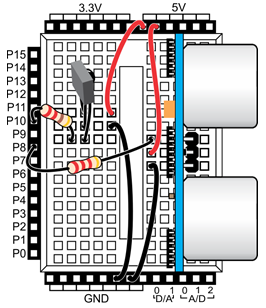
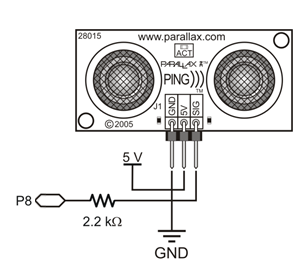
The Ping))) sensor can go directly into the breadboard.

  • Add the Ping))) sensor to the cyber:bot and connect its signal pin to P8, as shown below. You may need to re-position the IR receiver, but that is fine as long as its signal pin still connects to P10.


The script IR_Remote_Control_with_Ping is just an expansion of the original.  Up top, it adds from ping import *.   Then, it takes the entire contents of the while True: loop and wraps it in a nested conditional while loop.  This inner loop only executes while (ping(8).distance(’cm’)) > 15:.  If that condition is not true, meaning you have driven your cyber:bot close too an object, some new lines of code at the bottom of the conditional loop make the cyber:bot express its surprise and turn away until the obstacle is no longer detected.

  • You will need to add the ping.py module to your project, just like you added the cyberbot.py and tv_remote.py before testing the remote.
  • Change the project’s name from ir_remote_control to ping_servo_test. 
  • Enter the script below, and then click Save.
  • Click Send to micro:bit.  
  • Disconnect the cyber:bot robot’s USB cable, and set it on the floor.
  • Set the cyber:bot board’s PWR switcht to 2 and 
# ir_remote_control_with_ping

from cyberbot import *
from tv_remote import *
from ping import *

wL = 0
wR = 0
img = Image.HAPPY

bot(22).tone(2000, 300)

while True:

    while (ping(8).distance('cm')) > 15:
        num = ir(10).remote()
    
        if num == 1:
            wL = 0
            wR = -75
            img = Image.ARROW_SE
        elif num == 2:
            wL = 75
            wR = -75
            img = Image.ARROW_S
        elif num == 3:
            wL=75
            wR=0
            img=Image.ARROW_SW
        elif num == 4:
            wL=-75
            wR=-75
            img=Image.ARROW_E
        elif num == 5:
            wL=0
            wR=0
            img=Image.HAPPY
        elif num == 6:
            wL=75
            wR=75
            img=Image.ARROW_W
        elif num == 7:
            wL=0
            wR=75
            img=Image.ARROW_NE
        elif num == 8:
            wL=-75
            wR=75
            img=Image.ARROW_N
        elif num == 9:
            wL=-75
            wR=0
            img=Image.ARROW_NW
   
        display.show(img)
        bot(18).servo_speed(wL)
        bot(19).servo_speed(wR)
        
    display.show(Image.SURPRISED)
    bot(18).servo_speed(-50)
    bot(19).servo_speed(-50)
    bot(22).tone(500, 1000)


Printer-friendly version
How the IR Remote Control Code Works
Prev

DISCUSSION FORUMS | PARALLAX INC. STORE

About | Terms of Use | Feedback: learn@parallax.com | Copyright©Parallax Inc. 2024

© 2025 Parallax Learn • Built with GeneratePress