Skip to content
Parallax Learn

Parallax Learn

  • Welcome
  • Tutorials
        • Tutorial Series head tag

          Tutorial Series
        • Tutorial Series

          The special, classroom-ready series pages are organized collections of tutorials for our most popular hardware and/or languages. The tutorials for each topic are conveniently accessible from a single page, shown in the order it is recommended that they be completed.
        • Robotics Series Head tag

          Robotics Series
        • Robotics Series

          • Artificial Intelligence
          • Cybersecurity: Radio Data tutorialCybersecurity
          • cyber:bot + Python
          • cyber:bot + MakeCode
          • Boe-Bot Tutorial SeriesBoe-Bot
          • Arduino Shield-Bot
          • ActivityBot with C TutorialsActivityBot + C
          • ActivityBot with BlocklyProp Tutorial SeriesActivityBot + BlocklyProp
          • Scribbler 3 Tutorial SeriesScribbler 3
        • Electronics & Programming Series Head tag

          Electronics & Programming Series
          • BS2 Board of Education Tutorial SeriesBS2 Board of Education
          • Propeller C-Language BasicsPropeller C Basics
          • FLiP Try-It Kit C Tutorial SeriesFLiP Try-It Kit + C
          • FLiP Try-It Kit BlocklyProp TutorialsFLiP Try-It Kit + BlocklyProp
          • Badge WX Tutorial SeriesBadge WX
          • Propeller BlocklyProp Basics and ProjectsPropeller BlocklyProp Basics
          • View All Tutorial Series »
        • Browse Tutorials
        • Browse Tutorials

          Individual tutorials sorted by robot or kit, and language.
        • By Robot or Kit
          • ActivityBot
          • SumoBot WX
          • Boe-Bot
          • Shield-Bot
          • cyber:bot
          • Badge WX
          • ELEV-8
          • ARLO
        • By Language
        • By Language

          • Propeller C
          • Arduino
          • BlocklyProp
          • PBASIC
          • Python
          • MakeCode
          • View All Tutorials »
  • Educators
  • Reference
  • Downloads
  • Home
  • All Courses
  • Control your cyber:bot with an Infrared TV Remote

Control your cyber:bot with an Infrared TV Remote

How the IR Remote Control Code Works

IR Remote Signals

The remote flashes its IR LED on/off very rapidly—at 38.5 kHz—for certain periods of time, with periods of off-time in between. The combinations of these pulses are received by the micro:bit as the number pressed, not a series of pulses. How does this work exactly?

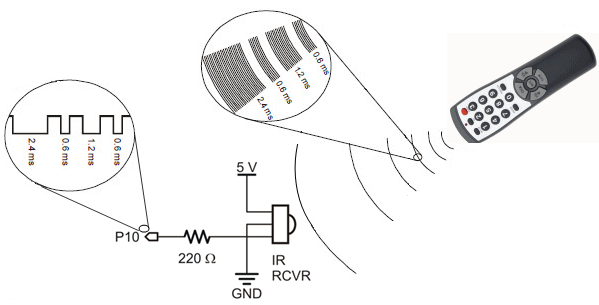
The IR receiver is sensitive to bursts of 38.5 kHz infrared light, and responds by outputting a 5V high signal. The Propeller I/O pin, P10 in this case, measures how long each high signal lasts. The Propeller’s cyberbot firmware interprets the high signal patterns, and then works with the ir remote block to match the patterns to different buttons on your remote.

How IR_Remote_Control Works

Our program IR_Remote_Control begins by initializing the variables wL and wR to zero, and displays a small square. After a quick beep, the bulk of the code is a forever loop. Inside the loop, set num to (ir remote pin(Pin10)) checks to see which remote button press is detected and stores the result in the variable num. Next, a long if…else if series uses the value of num to select new values for wL and wR as well as an image to accompany them.

The new values of wL and wR are passed to the (Pin18) servo speed (wL) and (Pin19) servo speed (wR) calls, so the robot drives off in a new direction with an updated display until the next new remote button press is detected.

More Actions for More Keys? — There are more buttons on the remote, so you can add more robot behaviors to your project, such as making sound effects on the piezospeaker. However, there is a catch! Keep in mind that when the cyber:bot is generating frequencies on the piezospeaker, it can’t do anything else, like check to see if you have pressed a new button on the remote. The exception is that the servos will maintain the last speed setting they received until they get a new one. 


Printer-friendly version
Drive your cyber:bot with the Remote
Prev
Private: Add Obstacle Detection
Next

DISCUSSION FORUMS | PARALLAX INC. STORE

About | Terms of Use | Feedback: learn@parallax.com | Copyright©Parallax Inc. 2024

© 2025 Parallax Learn • Built with GeneratePress