Crack a Cipher with Brute Force
The Cybersecurity: Sniffing Attacks and Defenses tutorial’s Share Something Personal – Encrypted activity demonstrated how even a relatively weak form of encryption can at least deter casual sniffing. However, an experienced attacker would likely examine that sniffing data and then make an educated guess that the data was encrypted with the Caesar cipher. After that, coding a brute force attack is a relatively simple matter.
In this activity, you will use brute force to crack the Caesar cipher that made sharing HAPPY, SAD, and ANGRY images (sort of) private in the Share Something Personal – Encrypted activity.
- Follow the instructions in Share Something Personal – Encrypted to set up communication between a transmitter and intended receiver micro:bit. (Don’t worry about the sniffer micro:bit!)
- Verify that the encrypted communication works.
- In the receiver script, comment this line: display.show(getattr(Image, packet))
- Set the modified transmitter script’s project name to radio_receive_images_caesar_sniffer, then click Save.
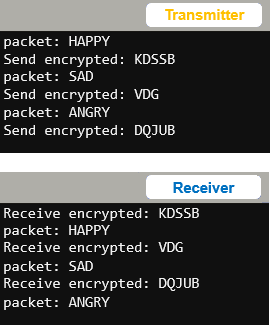
- Click Send to micro:bit to flash the modified script, and use the serial monitor to verify that you can still detect the encrypted strings. It should still receive and display the HAPPY/SAD/ANGRY strings in the terminal even though it no longer displays them with the LEDs.
- Make these changes to the transmitter script:
- Add import random below import radio.
- Add key = random.randint(1, 25) above while True:
- Change packet = caesar(3, packet) to packet = caesar(key, packet).
- Change sleep(2500) to sleep(6000).
- Set the modified transmitter script’s project name to radio_send_images_caesar_key_unknown, save it, and click the Send to micro:bit button flash it into your transmitter micro:bit.
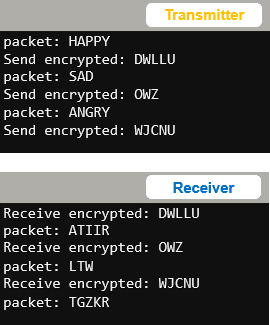
- When you run the transmitter script, it will encrypt with a random key.
- Verify that the receiver no longer displays intelligible data.
- Change the radio_receive_images_caesar_sniffer script’s project name to radio_receive_images_caesar_brute_force.
- Comment packet = caesar(-3, packet) and print(“packet:”, packet). Those are the two statements above the display.show(getattr(Image, packet)) statement you commented earlier:
        # packet = caesar(-3, packet)
        # print("packet:", packet)
        # display.show(getattr(Image, packet))
- Add these five statements immediately below the three commented ones:
        for key in range(-1, -26, -1):
            result = caesar(key, packet)
            print("key:", key, "result:", result)
            sleep(200)
        print()
- Save your modified script and flash it into the receiver micro:bit.
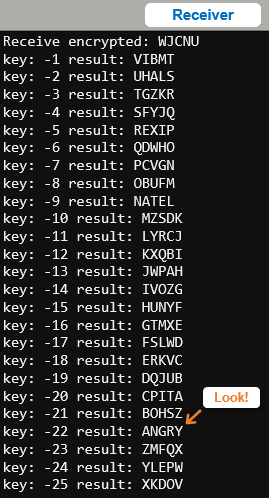
- Examine the output in the serial monitor. Can you find the HAPPY/SAD/ANGRY text within the list. If you did, check the key value. As an attacker, you would substitute that key into radio_receive_images_caesar_sniffer to continue monitoring the data.
Example Transmitter Script: radio_send_images_caesar_key_unknown.py
# radio_send_images_caesar_key_unknown.py

from microbit import *
import radio
import random                               # <- add

''' Function converts plaintext to ciphertext using key '''

def caesar(key, word):
    alpha = "ABCDEFGHIJKLMNOPQRSTUVWXYZ"
    result = "

    for letter in word:

        letter = letter.upper()
        index = ( alpha.find(letter) + key ) % 26
        result = result + alpha[index]

    return result

''' Script starts from here... '''

radio.on()
radio.config(channel=7)

sleep(1000)

string_list = ["HAPPY", "SAD", "ANGRY"]

key = random.randint(1, 25)                 # <- add

while True:

    for packet in string_list:
        print("packet:", packet)
        display.show(getattr(Image, packet))

        # packet = caesar(3, packet)        # <- change (before)
        packet = caesar(key, packet)        # <- change (after)


        print("Send encrypted:", packet)
        radio.send(packet)
        # sleep(2500)                       # <- change (before)
        sleep(6000)                         # <- change (after)
Example Receiver Script: radio_receive_images_caesar_brute_force.py
# radio_receive_images_caesar_brute_force.py

from microbit import *
import radio

''' Function converts plaintext to ciphertext using key '''

def caesar(key, word):
    alpha = "ABCDEFGHIJKLMNOPQRSTUVWXYZ"
    result = "

    for letter in word:

        letter = letter.upper()
        index = ( alpha.find(letter) + key ) % 26
        result = result + alpha[index]

    return result

''' Script starts from here... '''

radio.on()
radio.config(channel=7)

sleep(1000)

while True:

    packet = radio.receive()

    if packet:
        print("Receive encrypted:", packet)
        # packet = caesar(-3, packet)             # <- comment
        # print("packet:", packet)                # <- comment
        # display.show(getattr(Image, packet))    # <- comment
        for key in range(-1, -26, -1):            # <- add
            result = caesar(key, packet)          # <- add
            print("key:", key, "result:", result) # <- add
            sleep(200)                            # <- add
        print()                                   # <- add