micro:bit PIN Pad and Vault
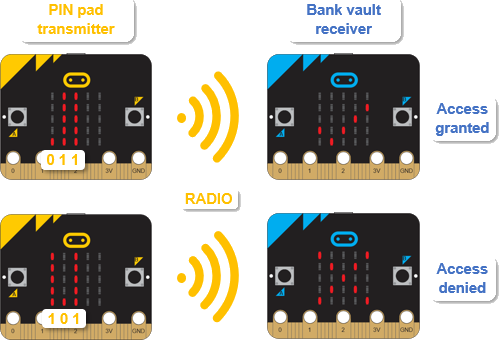
This activity starts with a micro:bit PIN pad that you can type a PIN into using its A and B buttons. It radio transmits the PIN you entered to a micro:bit vault. Enter the correct PIN and access is granted. Enter the wrong one, and access is denied. In this starting activity, the PIN’s security is intentionally weak: three binary digits (0s or 1s).
This first application does not require the serial monitor, so the micro:bit modules will only be drawing power from the USB cable. The step-by-step instructions are the same as you have been following for serial monitor connected micro:bit modules that are communicating wirelessly. However, you can optionally load programs in one at a time, and connect both micro:bit modules to batteries, and the application will still work.
- Decide which micro:bit you want to be the ’PIN pad’ transmitter and which one you want to be the ’bank vault’ receiver.
- Connect the two micro:bit modules to two USB ports with two USB cables.
- Open two separate browsers and navigate each one to python.microbit.org.
See Texting with Terminals if you need a reminder on how to set up the serial connection to the micro:bit modules.
- If you are part of a class, and have been assigned a channel, make sure to adjust the script’s channel=7 to your assigned channel before you save and flash the scripts.
- Enter, name, save, and flash the pin_pad_transmitter script into your chosen PIN Pad Transmitter micro:bit.
- Enter, name, save, and flash the script bank_vault_receiver script into your chosen Bank Vault Receiver micro:bit. The Receiver Script (bank vault) is below the Transmitter Script (PIN pad) script.
- Before continuing, take a look at the bank_vault_receiver script’s pin = ’011’ statement. This is the PIN number you will have to enter into the PIN Pad Transmitter micro:bit with its A/B buttons.
Transmitter Script: pin_pad_transmitter.py
# pin_pad_transmitter.py

from microbit import *
import radio

radio.on()
radio.config(channel=7)

sleep(1000)

pin = ''
n = 0

while True:

    x = len(pin)
    b = n * 9

    display.set_pixel(x,4,9)
    for y in range(0, 4):
        display.set_pixel(x, y, b)

    if button_a.was_pressed():
        n = n + 1
        n = n % 2
    if button_b.was_pressed():
        pin += str(n)
    if x == 3:
        radio.send(pin)
        display.scroll(pin)
        pin = ''
        n = 0
        display.clear()
Receiver Script: bank_vault_receiver
# bank_vault_receiver

from microbit import *
import radio

radio.on()
radio.config(channel=7)

sleep(1000)

pin = '011'

while True:

    display.set_pixel(2,2,9)

    message = radio.receive()

    if message:
        if message == pin:
            radio.send("Access granted.")
            for n in range(4):
                display.show(Image.YES)
                sleep(1000)
                display.clear()
                sleep(200)
        else:
            radio.send("Access denied.")
            display.show(Image.NO)
            sleep(3000)

        display.clear()
Before using the PIN Pad Transmitter micro:bit to open the Vault Receiver micro:bit, let’s check to make sure each one is running the correct script.
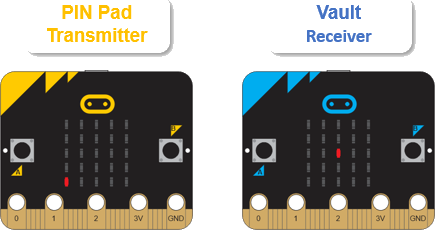
- Verify that the PIN Pad Transmitter micro:bit has one light in the lower-left.
- Verify that the Vault Receiver micro:bit has one light in the center.
Here’s how to enter PINs into the PIN pad transmitter. Press/release the A button to select 0 (one light) or 1 (all 5 lights in the column). When you have the digit you want, press B to enter it and advance to the next digit and column. The script automatically copies the previous column’s digit to the next column. If that’s the digit you want, just press the B button again to accept it, or press the A button to change it before pressing the B button to accept it.
After you press B to accept the digit in the 3rd column, the script automatically transmits the PIN to the Bank Vault Receiver micro:bit. If the PIN is correct, it’ll display a check-mark. If it’s not correct, it’ll display an X. Let’s try entering the correct 0 1 1 PIN first to get the access granted checkmark from the bank vault’s display.
To enter and send 0 1 1, press/release the PIN Pad Transmitter micro:bit’s reset button, then press/release: B A B B.
Verify that the Vault Receiver micro:bit displays a check mark indicating access granted.
<<< enter-correct-pin-how-to >>>
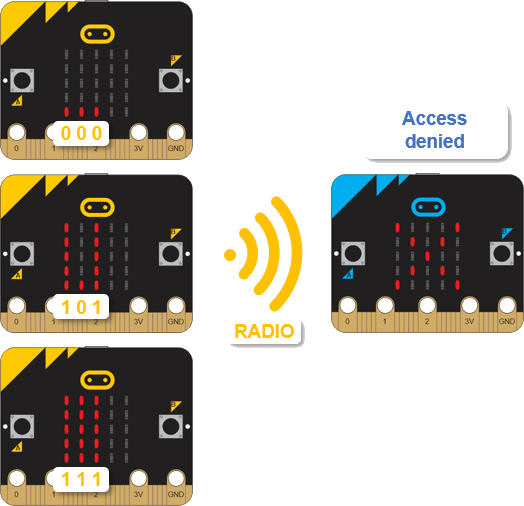
It’s also important to make sure the vault works by not granting access to any other PIN.
- Try these PIN combinations:
- Send 0 0 0 with B B B
- Send 1 0 1 with A B A B A B
- Send 1 1 1 with A B B B
- For each of the incorrect codes you entered, verify that the Vault Receiver micro:bit displays an X indicating access denied.
- To make it a challenge, have someone change the PIN in the bank vault receiver script so that you don’t know what it is.
How long does it take you to test through the possible PINs to get the correct response? (For a brute force attack, you would have to try 000, 001, 010, 011, 100, 101, 110, and 111.)