Encrypt and Decrypt with Serial Monitor
Modifying the key = and letter = statements to encrypt and re-flashing a script to get a ciphertext character isn’t very efficient. It would be much easier for your script to pass a function, a key, and a word to a function and let it encrypt or decrypt the whole string. Getting there can be broken into three steps:
- Get it to work with user-entered characters in a loop
- Add a loop to make it perform the cipher on all characters in a word
- Move the working code from the main loop into a function
Another reason for setting it up this way is that you can replace a Caesar cipher function with a different encryption function, and the main script might only need one line modified to get it to work.
Caesar Cipher on Terminal-Entered Characters
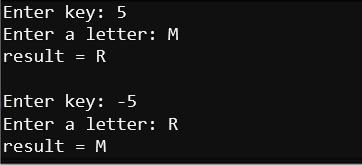
In this example, the terminal will prompt you for a key and a letter, and then display the Caesar cipher result. Previously, the encryption key was hard-coded as 5. With this script, you can enter 5, or 13 for ROT-13, or any other value you decide to use. Next, enter the letter to encrypt, and the script displays the ciphertext result in the terminal.
Example script: caesar_terminal_letters
- Enter caesar_terminal_letters into the micro:bit Python Editor.
- Set the project’s name to caesar_terminal_letters.
- Click Save.
- Click the Send to micro:bit button.
# caesar_terminal_letters

from microbit import *

sleep(1000)

print("Set your keyboard to CAPS LOCK.")
print()

while True:
    text = input("Enter key: ")
    key = int(text)

    letter = input("Enter a letter: ")

    letter = letter.upper()

    alpha = "ABCDEFGHIJKLMNOPQRSTUVWXYZ"

    index = alpha.find(letter)
    index = index + key
    index = index % 26

    result = alpha[index]

    print("result =", result)
    print()
- Make sure your keyboard is set to CAPS LOCK. (Or you will have to hold down the SHIFT key as you type letters.)
- If the serial monitor is not already open, click Show serial, then click in the serial monitor.
- Follow the prompts, typing in a key number and a letter to encrypt. Valid key numbers are from -25 to 25.
- Try encrypting a character, and then decrypting with the negative value of the key you encrypted with.
Example: Encrypt A with 13, then decrypt N with -13 to get back to A.
How caesar_terminal_letters Works
The techniques for building this script make use of:
- Terminal with input statements: Input Messages
- Looping with while True: Count and Repeat
- Caesar cipher: Encrypt Letters with a Caesar Cipher Script
Instead of hard coding key = 5 and letter = “M”, like in caesar_cipher_letter, this script makes it work during runtime with:
    text = input("Enter key: ")
    key = int(text)

    letter = input("Enter a letter: ")
Before doing the Caesar cipher, it uses letter = letter.upper() which changes any lower-case letter to upper-case. …just in case you forgot to set your keyboard’s CAPS LOCK.
Did You Know?
These steps from the previous example sketch can be performed in one line:
    index = alpha.find(letter)
    index = index + key
    index = index % 26
Here’s how it would look:
index = ( alpha.find(letter) + key ) % 26
This more compact format will be used in the next example script.