Skip to content
Parallax Learn

Parallax Learn

  • Welcome
  • Tutorials
        • Tutorial Series head tag

          Tutorial Series
        • Tutorial Series

          The special, classroom-ready series pages are organized collections of tutorials for our most popular hardware and/or languages. The tutorials for each topic are conveniently accessible from a single page, shown in the order it is recommended that they be completed.
        • Robotics Series Head tag

          Robotics Series
        • Robotics Series

          • Artificial Intelligence
          • Cybersecurity: Radio Data tutorialCybersecurity
          • cyber:bot + Python
          • cyber:bot + MakeCode
          • Boe-Bot Tutorial SeriesBoe-Bot
          • Arduino Shield-Bot
          • ActivityBot with C TutorialsActivityBot + C
          • ActivityBot with BlocklyProp Tutorial SeriesActivityBot + BlocklyProp
          • Scribbler 3 Tutorial SeriesScribbler 3
        • Electronics & Programming Series Head tag

          Electronics & Programming Series
          • BS2 Board of Education Tutorial SeriesBS2 Board of Education
          • Propeller C-Language BasicsPropeller C Basics
          • FLiP Try-It Kit C Tutorial SeriesFLiP Try-It Kit + C
          • FLiP Try-It Kit BlocklyProp TutorialsFLiP Try-It Kit + BlocklyProp
          • Badge WX Tutorial SeriesBadge WX
          • Propeller BlocklyProp Basics and ProjectsPropeller BlocklyProp Basics
          • View All Tutorial Series »
        • Browse Tutorials
        • Browse Tutorials

          Individual tutorials sorted by robot or kit, and language.
        • By Robot or Kit
          • ActivityBot
          • SumoBot WX
          • Boe-Bot
          • Shield-Bot
          • cyber:bot
          • Badge WX
          • ELEV-8
          • ARLO
        • By Language
        • By Language

          • Propeller C
          • Arduino
          • BlocklyProp
          • PBASIC
          • Python
          • MakeCode
          • View All Tutorials »
  • Educators
  • Reference
  • Downloads
  • Home
  • All Courses
  • Cybersecurity: Encryption Intro

Cybersecurity: Encryption Intro

Encrypt and Decrypt with Terminal

Modifying the set key to and set letter to blocks to encrypt and re-flashing a project to get a ciphertext character isn’t very efficient. It would be much easier for your project to pass a function, a key, and a word to a function and let it encrypt or decrypt the whole string. Getting there can be broken into three steps:

  1. Get it to work with user-entered characters in a loop
  2. Add a loop to make it perform the cipher on all characters in a word
  3. Move the working code from the main loop into a function

Another reason for setting it up this way is that you can replace a Caesar cipher function with a different encryption function, and the main project might only need one block modified to get it to work.

Caesar Cipher on Terminal-Entered Characters

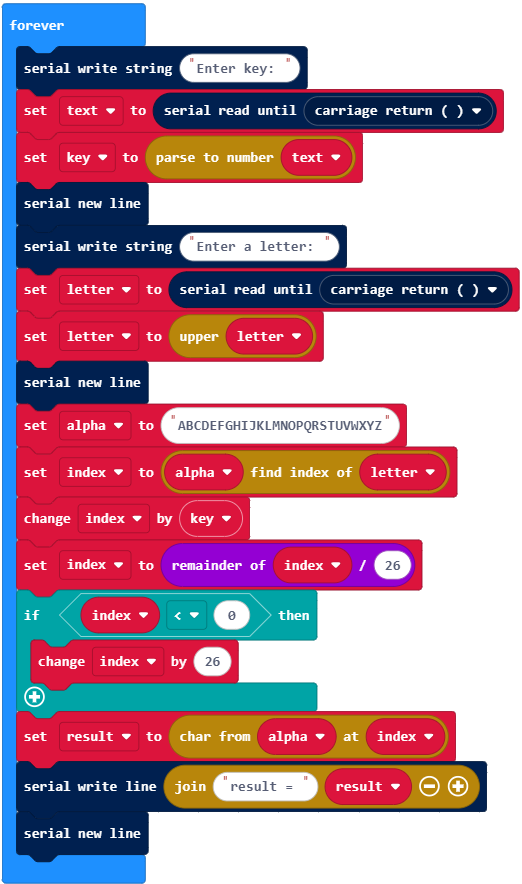
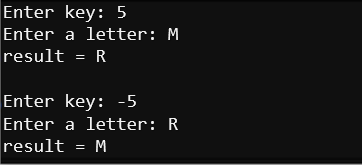
In this example, the terminal will prompt you for a key and a letter, and then display the Caesar cipher result. Previously, the encryption key was hard-coded as 5. With this project, you can enter 5, or 13 for ROT-13, or any other value you decide to use. Next, enter the letter to encrypt, and the project displays the ciphertext result in the terminal.
Example project: caesar_terminal_letters

  • Enter caesar_terminal_letters, then flash it into the micro:bit.
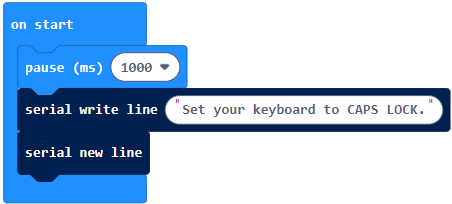
  • Make sure your keyboard is set to CAPS LOCK.
  • Open the terminal make sure that local echo is on and follow the prompts. Valid keys are from -25 to 25.
  • Try encrypting a character, and then decrypting with the negative value of the key you encrypted with.
    Example: Encrypt A with 13, then decrypt N with -13 to get back to A.

How caesar_terminal_letters Works

Instead of hard-coding set key to (5) and set letter to (“M”), like in caesar_cipher_letter, this project makes it work during runtime with:
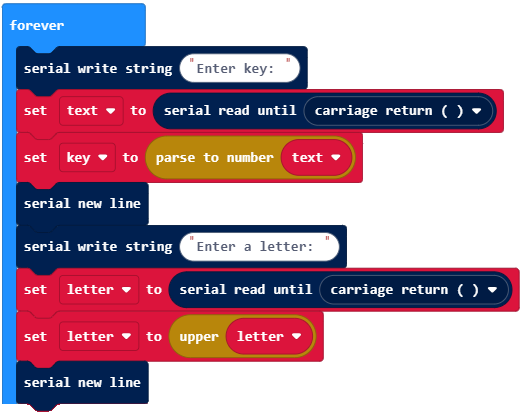
Before doing the Caesar cipher, it uses set letter to (upper(letter)) which changes any lower-case letter to upper-case. …just in case you forgot to set your keyboard’s CAPS LOCK.

Did You Know?

These steps from the previous example sketch can be performed in one block:

Here’s how it would look:

This more compact format will be used in the next example project.


Printer-friendly version
How Caesar Letter Encryption Works
Prev
Apply Caesar Cipher to Words from Terminal
Next

DISCUSSION FORUMS | PARALLAX INC. STORE

About | Terms of Use | Feedback: learn@parallax.com | Copyright©Parallax Inc. 2024

© 2025 Parallax Learn • Built with GeneratePress