Skip to content
Parallax Learn

Parallax Learn

  • Welcome
  • Tutorials
        • Tutorial Series head tag

          Tutorial Series
        • Tutorial Series

          The special, classroom-ready series pages are organized collections of tutorials for our most popular hardware and/or languages. The tutorials for each topic are conveniently accessible from a single page, shown in the order it is recommended that they be completed.
        • Robotics Series Head tag

          Robotics Series
        • Robotics Series

          • Artificial Intelligence
          • Cybersecurity: Radio Data tutorialCybersecurity
          • cyber:bot + Python
          • cyber:bot + MakeCode
          • Boe-Bot Tutorial SeriesBoe-Bot
          • Arduino Shield-Bot
          • ActivityBot with C TutorialsActivityBot + C
          • ActivityBot with BlocklyProp Tutorial SeriesActivityBot + BlocklyProp
          • Scribbler 3 Tutorial SeriesScribbler 3
        • Electronics & Programming Series Head tag

          Electronics & Programming Series
          • BS2 Board of Education Tutorial SeriesBS2 Board of Education
          • Propeller C-Language BasicsPropeller C Basics
          • FLiP Try-It Kit C Tutorial SeriesFLiP Try-It Kit + C
          • FLiP Try-It Kit BlocklyProp TutorialsFLiP Try-It Kit + BlocklyProp
          • Badge WX Tutorial SeriesBadge WX
          • Propeller BlocklyProp Basics and ProjectsPropeller BlocklyProp Basics
          • View All Tutorial Series »
        • Browse Tutorials
        • Browse Tutorials

          Individual tutorials sorted by robot or kit, and language.
        • By Robot or Kit
          • ActivityBot
          • SumoBot WX
          • Boe-Bot
          • Shield-Bot
          • cyber:bot
          • Badge WX
          • ELEV-8
          • ARLO
        • By Language
        • By Language

          • Propeller C
          • Arduino
          • BlocklyProp
          • PBASIC
          • Python
          • MakeCode
          • View All Tutorials »
  • Educators
  • Reference
  • Downloads
  • Home
  • All Courses
  • Cybersecurity: Malformed Packet Attacks & Defenses

Cybersecurity: Malformed Packet Attacks & Defenses

Try This: Add Exception Handling

How the Tests Work

For background info on how the scripts work without the malformed packets, see How Radio Data Packets Work from the Cybersecurity: Radio Data tutorial.

Here is an example of a properly formed packet, sent by the sender micro:bit:

{'after': 'All done!', 'start': 3}

Even when you type -1 for the countdown start, the dictionary that’s created is this:

{'after': 'All done!', 'start': -1}

…but then, the script reaches these statements:

    # Sends malformed packet if value is -1
    if value is -1:
        dictionary['start'] = "Not a number!"    

After that, the packet is changed to this:

{'after': 'Add done!', 'start': 'Not a number!'}

In the receiver script, the value corresponding to the dictionary’s ’start’ key is stored in a variable named value.  When the receiver script gets to this line:

            value = value - 1

…it tries to subtract 1 from the ’Not a number!’ string, and throws this runtime exception: TypeError: can’t convert ’int’ object to str implicitly.  After the exception, the receiver micro:bit will not respond until it is restarted.  


Try This: Add Exception Handling

The receiver’s runtime exception from the malformed packet is easily preventable with exception handling.  For the basics of how exception handling works, try or review the Exception Handling Primer. 

After placing the susceptible portion of the script into a try: block and handling the exception with except:, the receiver will no longer stop running its script when it receives that kind of malformed packet.

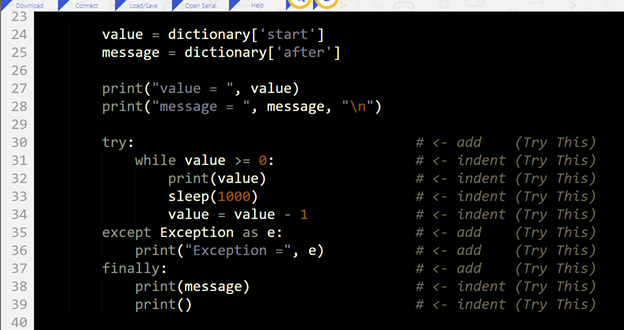
This modified receiver script puts the while value >= 0: countdown loop into a try-except statement.  

  • Modify the receiver script as shown in the Receiver Script Changes image below.
  • Set the project name to countdown_receiver_w_exception_handling_try_this, and then click Save.
  • Flash it into the receiver micro:bit with the Send to micro:bit button.
  • Repeat the instructions in the Sender & Receiver Tests section.  With the exception handling added, the micro:bit should no longer stop in its tracks and become unresponsive when it receives the  malformed packet.

Receiver Script Changes


Printer-friendly version
Sender & Receiver Tests
Prev
Your Turn: Add a Vulnerability
Next

DISCUSSION FORUMS | PARALLAX INC. STORE

About | Terms of Use | Feedback: learn@parallax.com | Copyright©Parallax Inc. 2024

© 2025 Parallax Learn • Built with GeneratePress