Try This: Prevent Freezing
The script starts with its name as a comment, followed by importing the microbit and radio modules. Then, initialization starts by setting the radio to on and the channel to 7.
# radio_send_receive_images_w_buttons

from microbit import *
import radio

radio.on()
radio.config(channel=7)
The initialization continues by creating a global variable n and setting it to zero. Then, a list of emoji is created and named emoji. The image = eval(emoji[n]) statement uses eval to convert the string emoji[0] = ’Image.YES’ to the object Image.YES, and stores the result in a variable named image. Then, display.show(image) makes the micro:bit modules LED matrix display the Image.YES image, which is a checkmark.
n = 0
emoji = [ 'Image.YES', 'Image.NO', 'Image.HEART', 'Image.SKULL' ]
image = eval(emoji[n])
display.show(image)
The main loop starts with a statement checking if the A button has been pressed. If so, it adds 1 to n. The statement n = n % len(emoji) is a trick to keep the value of n cycling through index values of n that never go out of range. With four emoji in the list, repeatedly pressing and releasing the A button result in n incrementing 0, 1, 2, 3, 0, 1, 2, 3,… and so on. After the first press of A, the value of n has been incremented from 0 to 1. So, instead of Image.YES (a checkmark), eval(emoji[n]) returns Image.NO (an X), which is stored in the image variable and then displayed by display.show(image).
while True:
    if button_a.was_pressed():
        n = n + 1
        n = n % len(emoji)
        image = eval(emoji[n])
        display.show(image)
If the B button is pressed, the packet variable is set to emoji[n]. For example, if n is 2, packet will be set to ’Image.HEART’, or if n is 3, packet will be set to ’Image.SKULL’. Both of those are strings that represent the image to transmit. The print(’packet:’, packet) statement displays the string that packet stores in the Serial terminal. Back when button A was pressed, the image variable was set to the corresponding Image object. So, when n was 2, image became Image.HEART or when n was 3, image was set to Image.SKULL. Basically, the image variable stores the Image object that is displayed, and packet stores the corresponding string that will be sent to the receiver. The receiver will convert that string to an Image object and display it.
    if button_b.was_pressed():
        packet = emoji[n]
        print('packet:', packet)
        if image is Image.SKULL:              # Sends malformed packet
            packet = 'malformed packet'       # Sends malformed packet
        radio.send(packet)
The if image is Image.SKULL: statement above compares the image the transmitting micro:bit displays to Image.SKULL. If it’s a match, the packet is changed from ’Image.SKULL’ to a string that simply says ’malformed packet’. If the string does not contain an image that the receiver recognizes, it will cause a runtime exception, so the string could instead contain something else, like ’abcdefg…’, for example, and it would have the same effect.
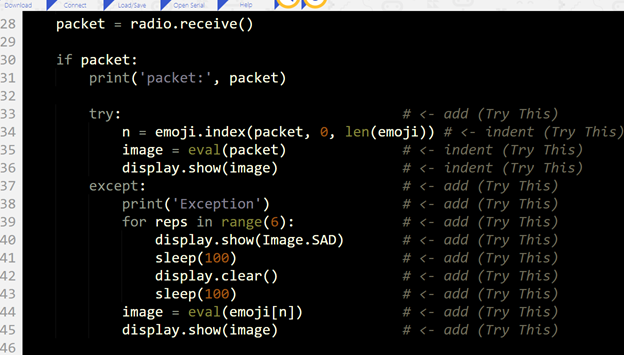
Every time through the while True: loop, the packet = radio.receive() statement checks for incoming packets. If one is waiting in the radio receiver’s buffer, the if packet: statement processes and displays it. First, it displays it in the Serial terminal with a print statement. Then, it uses n = emoji.index(packet, 0, len(emoji)) to find the index value that matches the incoming string.
For example, if the incoming string is ’Image.HEART’, the emoji.index method will return 2, which gets stored in n. Without this statement, you might have received an image and press B to try to send it back since it’s displaying, but without updating the value of n like this, it might send a different image. Then, image = eval(packet) changes a string like ’Image.HEART’ to an Image object like Image.HEART, and finally, display.show(image) displays the incoming image on the receiving micro:bit.
    packet = radio.receive()

    if packet:
        print('packet:', packet)

        n = emoji.index(packet, 0, len(emoji))
        image = eval(packet)
        display.show(image)
Try This: Prevent Freezing
As with the first activity, exception handling can prevent the micro:bit from freezing in response to a malformed packet.
- Set the project name to radio_send_receive_images_w_buttons.
- Modify the script as shown below to handle exceptions when receiving malformed packets.
- Click Save and then flash the script into both micro:bit modules with the Send to micro:bit button.
- Verify that both micro:bit modules can still send and receive images.
- Try sending the SKULL image. What does the receiving micro:bit’s LED matrix show in response?
- Was the receiving micro:bit disabled by the malformed packet, or can it continue to function?
- If the serial monitor isn’t already open, click the Show serial buttons in both python.microbit.org editors, and observe the activity as you use the A and B buttons on the micro:bit module to exchange images.
What does a micro:bit terminal now display when it receives a malformed packet?