Skip to content
Parallax Learn

Parallax Learn

  • Welcome
  • Tutorials
        • Tutorial Series head tag

          Tutorial Series
        • Tutorial Series

          The special, classroom-ready series pages are organized collections of tutorials for our most popular hardware and/or languages. The tutorials for each topic are conveniently accessible from a single page, shown in the order it is recommended that they be completed.
        • Robotics Series Head tag

          Robotics Series
        • Robotics Series

          • Artificial Intelligence
          • Cybersecurity: Radio Data tutorialCybersecurity
          • cyber:bot + Python
          • cyber:bot + MakeCode
          • Boe-Bot Tutorial SeriesBoe-Bot
          • Arduino Shield-Bot
          • ActivityBot with C TutorialsActivityBot + C
          • ActivityBot with BlocklyProp Tutorial SeriesActivityBot + BlocklyProp
          • Scribbler 3 Tutorial SeriesScribbler 3
        • Electronics & Programming Series Head tag

          Electronics & Programming Series
          • BS2 Board of Education Tutorial SeriesBS2 Board of Education
          • Propeller C-Language BasicsPropeller C Basics
          • FLiP Try-It Kit C Tutorial SeriesFLiP Try-It Kit + C
          • FLiP Try-It Kit BlocklyProp TutorialsFLiP Try-It Kit + BlocklyProp
          • Badge WX Tutorial SeriesBadge WX
          • Propeller BlocklyProp Basics and ProjectsPropeller BlocklyProp Basics
          • View All Tutorial Series »
        • Browse Tutorials
        • Browse Tutorials

          Individual tutorials sorted by robot or kit, and language.
        • By Robot or Kit
          • ActivityBot
          • SumoBot WX
          • Boe-Bot
          • Shield-Bot
          • cyber:bot
          • Badge WX
          • ELEV-8
          • ARLO
        • By Language
        • By Language

          • Propeller C
          • Arduino
          • BlocklyProp
          • PBASIC
          • Python
          • MakeCode
          • View All Tutorials »
  • Educators
  • Reference
  • Downloads
  • Home
  • All Courses
  • Cybersecurity: Navigation Control from a Keyboard

Cybersecurity: Navigation Control from a Keyboard

Transmitter Script for Keyboard Inputs

Let’s build on experience, and adapt a familiar script from a previous tutorial to use keyboard inputs.

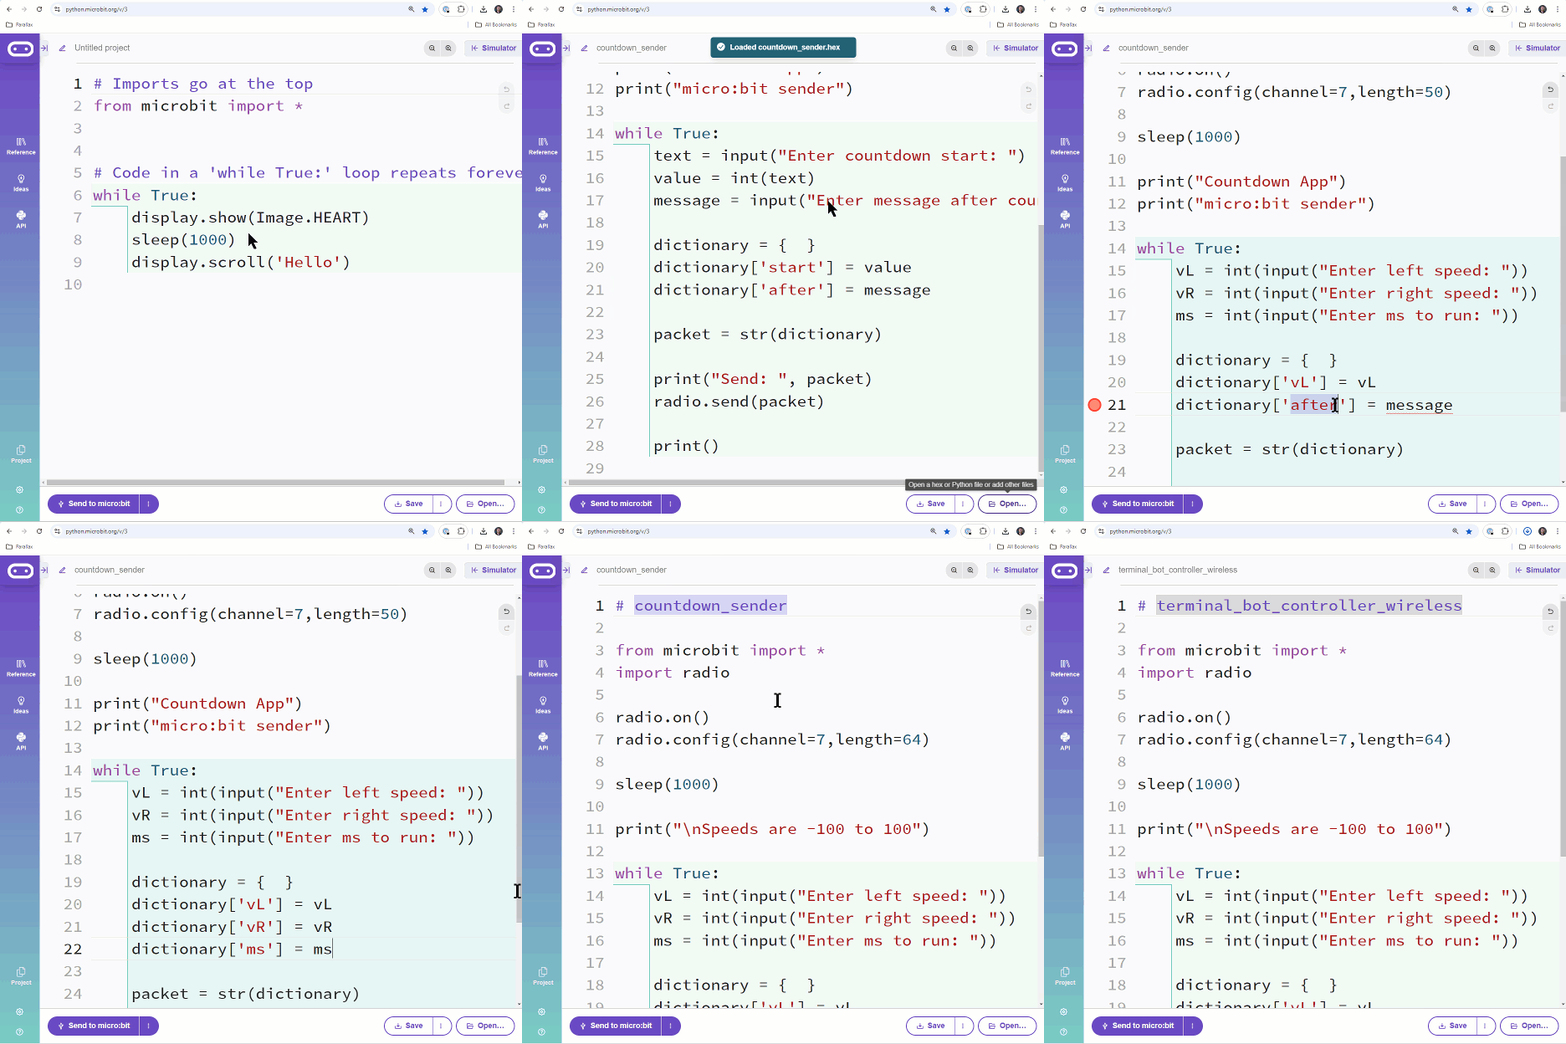
Starting with the countdown_sender script from the Send and Receive Packets activity, you can replace its input statements with the ones from terminal_controlled_bot_tethered_try_this.  Then, the dictionary that’s created has to be adjusted to contain the vL, vR, and ms keys and values.  That’s the most crucial part of incorporating the terminal-in, radio-out part of your tethered app into script that wirelessly transmits.  

This animated GIF shows the script being modified.  

(View full-size: terminal_bot_controller_wireless.mp4)

You will also need to make a few other adjustments.  Here they are, step-by-step:

  • Open terminal_controlled_bot_tethered_try_this
  • Copy these lines:
    vL = int(input("Enter left speed: "))
    vR = int(input("Enter right speed: "))
    ms = int(input("Enter ms to run: "))
  • Open the countdown_sender script from Send and Receive Packets.
  • Paste the three lines you copied over these lines:
    text = input("Enter countdown start: ")
    value = int(text)
    message = input("Enter message after countdown: ")
  • Find these two lines:
    dictionary['start'] = value
    dictionary['after'] = message
  • Replace them with these three lines:
    dictionary['vL'] = vL
    dictionary['vR'] = vR
    dictionary['ms'] = ms
  • Update the comment at the top of the script with the name terminal_bot_controller_wireless.
  • Find these lines:
        print("Countdown App")
        print("micro:bit sender")

Replace them with this line:

        print("\nSpeeds are -100 to 100\n")
  • Change the 50 in this line to 64:
        radio.config(channel=7,length=50)

It should look like this:

        radio.config(channel=7,length=64)
  • If you are in a classroom and using assigned channels, update your channel.  
  • Rename the script terminal_bot_controller_wireless.
  • Save a copy of your work. 

Now, your script should be ready.  

  • Verify the changes you made against the example script shown below, then save it.
  • Load the code into the micro:bit you plan to use as the transmitter.

Example script: terminal_bot_controller_wireless.py

# terminal_bot_controller_wireless.py

from microbit import *
import radio

radio.on()
radio.config(channel=7,length=64)

sleep(1000)

print("\nSpeeds are -100 to 100\n")

while True:
    vL = int(input("Enter left speed: "))
    vR = int(input("Enter right speed: "))
    ms = int(input("Enter ms to run: "))

    dictionary = {  }
    dictionary['vL'] = vL
    dictionary['vR'] = vR
    dictionary['ms'] = ms

    packet = str(dictionary)
    
    print("Send: ", packet)
    radio.send(packet)
    
    print()

Printer-friendly version
Terminal Control — Go Wireless!
Prev
Receiver Script for cyber:bot Output
Next

DISCUSSION FORUMS | PARALLAX INC. STORE

About | Terms of Use | Feedback: learn@parallax.com | Copyright©Parallax Inc. 2024

© 2025 Parallax Learn • Built with GeneratePress