Skip to content
Parallax Learn

Parallax Learn

  • Welcome
  • Tutorials
        • Tutorial Series head tag

          Tutorial Series
        • Tutorial Series

          The special, classroom-ready series pages are organized collections of tutorials for our most popular hardware and/or languages. The tutorials for each topic are conveniently accessible from a single page, shown in the order it is recommended that they be completed.
        • Robotics Series Head tag

          Robotics Series
        • Robotics Series

          • Artificial Intelligence
          • Cybersecurity: Radio Data tutorialCybersecurity
          • cyber:bot + Python
          • cyber:bot + MakeCode
          • Boe-Bot Tutorial SeriesBoe-Bot
          • Arduino Shield-Bot
          • ActivityBot with C TutorialsActivityBot + C
          • ActivityBot with BlocklyProp Tutorial SeriesActivityBot + BlocklyProp
          • Scribbler 3 Tutorial SeriesScribbler 3
        • Electronics & Programming Series Head tag

          Electronics & Programming Series
          • BS2 Board of Education Tutorial SeriesBS2 Board of Education
          • Propeller C-Language BasicsPropeller C Basics
          • FLiP Try-It Kit C Tutorial SeriesFLiP Try-It Kit + C
          • FLiP Try-It Kit BlocklyProp TutorialsFLiP Try-It Kit + BlocklyProp
          • Badge WX Tutorial SeriesBadge WX
          • Propeller BlocklyProp Basics and ProjectsPropeller BlocklyProp Basics
          • View All Tutorial Series »
        • Browse Tutorials
        • Browse Tutorials

          Individual tutorials sorted by robot or kit, and language.
        • By Robot or Kit
          • ActivityBot
          • SumoBot WX
          • Boe-Bot
          • Shield-Bot
          • cyber:bot
          • Badge WX
          • ELEV-8
          • ARLO
        • By Language
        • By Language

          • Propeller C
          • Arduino
          • BlocklyProp
          • PBASIC
          • Python
          • MakeCode
          • View All Tutorials »
  • Educators
  • Reference
  • Downloads
  • Home
  • All Courses
  • Cybersecurity: Navigation Control from a Keyboard

Cybersecurity: Navigation Control from a Keyboard

How the Wireless Controlled Bot Project Works

Like the transmitter project, the wireless receiver project’s radio call is also similar to countdown_receiver.

Inside the on radio received (rLongString) loop, the project waits for the radio to receive a signal. If the micro:bit has not received a radio message, it returns None. If the micro:bit receives a packet (because you finished typing all three values and pressed Enter), then on radio received returns a string that contains the dictionary. That gets stored in a variable named rLongString.

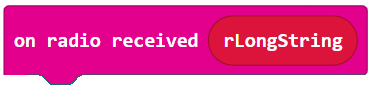
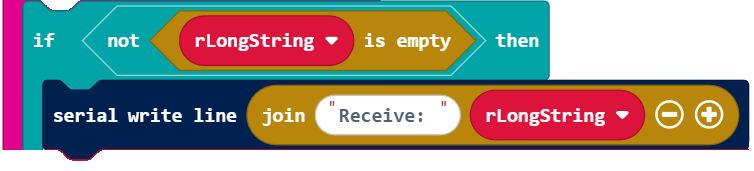
When on radio received returns None, the rest of the project gets skipped and the loop gets ignored. When on radio received returns a string (with characters that represent a dictionary), the statements under if (not ((rLongString) is empty)) are executed, starting with printing the packet. (You can only see that if you have the cyber:bot tethered and connected to a terminal.)

This statement converts a string containing a dictionary into an actual dictionary. The result is named dictionary.

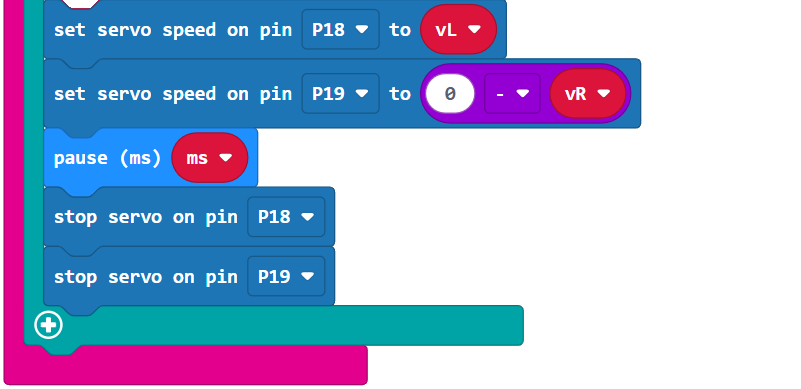
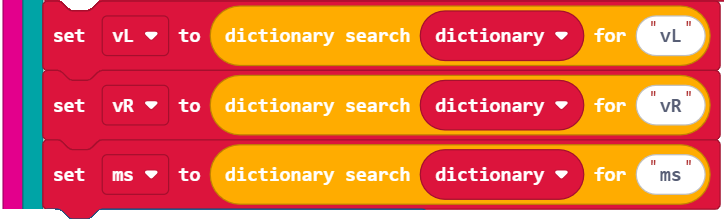
Assuming you typed 25, -25, 1000 in response to the prompts, the dictionary will be something like {‘vL’: 25, ‘vR’: -25, ‘ms’: 1000}. (Again, the order of the key-value pairs doesn’t matter since you use the key to find its corresponding value.) These statements use the ‘vL’, ‘vR’, and ‘ms’ keys to fetch the 25, -25, and 1000 values.

With the variables named vL, vR, and ms now storing the correct values, all that’s left is to make the left and right wheels turn at 25 and -25. And, keep that maneuver going for 1000 ms with pause before stopping the servos again.


Printer-friendly version
How the Wireless Controller Project Works
Prev

DISCUSSION FORUMS | PARALLAX INC. STORE

About | Terms of Use | Feedback: learn@parallax.com | Copyright©Parallax Inc. 2024

© 2025 Parallax Learn • Built with GeneratePress