Unidirectional Texts
Time to choose your hardware setup!
- Complete one of these:
- Option 1: Connect each micro:bit to a different computer.
- Use USB cables to connect a micro:bit to each computer.
- In each computer, open the python.microbit.org editor, click the Connect button, and set up the connection.
- Option 2: Connect the micro:bit modules to different USB ports on the same computer.
- Use USB cables to connect two micro:bits to two USB ports on your computer.
- Open two separate chrome browsers, and take each one to python.microbit.org.
- Click the Connect button in one browser, choose one micro:bit from the list, and confirm by clicking Connect in the dialog.
- Click the Connect button in the other browser, choose the other micro:bit from the list, and confirm by clicking Connect in the dialog.
- Option 1: Connect each micro:bit to a different computer.
If you accidentally connect both browsers to the same micro:bit, you might need to unplug/replug their UB cables and repeat the browser connecting steps.
It is time to decide which micro:bit you want to be the sender and which one you want to be the receiver. You will start with the browser connected to the receiver micro:bit
- Open the receive_radio_test_message in the receiver micro:bit.
- Update the script to your assigned channel if you are working in a classroom setting. (Each pair of students should share a channel. Channels should be evenly spaced in the 0…83 range.)
- Flash the script.
- Click the Open Serial button, and make sure the terminal displays the micro:bit radio receiver message.
Now, you will use the browser connected to the sender micro:bit.
- Enter, save, and flash the text_terminal_to_radio script to the sender micro:bit.
# text_terminal_to_radio

from microbit import *
import radio

radio.on()
radio.config(channel = 7)

sleep(1000)

print("micro:bit radio sender")

while True:
    message = input("Send: ")
    radio.send(message)
- Click the Open Serial button.
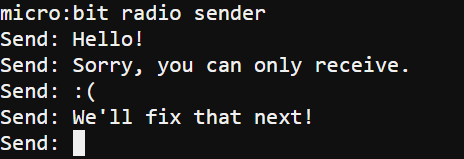
- Verify that the “micro:bit radio sender” messages is printed.
- Click in the transmitter terminal next to the Send: prompt and type a message like Hello! And press Enter.
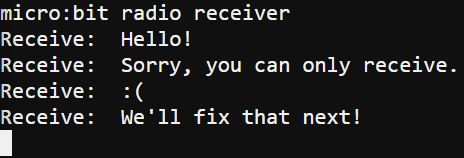
- Verify that the receiver micro:bit’s terminal displays Receive: Hello!
- Try typing some more messages and verify that the receiver micro:bit is receiving them.
- Try sending longer messages. Do all the characters make it through? How many can go through in one message?
Sender terminal
Receiver terminal