Skip to content
Parallax Learn

Parallax Learn

  • Welcome
  • Tutorials
        • Tutorial Series head tag

          Tutorial Series
        • Tutorial Series

          The special, classroom-ready series pages are organized collections of tutorials for our most popular hardware and/or languages. The tutorials for each topic are conveniently accessible from a single page, shown in the order it is recommended that they be completed.
        • Robotics Series Head tag

          Robotics Series
        • Robotics Series

          • Artificial Intelligence
          • Cybersecurity: Radio Data tutorialCybersecurity
          • cyber:bot + Python
          • cyber:bot + MakeCode
          • Boe-Bot Tutorial SeriesBoe-Bot
          • Arduino Shield-Bot
          • ActivityBot with C TutorialsActivityBot + C
          • ActivityBot with BlocklyProp Tutorial SeriesActivityBot + BlocklyProp
          • Scribbler 3 Tutorial SeriesScribbler 3
        • Electronics & Programming Series Head tag

          Electronics & Programming Series
          • BS2 Board of Education Tutorial SeriesBS2 Board of Education
          • Propeller C-Language BasicsPropeller C Basics
          • FLiP Try-It Kit C Tutorial SeriesFLiP Try-It Kit + C
          • FLiP Try-It Kit BlocklyProp TutorialsFLiP Try-It Kit + BlocklyProp
          • Badge WX Tutorial SeriesBadge WX
          • Propeller BlocklyProp Basics and ProjectsPropeller BlocklyProp Basics
          • View All Tutorial Series »
        • Browse Tutorials
        • Browse Tutorials

          Individual tutorials sorted by robot or kit, and language.
        • By Robot or Kit
          • ActivityBot
          • SumoBot WX
          • Boe-Bot
          • Shield-Bot
          • cyber:bot
          • Badge WX
          • ELEV-8
          • ARLO
        • By Language
        • By Language

          • Propeller C
          • Arduino
          • BlocklyProp
          • PBASIC
          • Python
          • MakeCode
          • View All Tutorials »
  • Educators
  • Reference
  • Downloads
  • Home
  • All Courses
  • Cybersecurity: Radio Data

Cybersecurity: Radio Data

Send and Receive Packets

The sender micro:bit and receiver micro:bit each have their own script, and they must be running at the same time.

  • Connect two micro:bit modules to two USB ports with two USB cables.
  • Open two separate browsers and navigate both to python.microbit.org.
  • In each micro:bit Python Editor, click the three dots   ⋮   by the Send to micro:bit button, select Connect, and then set up each micro:bit connection.
  • If you are part of a class, and have been assigned a channel, make sure to adjust the script’s channel=7 to your assigned channel before you save and flash the scripts.
  • Enter, name, save, and flash the sender script countdown_sender into the sending micro:bit.
    (See Save & Edit Scripts and Flash Scripts with Python Editor.) 
  • Enter, name, save, and flash the receiver script countdown_reciever into the receiving micro:bit.  It’s below the countdown_sender script.

Example Sender Script: countdown_sender

# countdown_sender

from microbit import *
import radio

radio.on()
radio.config(channel=7,length=50)

sleep(1000)

print("Countdown App")
print("micro:bit sender")

while True:
    text = input("Enter countdown start: ")
    value = int(text)
    message = input("Enter message after countdown: ")
    
    dictionary = {  }
    dictionary['start'] = value
    dictionary['after'] = message

    packet = str(dictionary)
    
    print("Send: ", packet)
    radio.send(packet)
    
    print()


Example Receiver Script: countdown_receiver

# countdown_receiver


from microbit import *
import radio

radio.on()
radio.config(channel=7,length=50)

sleep(1000)

print("Countdown App")
print("micro:bit receiver\n")

while True:
    packet = radio.receive()
    if packet is not None:
        print("Receive: ", packet)

        print()
        print("Parse: ")

        dictionary = eval(packet)

        value = dictionary['start']
        message = dictionary['after']
        
        print("value = ", value)
        print("message = ", message, "\n")
        
        while value >= 0:
            print(value)
            sleep(1000)
            value = value - 1
            
        print(message)
        
        print()


  • Click Show serial in both browsers.
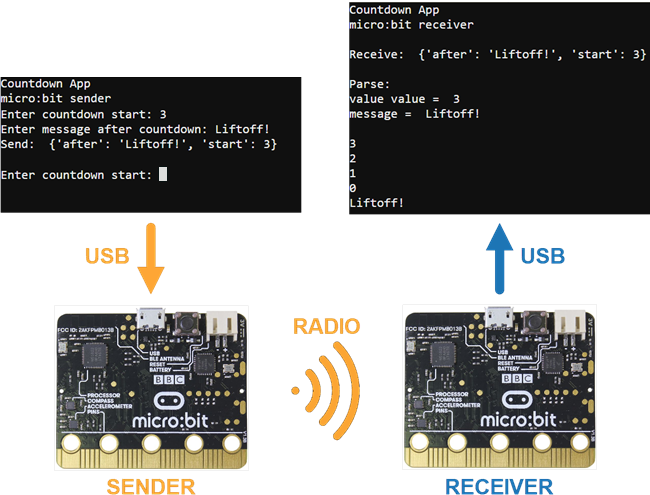
  • Follow the prompts in the sender micro:bit’s serial monitor for entering the countdown start value and the message to display afterwards.
  • Check the receiver micro:bot’s serial monitor and verify that it completes the countdown and displays the message you entered.


Printer-friendly version
Radio Data Packets
Prev
How Radio Data Packets Work
Next

DISCUSSION FORUMS | PARALLAX INC. STORE

About | Terms of Use | Feedback: learn@parallax.com | Copyright©Parallax Inc. 2024

© 2025 Parallax Learn • Built with GeneratePress