Skip to content
Parallax Learn

Parallax Learn

  • Welcome
  • Tutorials
        • Tutorial Series head tag

          Tutorial Series
        • Tutorial Series

          The special, classroom-ready series pages are organized collections of tutorials for our most popular hardware and/or languages. The tutorials for each topic are conveniently accessible from a single page, shown in the order it is recommended that they be completed.
        • Robotics Series Head tag

          Robotics Series
        • Robotics Series

          • Artificial Intelligence
          • Cybersecurity: Radio Data tutorialCybersecurity
          • cyber:bot + Python
          • cyber:bot + MakeCode
          • Boe-Bot Tutorial SeriesBoe-Bot
          • Arduino Shield-Bot
          • ActivityBot with C TutorialsActivityBot + C
          • ActivityBot with BlocklyProp Tutorial SeriesActivityBot + BlocklyProp
          • Scribbler 3 Tutorial SeriesScribbler 3
        • Electronics & Programming Series Head tag

          Electronics & Programming Series
          • BS2 Board of Education Tutorial SeriesBS2 Board of Education
          • Propeller C-Language BasicsPropeller C Basics
          • FLiP Try-It Kit C Tutorial SeriesFLiP Try-It Kit + C
          • FLiP Try-It Kit BlocklyProp TutorialsFLiP Try-It Kit + BlocklyProp
          • Badge WX Tutorial SeriesBadge WX
          • Propeller BlocklyProp Basics and ProjectsPropeller BlocklyProp Basics
          • View All Tutorial Series »
        • Browse Tutorials
        • Browse Tutorials

          Individual tutorials sorted by robot or kit, and language.
        • By Robot or Kit
          • ActivityBot
          • SumoBot WX
          • Boe-Bot
          • Shield-Bot
          • cyber:bot
          • Badge WX
          • ELEV-8
          • ARLO
        • By Language
        • By Language

          • Propeller C
          • Arduino
          • BlocklyProp
          • PBASIC
          • Python
          • MakeCode
          • View All Tutorials »
  • Educators
  • Reference
  • Downloads
  • Home
  • All Courses

Cybersecurity: Radio Tilt Control

Curriculum

  • 1 Section
  • 33 Lessons
  • Lifetime
Expand all sectionsCollapse all sections
  • Cybersecurity: Radio Tilt Control
    33
    • 1.0
      Measure Accelerometer Tilt
    • 1.1
      Test Tilts
    • 1.2
      A Bit About Acceleration
    • 1.3
      Inside the micro:bit Accelerometer
    • 1.4
      How the Project Works
    • 1.5
      Try This: Take X and Y Rotation Samples
    • 1.6
      Your Turn: Combine Tilt and Rotation
    • 1.7
      Measure Rotation Angles
    • 1.8
      Measuring Rotation Angles
    • 1.9
      How Measuring Rotation Angles Works
    • 1.10
      Did You Know? Trigonometry and Rotation Angles
    • 1.11
      Measure How Far from Vertical or Level
    • 1.12
      How It Works
    • 1.13
      Z-Axis: Which Way Is Up?
    • 1.14
      How it Works: Z-axis
    • 1.15
      Did You Know? This Way Up
    • 1.16
      Try This: Get Familiar Z-Axis Angle Measurements
    • 1.17
      Your Turn: All Together Now
    • 1.18
      Display Tilt Direction
    • 1.19
      Your Turn: Display Tilt Direction
    • 1.20
      Tilt Radio Tests
    • 1.21
      Radio-Transmit Tilt
    • 1.22
      Radio-Receive Tilt
    • 1.23
      How the Tilt Radio Tests Work
    • 1.24
      Tilt Control Forward & Backward
    • 1.25
      Rapid Radio-Transmit Tilt Data
    • 1.26
      Rapid Radio-Receive Tilt Plus Forward/Backward Control
    • 1.27
      Adding a Stop Range
    • 1.28
      Transmitter Displays Stop Range
    • 1.29
      Receiver Full Tilt Control & Stop Range
    • 1.30
      Add Left/Right Tilt Control
    • 1.31
      Update the Receiver cyber:bot project
    • 1.32
      How the Receiver Works

How the Project Works

How test_tilts_intro works

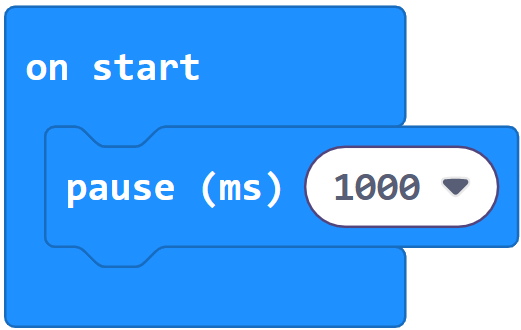
The accelerometer methods are part of the microbit module, so no other imports are needed. The instruction pause (1000) is always recommended at the beginning of any project that prints messages to the terminal. After that, the main loop begins.

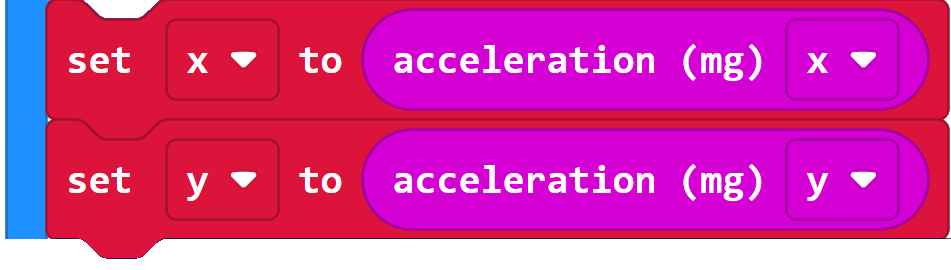
With the accelerometer held still, a project can get information from each axis about how much it is aligned with gravity. Regardless of whether it’s acceleration (x), acceleration (y), or acceleration (z), the method call returns a value in the range of 1024 to 0 to -1024.

When the measurement is 1024, it means that the accelerometer’s sensing axis is aligned with gravity. As the sensing axis is tilted further out of alignment with gravity, the value decreases. When it’s level (pointing sideways and not at all up or down), the value is zero. As it starts to point away from gravity, the value becomes negative. When it’s aligned with gravity, but pointing the opposite direction, the value is -1024. 

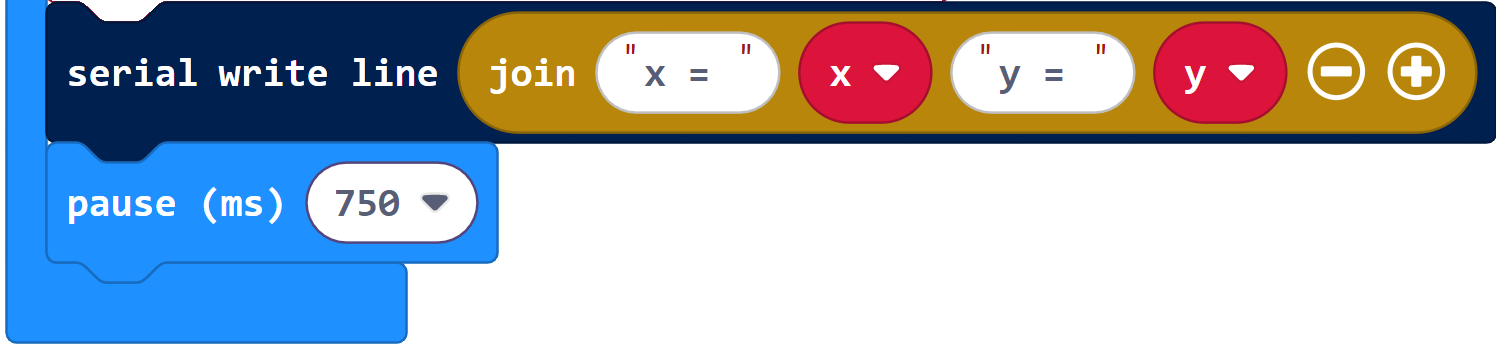
The accelerometer x and y values are printed, and after a 0.75 second pause, the main loop repeats.


Printer-friendly version
Inside the micro:bit Accelerometer
Prev
Try This: Take X and Y Rotation Samples
Next

DISCUSSION FORUMS | PARALLAX INC. STORE

About | Terms of Use | Feedback: learn@parallax.com | Copyright©Parallax Inc. 2024

© 2026 Parallax Learn • Built with GeneratePress