Skip to content
Parallax Learn

Parallax Learn

  • Welcome
  • Tutorials
        • Tutorial Series head tag

          Tutorial Series
        • Tutorial Series

          The special, classroom-ready series pages are organized collections of tutorials for our most popular hardware and/or languages. The tutorials for each topic are conveniently accessible from a single page, shown in the order it is recommended that they be completed.
        • Robotics Series Head tag

          Robotics Series
        • Robotics Series

          • Artificial Intelligence
          • Cybersecurity: Radio Data tutorialCybersecurity
          • cyber:bot + Python
          • cyber:bot + MakeCode
          • Boe-Bot Tutorial SeriesBoe-Bot
          • Arduino Shield-Bot
          • ActivityBot with C TutorialsActivityBot + C
          • ActivityBot with BlocklyProp Tutorial SeriesActivityBot + BlocklyProp
          • Scribbler 3 Tutorial SeriesScribbler 3
        • Electronics & Programming Series Head tag

          Electronics & Programming Series
          • BS2 Board of Education Tutorial SeriesBS2 Board of Education
          • Propeller C-Language BasicsPropeller C Basics
          • FLiP Try-It Kit C Tutorial SeriesFLiP Try-It Kit + C
          • FLiP Try-It Kit BlocklyProp TutorialsFLiP Try-It Kit + BlocklyProp
          • Badge WX Tutorial SeriesBadge WX
          • Propeller BlocklyProp Basics and ProjectsPropeller BlocklyProp Basics
          • View All Tutorial Series »
        • Browse Tutorials
        • Browse Tutorials

          Individual tutorials sorted by robot or kit, and language.
        • By Robot or Kit
          • ActivityBot
          • SumoBot WX
          • Boe-Bot
          • Shield-Bot
          • cyber:bot
          • Badge WX
          • ELEV-8
          • ARLO
        • By Language
        • By Language

          • Propeller C
          • Arduino
          • BlocklyProp
          • PBASIC
          • Python
          • MakeCode
          • View All Tutorials »
  • Educators
  • Reference
  • Downloads
  • Home
  • All Courses

Cybersecurity: Radio Tilt Control

Curriculum

  • 1 Section
  • 33 Lessons
  • Lifetime
Expand all sectionsCollapse all sections
  • Cybersecurity: Radio Tilt Control
    33
    • 1.0
      Measure Accelerometer Tilt
    • 1.1
      Test Tilts
    • 1.2
      A Bit About Acceleration
    • 1.3
      Inside the micro:bit Accelerometer
    • 1.4
      How the Project Works
    • 1.5
      Try This: Take X and Y Rotation Samples
    • 1.6
      Your Turn: Combine Tilt and Rotation
    • 1.7
      Measure Rotation Angles
    • 1.8
      Measuring Rotation Angles
    • 1.9
      How Measuring Rotation Angles Works
    • 1.10
      Did You Know? Trigonometry and Rotation Angles
    • 1.11
      Measure How Far from Vertical or Level
    • 1.12
      How It Works
    • 1.13
      Z-Axis: Which Way Is Up?
    • 1.14
      How it Works: Z-axis
    • 1.15
      Did You Know? This Way Up
    • 1.16
      Try This: Get Familiar Z-Axis Angle Measurements
    • 1.17
      Your Turn: All Together Now
    • 1.18
      Display Tilt Direction
    • 1.19
      Your Turn: Display Tilt Direction
    • 1.20
      Tilt Radio Tests
    • 1.21
      Radio-Transmit Tilt
    • 1.22
      Radio-Receive Tilt
    • 1.23
      How the Tilt Radio Tests Work
    • 1.24
      Tilt Control Forward & Backward
    • 1.25
      Rapid Radio-Transmit Tilt Data
    • 1.26
      Rapid Radio-Receive Tilt Plus Forward/Backward Control
    • 1.27
      Adding a Stop Range
    • 1.28
      Transmitter Displays Stop Range
    • 1.29
      Receiver Full Tilt Control & Stop Range
    • 1.30
      Add Left/Right Tilt Control
    • 1.31
      Update the Receiver cyber:bot project
    • 1.32
      How the Receiver Works

How the Receiver Works

The radio_tilt_bot_fb_lr_with_stop_range project is just another development step from the previous activity. Here are the changes that were made to radio_tilt_bot_fb_with_stop_range to add the left/right control.

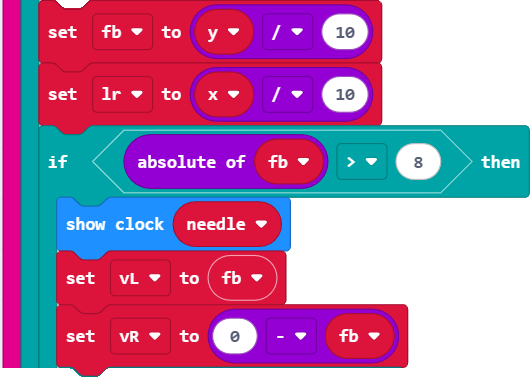
Remember how the project sets fb to y /10 to reduce the range of values from -1024…1024 to -102 to 102? Well, since the x-axis measurements also come in a range of -1024 to 1024, the project can also divide those by 10. That’s what set lr to (x / 10) does, and lr is shorthand for left/right.

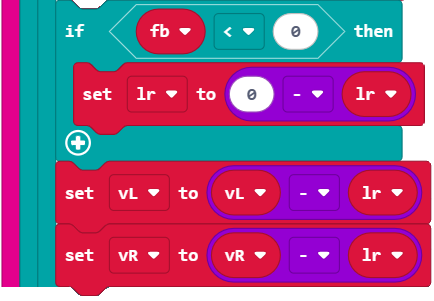
After setting up vL and vR with fb and –fb, the lr component can be added in to cause turns. The statement if(fb < 0): set lr to (0 – lr) changes the sign of the lr variable if you are tipping the tilt transmitter toward you. That’s because the rules for wheel rotation directions for turning reverse when the robot is backing up.

Let’s try an exercise called variable tracing. Variable tracing is the process of stepping through each block after setting variable values and checking what each statement does with those values. Some software development environments offer an automated version of this, but here, it is a mental exercise to help better understand how the statements correctly control the wheel speeds. The variable values are calculated in comments to the right of the statements.

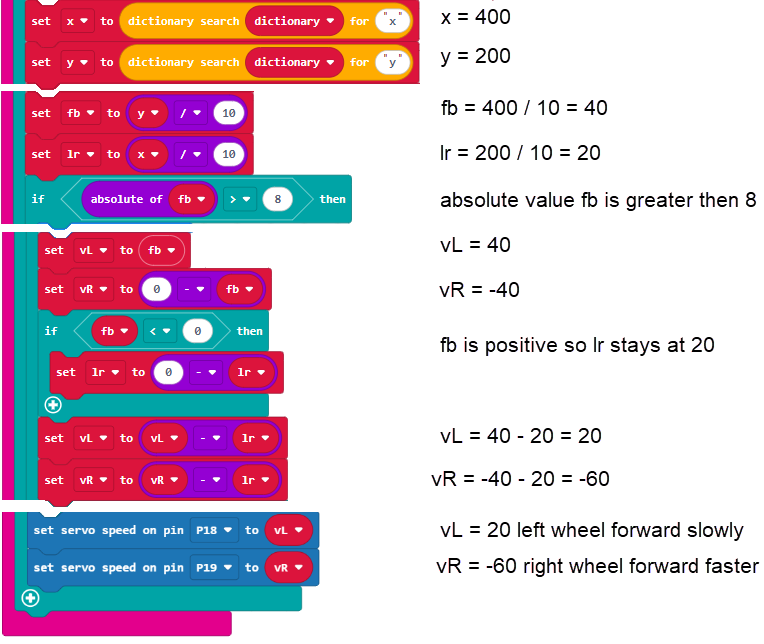
Example: Tilt the micro:bit away from you and to the left. 

Assume the y variable is 400, and the x variable is 200. 

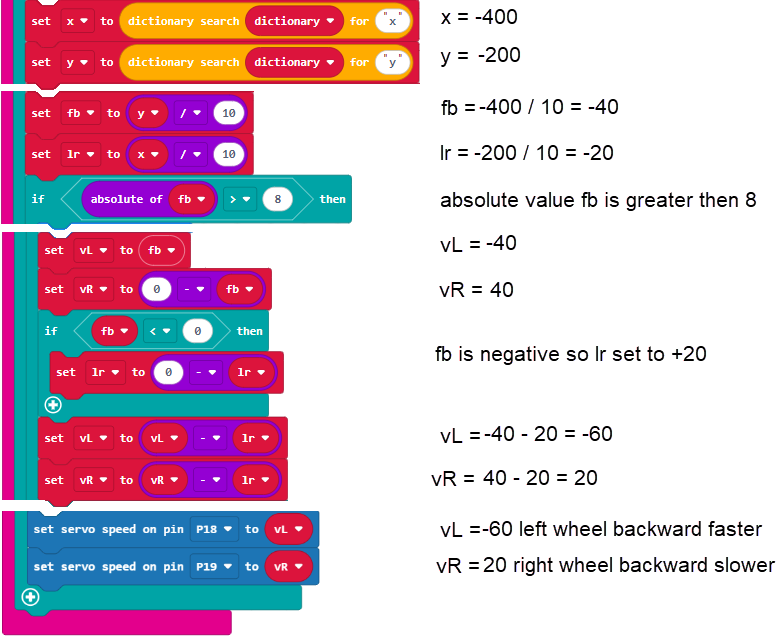
Example: Tilt the micro:bit toward you and to the right. 

Assume the y variable is -400, and the x variable is -200. 


Printer-friendly version
Update the Receiver cyber:bot project
Prev

DISCUSSION FORUMS | PARALLAX INC. STORE

About | Terms of Use | Feedback: learn@parallax.com | Copyright©Parallax Inc. 2024

© 2026 Parallax Learn • Built with GeneratePress