Texting with Terminals: Unencrypted vs. Encrypted
Another activity that was vulnerable to sniffing attacks was the Bidirectional Texts application from Cybersecurity: Radio Basics. In this activity, you will add an ASCII shift cipher to encrypt and decrypt the text communication.
- Reopen terminal_chat_through_microbits from Bidirectional Texts. (If you did not save it, go back to the activity and follow the instructions to get it up and running.)
- Make sure that one micro:bit is running a transceiver A version, and the other is running a transceiver B version.
- Make sure you can exchange unencrypted messages from one serial monitor to another through the radio-connected micro:bit modules.
- Careful what you type, anybody else can see what you write!
Next, let’s encrypt micro:bit transceiver A’s data and see what it looks like in micro:bit transceiver B’s serial monitor.
- Leave micro:bit transceiver B as-is.
- In the browser connected to micro:bit transceiver A:
- Change the project name from terminal_chat_through_microbits to terminal_chat_through_microbits_encrypted_A.
- Update the script to match the one below, and then Save it.
- Click Send to micro:bit.
- Make sure to leave micro:bit transceiver B unchanged, running the micro:bit Transceiver B version of the original terminal_chat_through_microbits script.
Transceiver Script: terminal_chat_through_microbits_encrypted_A
# terminal_chat_through_microbits_encrypted_A.py
# learn.parallax.com/cyberbot
# Copyright Parallax Inc 2020 under MIT license

from microbit import *
import radio

''' Function converts plaintext to ciphertext using key '''

def ascii_shift(key, text):
    result = "
    for letter in text:
        ascii = ( ord(letter) + key - 32 ) % 94 + 32
        result = result + chr(ascii)
    return result


''' Script starts from here... '''

radio.on()
radio.config(channel=7)

sleep(1000)

print("micro:bit transceiver A")
print()

text = input("Enter key: ")
key = int(text)

print()
print("Type messages, press enter to send.")
print("Received messages will also be displayed.")
print()

while True:
    if uart.any():
        tx = input("Send: ")
        tx = ascii_shift(key, tx)
        radio.send(tx)
    message = radio.receive()
    if message:
        message = ascii_shift(-key, message)
        print("Receive: ", message)
- Make sure the serial monitor is open in both browsers. (Click Show serial to open if needed.)
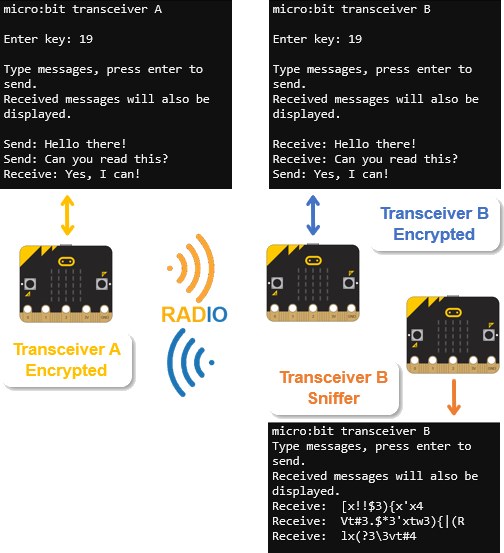
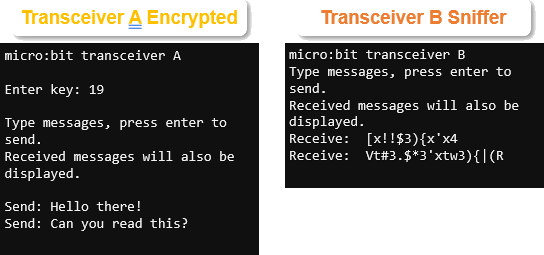
- In micro:bit transceiver A’s browser, you will need to enter a key value between 1 and 25. This example uses 19.
- Try typing this into micro:bit transceiver A: Hello there! Can you read this?
What do you see in micro:bit transceiver B’s serial monitor? This is what an attacker trying to use sniffing would see when you send the encrypted message.
Next, let’s make it so that micro:bit transceiver B can exchange encrypted messages with micro:bit transceiver A.
- Repeat the steps you just did for micro:bit transceiver A, but this time, follow those steps in the browser connected to micro:bit transceiver B.
- Re-test in micro:bit transceiver A’s serial monitor with Hello there! Can you read this? Also try replying Yes I can! from micro:bit transceiver B’s serial monitor.
