Skip to content
Parallax Learn

Parallax Learn

  • Welcome
  • Tutorials
        • Tutorial Series head tag

          Tutorial Series
        • Tutorial Series

          The special, classroom-ready series pages are organized collections of tutorials for our most popular hardware and/or languages. The tutorials for each topic are conveniently accessible from a single page, shown in the order it is recommended that they be completed.
        • Robotics Series Head tag

          Robotics Series
        • Robotics Series

          • Artificial Intelligence
          • Cybersecurity: Radio Data tutorialCybersecurity
          • cyber:bot + Python
          • cyber:bot + MakeCode
          • Boe-Bot Tutorial SeriesBoe-Bot
          • Arduino Shield-Bot
          • ActivityBot with C TutorialsActivityBot + C
          • ActivityBot with BlocklyProp Tutorial SeriesActivityBot + BlocklyProp
          • Scribbler 3 Tutorial SeriesScribbler 3
        • Electronics & Programming Series Head tag

          Electronics & Programming Series
          • BS2 Board of Education Tutorial SeriesBS2 Board of Education
          • Propeller C-Language BasicsPropeller C Basics
          • FLiP Try-It Kit C Tutorial SeriesFLiP Try-It Kit + C
          • FLiP Try-It Kit BlocklyProp TutorialsFLiP Try-It Kit + BlocklyProp
          • Badge WX Tutorial SeriesBadge WX
          • Propeller BlocklyProp Basics and ProjectsPropeller BlocklyProp Basics
          • View All Tutorial Series »
        • Browse Tutorials
        • Browse Tutorials

          Individual tutorials sorted by robot or kit, and language.
        • By Robot or Kit
          • ActivityBot
          • SumoBot WX
          • Boe-Bot
          • Shield-Bot
          • cyber:bot
          • Badge WX
          • ELEV-8
          • ARLO
        • By Language
        • By Language

          • Propeller C
          • Arduino
          • BlocklyProp
          • PBASIC
          • Python
          • MakeCode
          • View All Tutorials »
  • Educators
  • Reference
  • Downloads
  • Home
  • All Courses

Dictionary Primer

Curriculum

  • 1 Section
  • 4 Lessons
  • Lifetime
Expand all sectionsCollapse all sections
  • Dictionary Primer
    4
    • 1.0
      About Dictionaries
    • 1.1
      Create a Dictionary
    • 1.2
      Try This: Use Keys to Change Values
    • 1.3
      Your Turn: Expand and Use the Dictionary

Create a Dictionary

Let’s make a simple interactive dictionary with two key-value pairs.

Example script: interactive_dictionary

  • Enter, name, and save interactive_dictionary.  
  • Click the Send to micro:bit button.
# interactive_dictionary

from microbit import *

sleep(1000)

string = input("Enter your name: ")

text = input("Enter a recent game score: ")
value = int(text)

info = {   }

info['name'] = string
info['score'] = value

print("Dictionary")
print("info = ", info)

name_val = info['name']
text = info['score']
score_val = int(text)

print("Hello", name_val, "your score was", score_val)
  • If the serial monitor is not already open, click Show serial.
  • Click to the right of the Enter your name: prompt.
  • Follow the prompts to enter a name and a score. 

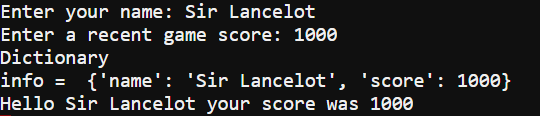
Assuming you entered Sir Lancelot for the name and 1000 for the score, the terminal should respond with info = {’name’: ’Sir Lancelot’, ’score’ : 1000} on one line and Hello Sir Lancelot your score was 1000 on the next.

  • Verify that the response in the serial monitor is consistent with your input.


How interactive_dictionary Works

The script starts by storing your keyboard input into the string and value variables.  Let’s assume you typed Sir Lancelot and 1000 in response to the prompts.  The string variable will store ’Sir Lancelot’, and the value variable will store 1000.  

string = input(“Enter your name: “)

text = input(“Enter a recent game score: “)
value = int(text)

This statement creates an empty dictionary and names it info.

info = {   }

Since the dictionary does not already have ’name’ or ’score’ keys, these two statements add two key-value pairs to the dictionary.  Assuming the string variable stores ’Sir Lancelot’ and the value variable stores 1000, one key-value pair would be ’name’: ’Sir Lancelot’, and the second would be ’score’ : 1000.

info['name'] = string
info['score'] = value

The first print statement is just a heading.  The second one displays info = and then the contents of the dictionary.  Continuing the Sir Lancelot example, it would look like this: info = {’name’: ’Sir Lancelot’, ’score’ : 1000}

print("Dictionary")
print("info = ", info)

The first two statements here “look up” values in the dictionary by using their keys.  The name_val variable stores the value that’s paired with ’name’ in the dictionary.  Continuing the earlier example, name_val would store the string value ’Sir Lancelot’ and score_val would store the int value 1000.

name_val = info['name']
text = info['score']
score_val = int(text)

After looking up the values and storing them in variables, the script uses a print statement to display “Hello Sir Lancelot your score was 1000”.

print("Hello", name_val, "your score was", score_val)


Printer-friendly version
About Dictionaries
Prev
Try This: Use Keys to Change Values
Next

DISCUSSION FORUMS | PARALLAX INC. STORE

About | Terms of Use | Feedback: learn@parallax.com | Copyright©Parallax Inc. 2024

© 2026 Parallax Learn • Built with GeneratePress