Skip to content
Parallax Learn

Parallax Learn

  • Welcome
  • Tutorials
        • Tutorial Series head tag

          Tutorial Series
        • Tutorial Series

          The special, classroom-ready series pages are organized collections of tutorials for our most popular hardware and/or languages. The tutorials for each topic are conveniently accessible from a single page, shown in the order it is recommended that they be completed.
        • Robotics Series Head tag

          Robotics Series
        • Robotics Series

          • Artificial Intelligence
          • Cybersecurity: Radio Data tutorialCybersecurity
          • cyber:bot + Python
          • cyber:bot + MakeCode
          • Boe-Bot Tutorial SeriesBoe-Bot
          • Arduino Shield-Bot
          • ActivityBot with C TutorialsActivityBot + C
          • ActivityBot with BlocklyProp Tutorial SeriesActivityBot + BlocklyProp
          • Scribbler 3 Tutorial SeriesScribbler 3
        • Electronics & Programming Series Head tag

          Electronics & Programming Series
          • BS2 Board of Education Tutorial SeriesBS2 Board of Education
          • Propeller C-Language BasicsPropeller C Basics
          • FLiP Try-It Kit C Tutorial SeriesFLiP Try-It Kit + C
          • FLiP Try-It Kit BlocklyProp TutorialsFLiP Try-It Kit + BlocklyProp
          • Badge WX Tutorial SeriesBadge WX
          • Propeller BlocklyProp Basics and ProjectsPropeller BlocklyProp Basics
          • View All Tutorial Series »
        • Browse Tutorials
        • Browse Tutorials

          Individual tutorials sorted by robot or kit, and language.
        • By Robot or Kit
          • ActivityBot
          • SumoBot WX
          • Boe-Bot
          • Shield-Bot
          • cyber:bot
          • Badge WX
          • ELEV-8
          • ARLO
        • By Language
        • By Language

          • Propeller C
          • Arduino
          • BlocklyProp
          • PBASIC
          • Python
          • MakeCode
          • View All Tutorials »
  • Educators
  • Reference
  • Downloads
  • Home
  • All Courses

Door Control Project

Curriculum

  • 1 Section
  • 3 Lessons
  • Lifetime
Expand all sectionsCollapse all sections
  • Door Control Project
    3
    • 1.1
      Setting Up the Demo Unit
    • 1.2
      Test and Run the Demo Unit
    • 1.3
      How the Demo Works

Test and Run the Demo Unit

Test It

Download the source code:

Source Code for Door Control

For testing purposes I just wrote a DEBUG line that displayed the binary representation of the input signals from the switches and phototransistors. BASICally I just used the following line of code:

DEBUG HOME, BIN Open, BIN Close, BIN Opened, BIN Closed

With this line running in a loop you should see four 1’s and/or 0’s on your DEBUG terminal. The first two should be 1’s unless a button is pressed, then the corresponding bit should become a 0. On the phototransistors you should see a 0 unless the door is interrupting the beam, which is your indication that the IR sensor has detected object blocking the beam. If you’re not seeing a 1, but there is no object to interrupt the beam, you can verify your IR LEDs work by simply looking at the sensor with a camera. Your eyes may not be able to see IR light, but the camera in your smart phone, digital camera or camcorder can see it.

If the LED colors are backward you can either reverse the LED, or if it’s soldered in you can change (reverse) the pin constants. Additionally, remember that on the Board of Education the switch must be in position 2 for the servo to get power.


Run It

On power-up the door will either be open or closed. If it is in between the program will close it automatically. At this point, pushing the Open button opens the door and sets the status LED light to green.

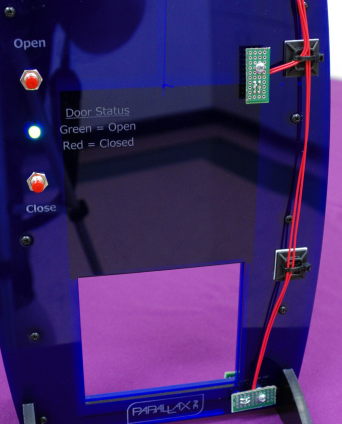
Pressing the Close button closes the door and sets the status LED light to red. If the door is already in the opened or closed position the corresponding button will have no effect. Also, if the door is already being opened/closed you cannot reverse the direction of the door until it reaches the limit switch. This effect can be altered in the code, if desired.

Note that on power-up, the LED status is off until a button is pressed and the door reaches that position limit.


Printer-friendly version
Setting Up the Demo Unit
Prev
How the Demo Works
Next

DISCUSSION FORUMS | PARALLAX INC. STORE

About | Terms of Use | Feedback: learn@parallax.com | Copyright©Parallax Inc. 2024

© 2026 Parallax Learn • Built with GeneratePress