Skip to content
Parallax Learn

Parallax Learn

  • Welcome
  • Tutorials
        • Tutorial Series head tag

          Tutorial Series
        • Tutorial Series

          The special, classroom-ready series pages are organized collections of tutorials for our most popular hardware and/or languages. The tutorials for each topic are conveniently accessible from a single page, shown in the order it is recommended that they be completed.
        • Robotics Series Head tag

          Robotics Series
        • Robotics Series

          • Artificial Intelligence
          • Cybersecurity: Radio Data tutorialCybersecurity
          • cyber:bot + Python
          • cyber:bot + MakeCode
          • Boe-Bot Tutorial SeriesBoe-Bot
          • Arduino Shield-Bot
          • ActivityBot with C TutorialsActivityBot + C
          • ActivityBot with BlocklyProp Tutorial SeriesActivityBot + BlocklyProp
          • Scribbler 3 Tutorial SeriesScribbler 3
        • Electronics & Programming Series Head tag

          Electronics & Programming Series
          • BS2 Board of Education Tutorial SeriesBS2 Board of Education
          • Propeller C-Language BasicsPropeller C Basics
          • FLiP Try-It Kit C Tutorial SeriesFLiP Try-It Kit + C
          • FLiP Try-It Kit BlocklyProp TutorialsFLiP Try-It Kit + BlocklyProp
          • Badge WX Tutorial SeriesBadge WX
          • Propeller BlocklyProp Basics and ProjectsPropeller BlocklyProp Basics
          • View All Tutorial Series »
        • Browse Tutorials
        • Browse Tutorials

          Individual tutorials sorted by robot or kit, and language.
        • By Robot or Kit
          • ActivityBot
          • SumoBot WX
          • Boe-Bot
          • Shield-Bot
          • cyber:bot
          • Badge WX
          • ELEV-8
          • ARLO
        • By Language
        • By Language

          • Propeller C
          • Arduino
          • BlocklyProp
          • PBASIC
          • Python
          • MakeCode
          • View All Tutorials »
  • Educators
  • Reference
  • Downloads
  • Home
  • All Courses
  • Electrical Measurements

Electrical Measurements

How it Works

How Measuring Voltage Works

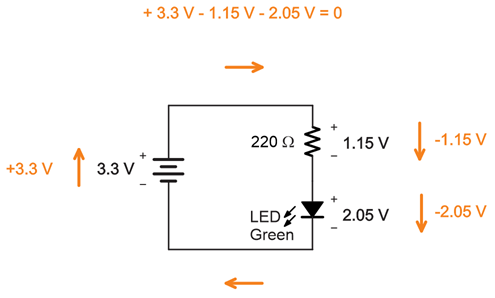
If you guessed from your measurements that adding up the voltages across each part in the circuit has to add up to the supply voltage, you guessed correctly. 

Think about the micro:bit module’s 3.3 V supply as a (positive) increase in voltage and the parts in the LED circuit as a (negative) decrease in voltage. 

Add those positive and negative voltages, and the result should be zero, in theory.  In practice, your measurements should add up to something close to zero.  


Did You Know?

This is an application of Kirchhoff’s voltage law (abbreviated KVL), which states: “The directed sum of the potential differences (voltages) around any closed loop is zero.” When parts in a circuit are connected end-to-end like the resistor to the LED, they are connected in series.

Learn more: https://en.wikipedia.org/wiki/Kirchhoff%27s_circuit_laws.


Try This

You can change the resistor, and the sum of voltages measured across the LED and resistor should still add up to the supply voltage.    

  • Replace the 220 Ω resistor with the 1000 Ω one.  The color code for the 1000 Ω resistor is brown-black-red.  
  • Measure the voltages again. 

Did they still add up to 3.3 V?

Your Turn

Red LEDs use slightly less voltage. 

  • Try replacing the green LED with a red LED, and then measure the voltage again. 

Did you notice a difference in the voltages?  Did they still add up to 3.3 V?


Printer-friendly version
Script and Tests
Prev
Review and Practice
Next

DISCUSSION FORUMS | PARALLAX INC. STORE

About | Terms of Use | Feedback: learn@parallax.com | Copyright©Parallax Inc. 2024

© 2025 Parallax Learn • Built with GeneratePress