Skip to content
Parallax Learn

Parallax Learn

  • Welcome
  • Tutorials
        • Tutorial Series head tag

          Tutorial Series
        • Tutorial Series

          The special, classroom-ready series pages are organized collections of tutorials for our most popular hardware and/or languages. The tutorials for each topic are conveniently accessible from a single page, shown in the order it is recommended that they be completed.
        • Robotics Series Head tag

          Robotics Series
        • Robotics Series

          • Artificial Intelligence
          • Cybersecurity: Radio Data tutorialCybersecurity
          • cyber:bot + Python
          • cyber:bot + MakeCode
          • Boe-Bot Tutorial SeriesBoe-Bot
          • Arduino Shield-Bot
          • ActivityBot with C TutorialsActivityBot + C
          • ActivityBot with BlocklyProp Tutorial SeriesActivityBot + BlocklyProp
          • Scribbler 3 Tutorial SeriesScribbler 3
        • Electronics & Programming Series Head tag

          Electronics & Programming Series
          • BS2 Board of Education Tutorial SeriesBS2 Board of Education
          • Propeller C-Language BasicsPropeller C Basics
          • FLiP Try-It Kit C Tutorial SeriesFLiP Try-It Kit + C
          • FLiP Try-It Kit BlocklyProp TutorialsFLiP Try-It Kit + BlocklyProp
          • Badge WX Tutorial SeriesBadge WX
          • Propeller BlocklyProp Basics and ProjectsPropeller BlocklyProp Basics
          • View All Tutorial Series »
        • Browse Tutorials
        • Browse Tutorials

          Individual tutorials sorted by robot or kit, and language.
        • By Robot or Kit
          • ActivityBot
          • SumoBot WX
          • Boe-Bot
          • Shield-Bot
          • cyber:bot
          • Badge WX
          • ELEV-8
          • ARLO
        • By Language
        • By Language

          • Propeller C
          • Arduino
          • BlocklyProp
          • PBASIC
          • Python
          • MakeCode
          • View All Tutorials »
  • Educators
  • Reference
  • Downloads
  • Home
  • All Courses

Electrical Measurements

Curriculum

  • 1 Section
  • 34 Lessons
  • Lifetime
Expand all sectionsCollapse all sections
  • Electrical Measurements
    34
    • 1.1
      Measure Voltage
    • 1.2
      Script and Tests
    • 1.3
      How it Works
    • 1.4
      Review and Practice
    • 1.5
      Solutions
    • 1.6
      Measure Resistance
    • 1.7
      Script and Tests
    • 1.8
      How it Works
    • 1.9
      Series vs. Parallel
    • 1.10
      Review and Practice
    • 1.11
      Solutions
    • 1.12
      Measurement Units
    • 1.13
      SI Units
    • 1.14
      Metric Prefixes
    • 1.15
      Convert Prefixes to Values
    • 1.16
      Prefix to Values Script and Tests
    • 1.17
      How the Prefix to Values Script Works
    • 1.18
      Convert Quantities to Values
    • 1.19
      How it Works
    • 1.20
      Script and Tests
    • 1.21
      Review and Practice
    • 1.22
      Solutions
    • 1.23
      Measure Current
    • 1.24
      Script and Tests
    • 1.25
      How it Works
    • 1.26
      Use Kirchoff’s Current Law
    • 1.27
      Review and Practice
    • 1.28
      Solutions
    • 1.29
      Ohm’s Law
    • 1.30
      Script and Tests
    • 1.31
      How it Works
    • 1.32
      Using Ohm’s Law
    • 1.33
      Review and Practice
    • 1.34
      Solutions

Script and Tests

Ammeter Script

  • Right-click ammeter_cyberscope.hex (below), and choose Save Link As…to download.

ammeter_cyberscope.hex

  • Click the micro:bit Python Editor’s Open button, then select and open ammeter_cyberscope.hex. 
  • Click Send to micro:bit.  
  • Click the three vertical dots  ⋮  by the Send to micro:bit button, and select Disconnect.
  • Start the CYBERscope:
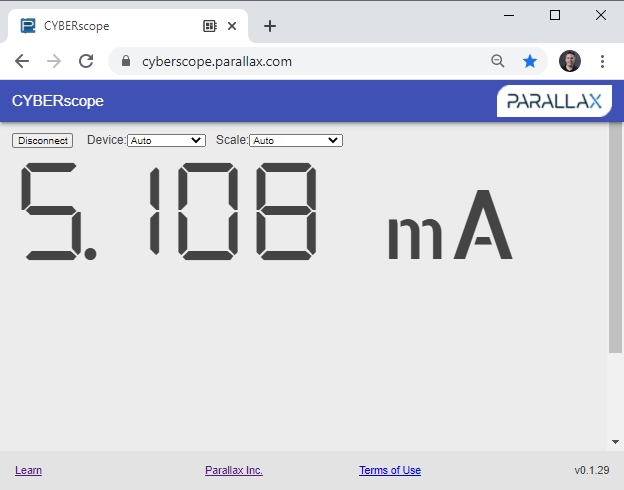
    • In a different browser tab, go to cyberscope.parallax.com.  
    • Click the CYBERscope’s Connect button.
    • In the serial port dialog, select the port with mbed in its name, and then click Connect. 

Ammeter Tests

You are now ready to measure current through the LED.

  • Check the meter. With a 220 Ω resistor, the current should be in the 5 mA neighborhood. 

The m in mA is the metric prefix for milli or “1/1000th of”.  In this case, the current measurement is 5.108 mA, or 5.108 thousandths of an amp.

Try This

  • Try replacing the 220 Ω resistor in the DC LED circuit with a 1 kΩ (brown-black-red) resistor. 
  • Repeat this with a 2 kΩ.
  • Also, try reversing the red and black probe ends in the LED circuit.  Is the measurement negative?


Printer-friendly version
Measure Current
Prev
How it Works
Next

DISCUSSION FORUMS | PARALLAX INC. STORE

About | Terms of Use | Feedback: learn@parallax.com | Copyright©Parallax Inc. 2024

© 2026 Parallax Learn • Built with GeneratePress