Use the Serial Monitor
The micro:bit Python Editor’s serial monitor is great for displaying messages from the mico:bit. You can also type messages into the serial monitor to send them to the micro:bit.
Another nice thing about the serial monitor is that there’s no need to wait for messages to scroll across the micro:bit module’s LED matrix display. You’ll be able to see the whole massage, all at once.
Different Python statements display messages in the serial monitor. Instead of display.scroll and display.show for the LED matrix, you’ll be using print statements to display messages and input statements to collect the text of messages you type.
This activity will use an example script that makes the micro:bit communicate with the serial monitor. The micro:bit will prompt you to type some text, and then repeat back what you typed. The video goes through the same steps as the checklist instructions.
- Follow along with your own computer and micro:bit module.
- Enter this script into the micro:bit Python Editor.
from microbit import *

while True:
    text = input('Type a message: ')
    print('You typed:', text)
- Click Send to micro:bit to make the micro:bit run it.
- Verify that the micro:bit module’s LED matrix display does not display anything.
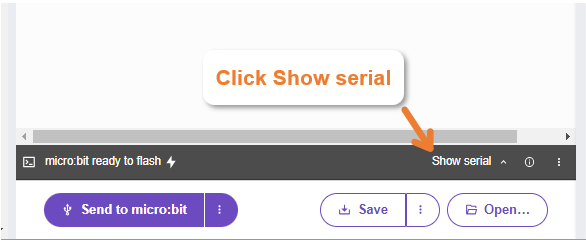
- Click Show serial to open the serial monitor. (Click the one above the Open button, not the one under the simulator!)
- Check for the ’Type a message:’ prompt. If it doesn’t appear, try clicking the Send to micro:bit button again. You might need to try more than once before it takes.
- If the ’type a message’ prompt did not appear and clicking the Send to micro:bit button a couple times doesn’t fix it, try this:
- Click the 3 dots to the right of the Show serial, and select the Send Ctrl+D to reset option.
- Then, click the Send to micro:bit button again, and it should start working.
- If the ’type a message’ prompt did not appear and clicking the Send to micro:bit button a couple times doesn’t fix it, try this:
- Click to the right of the ’Type a message:’ prompt, type a message, and press the Enter key.
- Make sure the serial monitor responds with ’You typed:’ and then a repeat of the message you typed.

Try this: Display What You Type in LED Matrix too
- Add display.scroll(text) immediately below the print(’You typed:’, text) statement. Make sure display.scroll(text) is at the same level of indentation as print(’You typed:’, text).
- Click Send to micro:bit.
- Type a message into the serial monitor.
- Verify that the message you typed is displayed on both the serial monitor AND on the micro:bit module’s LED matrix.