Using Reset as Part of a Program
You may have already used the reset button to scroll through the pre-programmed demos your S3 came with, but did you know that you can use the reset button in your personal BlocklyProp programs?
As you learned in the previous lesson, the blue reset button is actively monitored by your S3. When you press it, the S3 not only knows that it has been pressed, but it also counts and tracks the number of times you press the button in succession. Using this information, it will then display that count with the indicator LEDs and can even carry out certain commands in your code.
Reset Button & S3 Demo Programs
The reset button is used to select between the 8 pre-programmed Demonstration programs for the S3. It may be one of the first features you use. The Scribbler 3 Start-Up Guide shows you that the number of times the reset button is pressed is counted and lets you select which of the 8 default Demo programs runs on your robot.
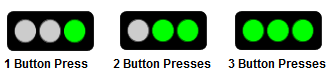
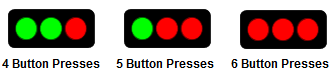
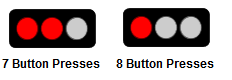
The code temporarily saves a count of the number of times the button is pressed as the S3 is reset. It gives visual feedback for the number of presses with the S3’s indicator LEDs (see the LED tutorial in “Lights and Sounds” for more information) in the following manner:
This feature can be defined in BlocklyProp so that the programmer may run programs or make program selections.
Pressing On
Take a look at this simple BlocklyProp code below:

The four blocks used are:
- The blue if…do block from the CONTROL category.
- The green button reset block from the SENSORS > BUTTON category.
- The purple compare values block from the MATH category.
- The purple number value block from the MATH category.
The code breaks down as follows: “if” the reset button is pressed once (during the last reset), the program will “do” whatever code is inserted in the keyed bracket. This code is not complete because there is nothing for it to “do” as it is shown. By inserting a program or command into the bracketed space, you create a way to execute it with the press of the reset button.
You can modify or enhance the code by changing the value of the number value block, so that some other number of button presses is required. You can copy the whole code multiple times and use it to execute different functions based on the number of button presses (from 1 up to 8 choices). This is how the default 8-demonstration program that came pre-programmed on your S3 works.
Remember that the S3 will track the number of presses, giving you feedback with the LEDs as described above, because those instructions are part of your robot’s core program.
This code can be added to the code of any of the examples that follow in the Learn S3 tutorials. As you experiment with new programs, challenge yourself to utilize the tools you’ve learned such as this one. You may be surprised at what you are capable of creating without the aid of step-by-step instructions like these. Or, you can run the code shown in each example exactly as it’s shown, tucking this information away for later use. As the programmer of your S3 robot, you are in charge!
Did You Know?
Button-press monitoring code is hidden in a lot of electronic gadgets that you use regularly. This sort of code allows users to make intuitive choices about what a device will do. Though we use such a feature regularly in our everyday lives (anything electronic with buttons probably uses it), we are often unaware or blind to its presence because it is so common.
Try This!
- Add a single reset button press start-up to your “Hello World!” program.
Keep in mind that when you run the program the Terminal will open, but the Hello World! message will not be sent until you press the reset button.
Your Turn!
- As you proceed with these tutorials, find a way to add this code to the new code you learn. It may be most useful when you need to test, run, or re-run code multiple times.
- Add a second if…do button press block set with a different value. For example, you could do something like “press the reset button once – message Hello World!, press the reset button twice – light an LED.”
Special thanks to Parallax friend Whit Stodghill for his assistance in writing, editing, and testing material for these S3 tutorials.