Skip to content
Parallax Learn

Parallax Learn

  • Welcome
  • Tutorials
        • Tutorial Series head tag

          Tutorial Series
        • Tutorial Series

          The special, classroom-ready series pages are organized collections of tutorials for our most popular hardware and/or languages. The tutorials for each topic are conveniently accessible from a single page, shown in the order it is recommended that they be completed.
        • Robotics Series Head tag

          Robotics Series
        • Robotics Series

          • Artificial Intelligence
          • Cybersecurity: Radio Data tutorialCybersecurity
          • cyber:bot + Python
          • cyber:bot + MakeCode
          • Boe-Bot Tutorial SeriesBoe-Bot
          • Arduino Shield-Bot
          • ActivityBot with C TutorialsActivityBot + C
          • ActivityBot with BlocklyProp Tutorial SeriesActivityBot + BlocklyProp
          • Scribbler 3 Tutorial SeriesScribbler 3
        • Electronics & Programming Series Head tag

          Electronics & Programming Series
          • BS2 Board of Education Tutorial SeriesBS2 Board of Education
          • Propeller C-Language BasicsPropeller C Basics
          • FLiP Try-It Kit C Tutorial SeriesFLiP Try-It Kit + C
          • FLiP Try-It Kit BlocklyProp TutorialsFLiP Try-It Kit + BlocklyProp
          • Badge WX Tutorial SeriesBadge WX
          • Propeller BlocklyProp Basics and ProjectsPropeller BlocklyProp Basics
          • View All Tutorial Series »
        • Browse Tutorials
        • Browse Tutorials

          Individual tutorials sorted by robot or kit, and language.
        • By Robot or Kit
          • ActivityBot
          • SumoBot WX
          • Boe-Bot
          • Shield-Bot
          • cyber:bot
          • Badge WX
          • ELEV-8
          • ARLO
        • By Language
        • By Language

          • Propeller C
          • Arduino
          • BlocklyProp
          • PBASIC
          • Python
          • MakeCode
          • View All Tutorials »
  • Educators
  • Reference
  • Downloads
  • Home
  • All Courses
  • Getting Started with BlocklyProp Solo

Getting Started with BlocklyProp Solo

Connect and Program

Now you have BlocklyProp Solo open in Chrome and the Launcher and drivers installed. It’s time to connect your hardware and run your first project.

Connect your Hardware

  • Connect your Propeller board to your computer’s USB port with its programming cable.  Below are the Propeller FLiP module on a breadboard (left) and Propeller Activity Board WX (right).


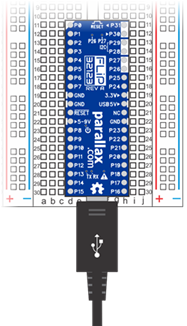
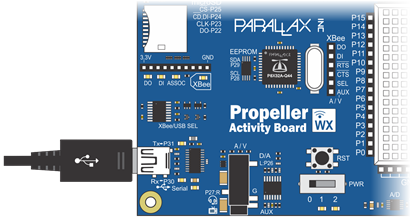
  • Connect the other end of the USB cable to your computer’s USB port. Both the Propeller Activity Board and the Propeller FLiP module are powered through the USB connection.
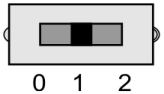
  • If you are using an Activity Board, you will also need to move the power switch to position 1:


Create a Project

BlocklyProp programs are also called “projects.” In the Edit pane, you build a project by making selections from the gray block menu to the right of the Edit pane.

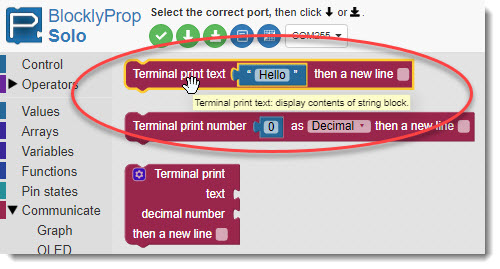
  • Click Communicate, then Terminal.


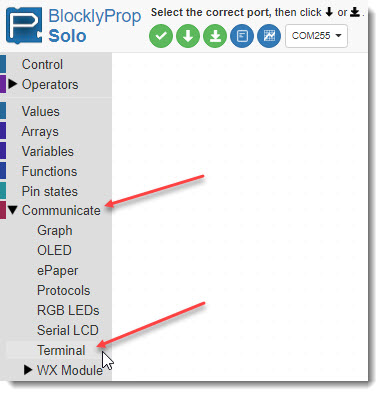
  • A palette of Terminal blocks will appear.  Notice that if you hover over a block, a yellow flyover message will give you hints about its use.
  • Click on the Terminal print text block to place it in the Editor pane.


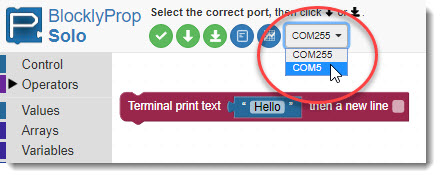
  • From the port dropdown menu, select the COM port connected to your Propeller board.


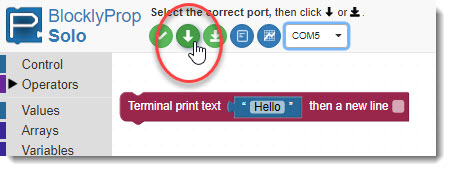
  • Click the arrow button to run the project once. (It won’t be saved to the memory on your Propeller board.)


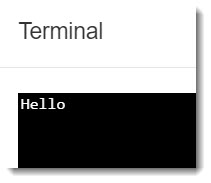
A terminal should open up, showing the “Hello!” messsage.


  • If you instead get an error message like the one below:
    • Check to make sure your USB cable is connect to both the board and the computer.
    • If you are using the Propeller Activity Board WX, make sure its Power switch is in position 1 or 2.
    • Check the port number in the error message. Then, check the port options in the BlocklyProp dropdown. If there is another port listed there, try it instead.


  • Back in the Edit pane, click inside the Terminal print text block and change the Hello message to something else.
  • Also check the new line box at the end of the block.

  • Click the Load RAM arrow button again to see your new message displayed.


Printer-friendly version
BlocklyProp Launcher
Prev
Saving Projects
Next

DISCUSSION FORUMS | PARALLAX INC. STORE

About | Terms of Use | Feedback: learn@parallax.com | Copyright©Parallax Inc. 2024

© 2025 Parallax Learn • Built with GeneratePress