Skip to content
Parallax Learn

Parallax Learn

  • Welcome
  • Tutorials
        • Tutorial Series head tag

          Tutorial Series
        • Tutorial Series

          The special, classroom-ready series pages are organized collections of tutorials for our most popular hardware and/or languages. The tutorials for each topic are conveniently accessible from a single page, shown in the order it is recommended that they be completed.
        • Robotics Series Head tag

          Robotics Series
        • Robotics Series

          • Artificial Intelligence
          • Cybersecurity: Radio Data tutorialCybersecurity
          • cyber:bot + Python
          • cyber:bot + MakeCode
          • Boe-Bot Tutorial SeriesBoe-Bot
          • Arduino Shield-Bot
          • ActivityBot with C TutorialsActivityBot + C
          • ActivityBot with BlocklyProp Tutorial SeriesActivityBot + BlocklyProp
          • Scribbler 3 Tutorial SeriesScribbler 3
        • Electronics & Programming Series Head tag

          Electronics & Programming Series
          • BS2 Board of Education Tutorial SeriesBS2 Board of Education
          • Propeller C-Language BasicsPropeller C Basics
          • FLiP Try-It Kit C Tutorial SeriesFLiP Try-It Kit + C
          • FLiP Try-It Kit BlocklyProp TutorialsFLiP Try-It Kit + BlocklyProp
          • Badge WX Tutorial SeriesBadge WX
          • Propeller BlocklyProp Basics and ProjectsPropeller BlocklyProp Basics
          • View All Tutorial Series »
        • Browse Tutorials
        • Browse Tutorials

          Individual tutorials sorted by robot or kit, and language.
        • By Robot or Kit
          • ActivityBot
          • SumoBot WX
          • Boe-Bot
          • Shield-Bot
          • cyber:bot
          • Badge WX
          • ELEV-8
          • ARLO
        • By Language
        • By Language

          • Propeller C
          • Arduino
          • BlocklyProp
          • PBASIC
          • Python
          • MakeCode
          • View All Tutorials »
  • Educators
  • Reference
  • Downloads
  • Home
  • All Courses
  • Gripper 3.0 Assembly Instructions

Gripper 3.0 Assembly Instructions

Assemble the Arms

Put the safety glasses on immediately! The Gripper has small parts, including a torsion spring which may be inadvertently released during assembly.

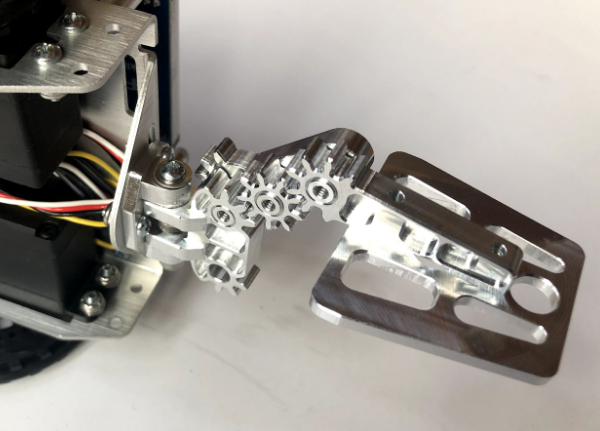
An Arm connects each Finger to the Base, from the top side. Each Arm has three posts pointing downward: one on the thin end for a Finger, one on the geared end for the Base, and one in the center for the Idler Gear that slips between the Finger and Base gears. A Gear Plate on the bottom holds the pieces together.

  • Turn your robot on its side. Place the geared end of the Arm on the Base, sliding the post into one hole on the Base.
  • Put a Finger on the post at the other end of the Arm, so that the paddle faces inward.
  • Place an Idler Gear on the middle post of the Arm, between the Base and Finger gears.
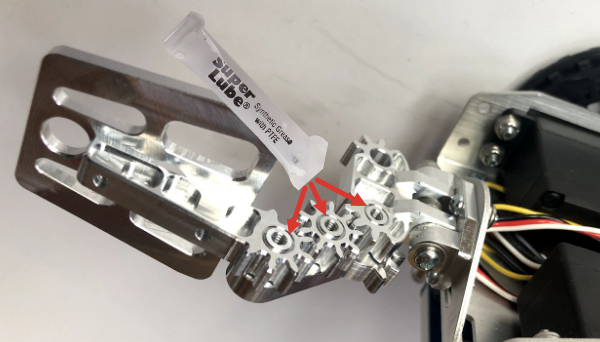
  • Snip the end off of your Super Lube PTFE grease and place a very small amount of it on the seam between each post and gear, where the metal pieces move together. (Then save the grease, you will need it again in a later step.)
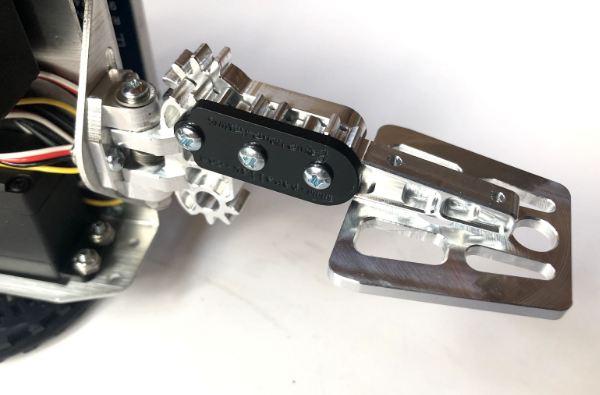
  • Using (3) 4-40 ¼” panhead screws, attach the black, laser-cut Gear Plate to the bottom of the Arm posts as shown.
  • Tighten the screws against the Gear Plate; this will not cause the gears to bind. The Gear Plate will help to minimize the potential for catching your fingers when picking up a robot with a moving Gripper mounted on the front.
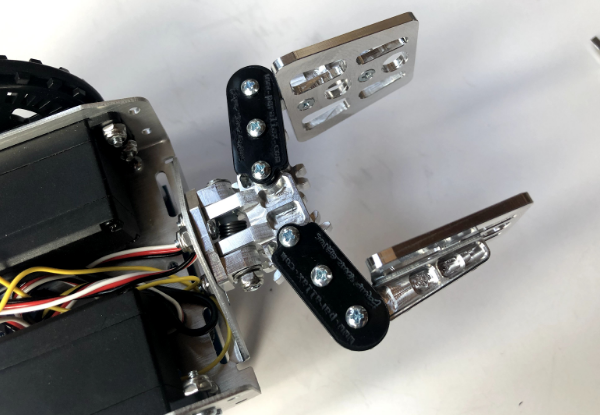
  • Repeat the previous step for the other side. The full assembly looks like this, from the bottom. 

Printer-friendly version

Leave a Comment Cancel reply

Attach Paddles to Fingers
Prev
Attach the Brass Rod
Next

DISCUSSION FORUMS | PARALLAX INC. STORE

About | Terms of Use | Feedback: learn@parallax.com | Copyright©Parallax Inc. 2024

© 2025 Parallax Learn • Built with GeneratePress