Sense Distance with a PING)))
The PING))) Ultrasonic Distance Sensor
The PING))) measures the round-trip echo time of ultrasonic sound to determine how far away an object is, and can measure distances anywhere from 3 centimeters to 3 meters. In addition to being a great distance sensor for robots, the PING))) is also useful for things such as detecting when a person passes through a doorway, approaches art exhibits, and walks near holiday props.
Want to go a bit more in depth? Check out this article about the speed of sound vs. air temperature, and learn how the temperature of your environment can impact distance measurements from your PING))) sensor.
Connection and Parts
The PING))) sensor only needs three connections to do its job: I/O pin, power, and ground. The connections are easily accessible at the Hacker Port, making for a simple hacking project with the S3. BlocklyProp makes programming the PING))) simple and fun.
To complete this tutorial, you will need these parts:
- (1) – PING))) Ultrasonic Distance Sensor (#28015)
- (1) – 3-Pin Signal-Power-Ground Cable Extension (8″) (#800-00080)
- S3 robot with programming cable.
- A means of mounting the PING))) sensor (ideas are listed below)
BlocklyProp Test Code
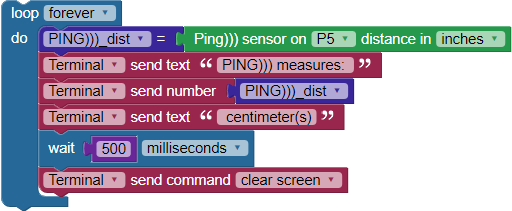
Let’s have some fun in BlocklyProp and test some code. This particular code will display the distance in centimeters to an object placed in front of the sensor, providing Terminal and LED feedback.
- Point your browser to BlocklyProp, login, and begin a new project for the S3. Name your program PING))) Test.
- In the HACKER PORT > SENSORS category, find the Ping))) distance block. With this you can set the unit of measure and the Pin connection. Now, snap together the following program with the settings shown in the image below. (Hint: you will also need the wait block, loop forever block, and the ACTIONS > COMMUNICATE category blocks shown.)
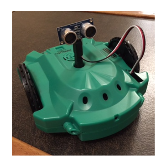
- Find a simple way to mount the PING))) to your S3. The example shown below uses a clothespin wrapped in black tape. Sharpie® pens with the cap on can also work well as a base, since they fit nicely into the pen port. Some sort of tape will likely be needed.
- Orient and seat the connector cable on the PING))) pins so that the black wire is connected to the Ground (GND) column, the red wire is connected to the middle or 5V pin, and the white signal connector is on the SIG column.
- Connect the other end of the cable to the Hacker Port pins at P5, making sure to verify that the wires are connected properly. The black cable wire should be connected to GND.
- Save, compile, load to EEPROM, and run the program.
- Place an object in front of the PING))) sensor and verify that the measurements change appropriately as you move the object closer and farther away.
How it Works
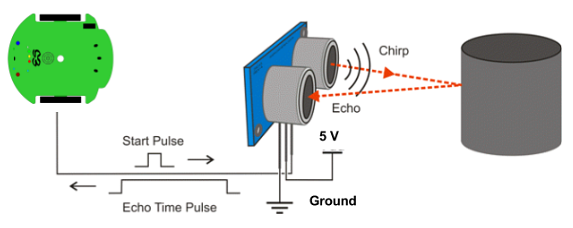
After the PING))) sensor receives a low-high-low start pulse from the S3’s Propeller Chip, it makes a brief ultrasonic chirping sound. Humans cannot hear this ultrasonic cound, but it is loud enough that its own ultrasonic transducer can detect when the echo comes back.
As soon as the PING))) sensor makes its chirp, it sets its output pin high. When the echo comes back, it sets the pin low. The Propeller measures how long the PING))) sensor holds this pin high. This number is the round trip time it takes for the sound to return.
The BlocklyProp Ping))) distance block contains functions that send the start pulse and measure the echo time pulse. It also utilizes functions that use the speed of sound in air to convert the echo time to a specified distance as set in the block.
Your Turn
- Modify your program to connect on a different row of Pins (0-4) of the Hacker Port. Do not use pins A0 or A1.
- Modify your program to measure and display the distance in another unit of measurement on the terminal.
- Create the following new program. Try to predict what it is going to do once you run it.

- Save, compile, load to EEPROM, and run the program.
- Place your hand in front of the PING))) sensor about 2 feet away and watch how the program controls the S3. Can you see how the behavior is controlled by the code shown? Did it do what you thought it would? Why or why not?
Special thanks to Parallax friend Whit Stodghill for his assistance in writing, editing, and testing material for these S3 tutorials.