Skip to content
Parallax Learn

Parallax Learn

  • Welcome
  • Tutorials
        • Tutorial Series head tag

          Tutorial Series
        • Tutorial Series

          The special, classroom-ready series pages are organized collections of tutorials for our most popular hardware and/or languages. The tutorials for each topic are conveniently accessible from a single page, shown in the order it is recommended that they be completed.
        • Robotics Series Head tag

          Robotics Series
        • Robotics Series

          • Artificial Intelligence
          • Cybersecurity: Radio Data tutorialCybersecurity
          • cyber:bot + Python
          • cyber:bot + MakeCode
          • Boe-Bot Tutorial SeriesBoe-Bot
          • Arduino Shield-Bot
          • ActivityBot with C TutorialsActivityBot + C
          • ActivityBot with BlocklyProp Tutorial SeriesActivityBot + BlocklyProp
          • Scribbler 3 Tutorial SeriesScribbler 3
        • Electronics & Programming Series Head tag

          Electronics & Programming Series
          • BS2 Board of Education Tutorial SeriesBS2 Board of Education
          • Propeller C-Language BasicsPropeller C Basics
          • FLiP Try-It Kit C Tutorial SeriesFLiP Try-It Kit + C
          • FLiP Try-It Kit BlocklyProp TutorialsFLiP Try-It Kit + BlocklyProp
          • Badge WX Tutorial SeriesBadge WX
          • Propeller BlocklyProp Basics and ProjectsPropeller BlocklyProp Basics
          • View All Tutorial Series »
        • Browse Tutorials
        • Browse Tutorials

          Individual tutorials sorted by robot or kit, and language.
        • By Robot or Kit
          • ActivityBot
          • SumoBot WX
          • Boe-Bot
          • Shield-Bot
          • cyber:bot
          • Badge WX
          • ELEV-8
          • ARLO
        • By Language
        • By Language

          • Propeller C
          • Arduino
          • BlocklyProp
          • PBASIC
          • Python
          • MakeCode
          • View All Tutorials »
  • Educators
  • Reference
  • Downloads
  • Home
  • All Courses
  • Infrared Light Navigation for the cyber:bot

Infrared Light Navigation for the cyber:bot

Adjust the Detection Range

When it is dark outside, you may have noticed that a brighter flashlight lets you see objects that are further away.  By making the cyber:bot’s infrared LED headlights brighter, you can also increase its detection range.  A smaller resistor allows more current to flow through an LED.  More current through an LED is what causes it to glow more brightly.  In this activity, you will examine the effect of different resistance values with both the red and infrared LEDs.

Parts List
(2)  Resistors, 470 Ω (yellow-violet-brown)
(2)  Resistors, 220 Ω (red-red-brown)
(2)  Resistors, 1 kΩ (brown-black-red)
(2)  Resistors, 4.7 kΩ (yellow-violet-red)
(1)  Red LED
(1)  Misc. Jumper Wire
Piece of white paper
Ruler

LED Brightness

First, let’s use a red LED to actually see the difference that a resistor makes in how brightly an LED glows.  All we need to test the LED circuit is a script that sends a high signal to an LED.

  • Leave all the current IR object detector circuits in place.
  • Put the cyber:bot board’s power switch in position 0.
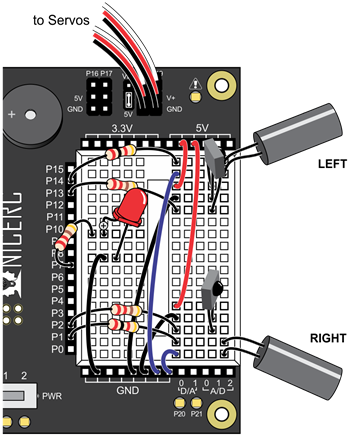
  • Add a red LED circuit connected to P7.

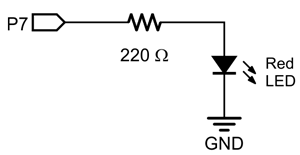
Example script: P7_led_on

  • Use the micro:bit Python Editor to open a previous cyber:bot project, like IR_interference_sniffer or cyberbot-template-with-blink.
  • Set the project’s name to P7_led_on, update the script so that it matches the one below, and then click Save.
  • Click Send to micro:bit.  
# P7_led_on

from cyberbot import *

bot(7).write_digital(1)
  • Put the cyber:bot board’s PWR switch in position 1.
  • Verify that the LED in the circuit connected to P7 emits light.

Try this: Test LED Brightness with Different Resistors

  • As you work, put set the cyber:bot board’s PWR switch to position 0 for changing resistors, and to position 1 for running the test.  When you set the PWR switch back to 1, the same script will run, so you can pick up right where you left off with each test.
    • Replace the 220 Ω resistor that goes from pin 7 to the LED’s cathode with a 470 Ω resistor. Note now how brightly the LED glows.
    • Repeat with a 1 kΩ resistor. Is the red LED brighter or dimmer?
    • Repeat once more with a 4.7 kΩ resistor.  Now how bright, or dim, is the red LED?
    • You can remove the 4.7 kΩ resistor, red LED, and jumper wire before moving on to the next portion of this activity.
    • Explain in your own words the relationship between LED brightness and series resistance.

Printer-friendly version
Check for IR Interference
Prev
Series Resistance and Range
Next

DISCUSSION FORUMS | PARALLAX INC. STORE

About | Terms of Use | Feedback: learn@parallax.com | Copyright©Parallax Inc. 2024

© 2025 Parallax Learn • Built with GeneratePress