Skip to content
Parallax Learn

Parallax Learn

  • Welcome
  • Tutorials
        • Tutorial Series head tag

          Tutorial Series
        • Tutorial Series

          The special, classroom-ready series pages are organized collections of tutorials for our most popular hardware and/or languages. The tutorials for each topic are conveniently accessible from a single page, shown in the order it is recommended that they be completed.
        • Robotics Series Head tag

          Robotics Series
        • Robotics Series

          • Artificial Intelligence
          • Cybersecurity: Radio Data tutorialCybersecurity
          • cyber:bot + Python
          • cyber:bot + MakeCode
          • Boe-Bot Tutorial SeriesBoe-Bot
          • Arduino Shield-Bot
          • ActivityBot with C TutorialsActivityBot + C
          • ActivityBot with BlocklyProp Tutorial SeriesActivityBot + BlocklyProp
          • Scribbler 3 Tutorial SeriesScribbler 3
        • Electronics & Programming Series Head tag

          Electronics & Programming Series
          • BS2 Board of Education Tutorial SeriesBS2 Board of Education
          • Propeller C-Language BasicsPropeller C Basics
          • FLiP Try-It Kit C Tutorial SeriesFLiP Try-It Kit + C
          • FLiP Try-It Kit BlocklyProp TutorialsFLiP Try-It Kit + BlocklyProp
          • Badge WX Tutorial SeriesBadge WX
          • Propeller BlocklyProp Basics and ProjectsPropeller BlocklyProp Basics
          • View All Tutorial Series »
        • Browse Tutorials
        • Browse Tutorials

          Individual tutorials sorted by robot or kit, and language.
        • By Robot or Kit
          • ActivityBot
          • SumoBot WX
          • Boe-Bot
          • Shield-Bot
          • cyber:bot
          • Badge WX
          • ELEV-8
          • ARLO
        • By Language
        • By Language

          • Propeller C
          • Arduino
          • BlocklyProp
          • PBASIC
          • Python
          • MakeCode
          • View All Tutorials »
  • Educators
  • Reference
  • Downloads
  • Home
  • All Courses
  • Infrared Light Navigation for the cyber:bot

Infrared Light Navigation for the cyber:bot

Build the IR Circuits

In this activity, you will build infrared object detector circuits on the cyber:bot robot’s breadboard.
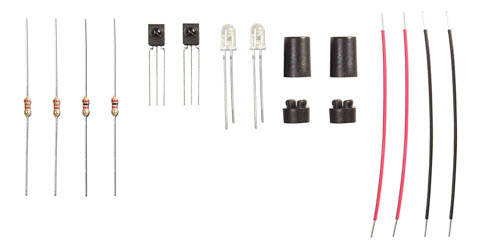
Parts List
(2)  IR receivers
(2)  IR LEDs (clear case)
(2)  IR LED shield assemblies
(2)  Resistors, 220 Ω (red-red-brown)
(2)  Resistors, 2 kΩ (red-black-red)
(misc) Jumper wires

Gather the parts in the Parts List, using the drawings below to help identify the infrared receivers, LEDs, and shield assembly parts.

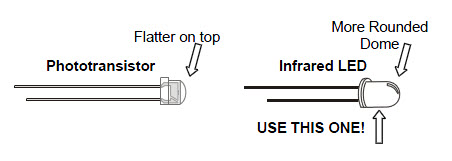
Make sure you are using infrared LEDs and not phototransistors.  The infrared LED has a taller and more rounded plastic dome:

Assemble the IR Headlights

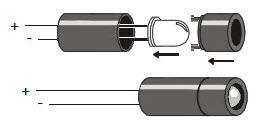
The infrared LEDs are designed to sit in the standoff tubes a certain way.  The flat spot on the LED dome matches a flat ledge inside the tube. Holes on the bottom of the tube are labeled for the anode (+) and cathode (-) leads.

  • Insert the infrared LED into the LED standoff tube, threading the anode and cathode leads through their respective holes in the bottom.  If properly aligned, the LED should drop in place without pushing.
  • Slip the short tube over the IR LED’s clear plastic case, tab end first. The tabs should snap into the standoff, holding the LED in place.

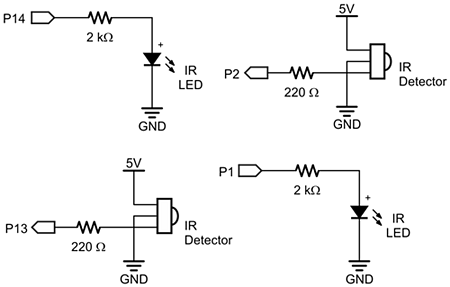
IR Object Detection Circuit

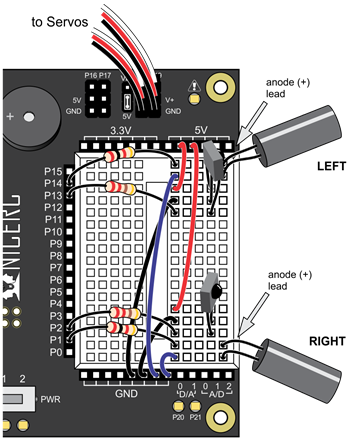
Each IR object detector requires its own IR LED and IR receiver, mounted together on a corner of the breadboard closest to the very front of the cyber:bot.

Note that the anode lead of each IR LED connects to a 2 kΩ resistor (red-black-red).  Also note that each IR LED and each IR receiver has its own ground connection wire.  In the diagram, the IR LED ground wires are shown in blue to help tell them apart.

  • Put the cyber:bot board’s power switch in position 0 — standard practice before building or modifying circuits.
  • Build the circuit in the schematic below, using the wiring diagram as a reference for parts placement.


Watch your IR LED anodes and cathodes!  
The anode lead is the longer lead on an IR LED by convention. The cathode lead is shorter and mounted in the plastic case closer to its flat spot.  These are the same conventions as the red LEDs in the kit.


Printer-friendly version
Infrared Light Signals
Prev
Test the IR Object Detectors
Next

DISCUSSION FORUMS | PARALLAX INC. STORE

About | Terms of Use | Feedback: learn@parallax.com | Copyright©Parallax Inc. 2024

© 2025 Parallax Learn • Built with GeneratePress