Add Obstacle Detection
Your Turn: Add Obstacle Detection Override
Right now, you can drive your ActivityBot right into an obstacle. But, if you already have the Ping))) Ultrasonic Distance Sensor or the whisker switches on board, you can program your ActivityBot for a little self-preservation!
The key is making the existing remote control loop conditional. That will let the remote control code run as long as no obstacle is detected. Placing this conditional loop inside of a repeat forever loop, and adding code for what to do If an obstacle is detected, is all it takes for the ActivityBot to defend itself!
Adding Code for Whisker Switches & Piezospeaker
- If your ActivityBot does not have a built and tested piezospeaker circuit, add it now.
- If your ActivityBot does not have built and tested whisker switches, add them now.
- Start with your original IR Remote Drive code, and save a copy as IR Remote Drive with Whiskers.
- Change the repeat forever loop into a repeat while loop with the block’s dropdown menu.
- As shown below, attach the following condition to repeat while: ((check PIN 7 + check PIN 8) = 2). Remember, the whisker switches are active-low. So, as long as their states add up to 2, neither one is being pressed and so the ActivityBot has not hit an obstacle.
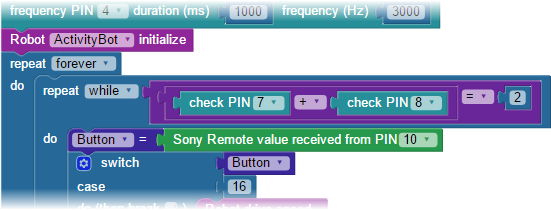
- Place the repeat while loop into a repeat forever loop, as shown above.
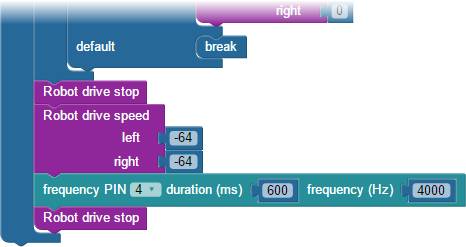
- At the bottom of the repeat forever loop, just after the repeat while loop, add the code shown below. It will make the ActivityBot stop, drive backward, play a beep for 600 ms, then stop again. This code will only be used if the repeat while condition does not equal 2 meaning one or both whiskers are pressed.
- Save the project and load it into your ActivityBot’s EEPROM.
- Take it for a test drive, and try to make the ActivityBot drive into a wall. It should automatically beep and back up, even if you hold the button down to make it drive forward.
Adding Code for PING))) Sensor & Piezospeaker
- If your ActivityBot does not have a built and tested piezospeaker circuit, add it now.
- If your ActivityBot does not have a built and tested PING))) Ultrasonic Distance Sensor circuit, add it now.
- Start with your original IR Remote Drive code, and save a copy as IR Remote Drive with Ping.
- Change the repeat forever loop into a repeat while loop with the block’s dropdown menu.
- As shown below, attach the following condition to repeat while: (Ping))) distance in cm > 15). So, this loop will only execute if the ActivityBot is more than 15 cm away from a detectable object.
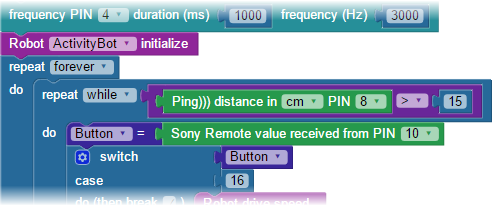
- Place this repeat while loop into a repeat forever loop, as shown above.
- At the bottom of the repeat forever loop, just after the repeat while loop, add the code shonw below. At will make the ActivityBot stop, drive backward, play a beep for 600 ms, then stop again. This code will only be used if the condition (Ping))) distance in cm > 15) is no longer true, meaning the ActivityBot has come within 15 cm of an object. (Yes, these are the same blocks that the Whisker Switches used above.)
- Save the project and load it into your ActivityBot’s EEPROM.
- Take it for a test drive, and try to make the ActivityBot drive into a wall. It should automatically beep and back up, even if you hold the button down to make it drive forward.