Skip to content
Parallax Learn

Parallax Learn

  • Welcome
  • Tutorials
        • Tutorial Series head tag

          Tutorial Series
        • Tutorial Series

          The special, classroom-ready series pages are organized collections of tutorials for our most popular hardware and/or languages. The tutorials for each topic are conveniently accessible from a single page, shown in the order it is recommended that they be completed.
        • Robotics Series Head tag

          Robotics Series
        • Robotics Series

          • Artificial Intelligence
          • Cybersecurity: Radio Data tutorialCybersecurity
          • cyber:bot + Python
          • cyber:bot + MakeCode
          • Boe-Bot Tutorial SeriesBoe-Bot
          • Arduino Shield-Bot
          • ActivityBot with C TutorialsActivityBot + C
          • ActivityBot with BlocklyProp Tutorial SeriesActivityBot + BlocklyProp
          • Scribbler 3 Tutorial SeriesScribbler 3
        • Electronics & Programming Series Head tag

          Electronics & Programming Series
          • BS2 Board of Education Tutorial SeriesBS2 Board of Education
          • Propeller C-Language BasicsPropeller C Basics
          • FLiP Try-It Kit C Tutorial SeriesFLiP Try-It Kit + C
          • FLiP Try-It Kit BlocklyProp TutorialsFLiP Try-It Kit + BlocklyProp
          • Badge WX Tutorial SeriesBadge WX
          • Propeller BlocklyProp Basics and ProjectsPropeller BlocklyProp Basics
          • View All Tutorial Series »
        • Browse Tutorials
        • Browse Tutorials

          Individual tutorials sorted by robot or kit, and language.
        • By Robot or Kit
          • ActivityBot
          • SumoBot WX
          • Boe-Bot
          • Shield-Bot
          • cyber:bot
          • Badge WX
          • ELEV-8
          • ARLO
        • By Language
        • By Language

          • Propeller C
          • Arduino
          • BlocklyProp
          • PBASIC
          • Python
          • MakeCode
          • View All Tutorials »
  • Educators
  • Reference
  • Downloads
  • Home
  • All Courses
  • IR SumoBot WX Opponent Detection and Tracking

IR SumoBot WX Opponent Detection and Tracking

Install the Front IR LEDs and Receivers

Parts:

  • (1) SumoBot, built up at least through the end of the Install the QTI Sensors page
  • (2) IR LEDs
  • (2) IR LED standoffs
  • (2) IR LED light shields
  • (2) IR Receivers


Prep:

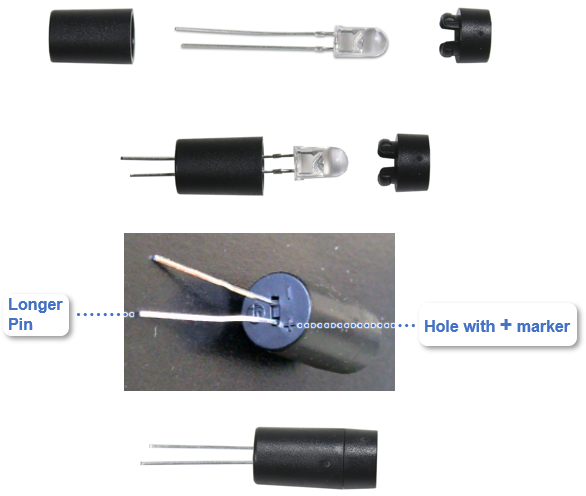
  • Insert each IR LED into a standoff so that its longer leg passes through the hole with the + mark by it.  The shorter leg should pass through the hole with the – mark by it.
  • Press each IR LED into the standoff so that it snaps into place.
  • Snap each IR shield onto a standoff.


Installation:

  • Set the SumoBot’s POWER switch to 0.
  • If red LEDs are in the P5 and P6 sockets from previous activities, remove them now.
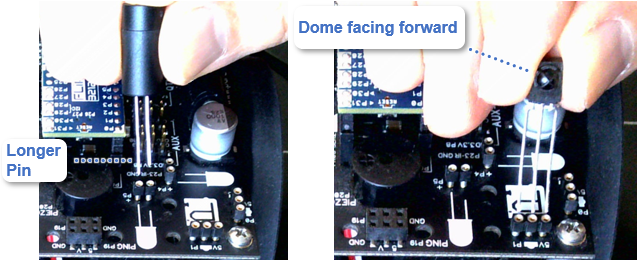
  • Insert the first LED into the P5 pair of sockets. Make sure the longer + pin goes into the socket labeled P5.  Also, make sure both pins are firmly seated in their sockets.  It’s okay to bend the longer pin a little to get the shorter pin to sink all the way into its socket.
  • With the dome on the IR receiver facing forward, insert it into the 5V…P1 sockets.  Make sure all three pins are firmly seated as well.
  • Repeat with a second IR LED into the P6 pair of sockets and a second IR receiver into the 5V…P2 sockets.


  • Bend the IR LEDs down so that they rest on the SumoBot board.  They should be level and pointing forward.  They should also be pointing slightly outward to the left and right.

Trimming the leads — The pictures show the leads of these parts untrimmed.  It’s best to leave them that way for now.  Before an actual match, the leads can be trimmed shorter to prevent bending if your robot gets toppled.  After trimming the LED leads, the LED won’t have a long and short pin, so you will need to use the + marker on the plastic standoff to figure out which lead goes into the +P5 and +P6 sockets.  Keep in mind, if you trim them too short, they won’t be usable.  So as a first step, it’s best to trim them so that the leads are still about twice as long as you think they should be.  Then, remove a little at a time until you get the best fit.  


Printer-friendly version
Terminal IR Distance Measurements Tests
Next

DISCUSSION FORUMS | PARALLAX INC. STORE

About | Terms of Use | Feedback: learn@parallax.com | Copyright©Parallax Inc. 2024

© 2025 Parallax Learn • Built with GeneratePress