Skip to content
Parallax Learn

Parallax Learn

  • Welcome
  • Tutorials
        • Tutorial Series head tag

          Tutorial Series
        • Tutorial Series

          The special, classroom-ready series pages are organized collections of tutorials for our most popular hardware and/or languages. The tutorials for each topic are conveniently accessible from a single page, shown in the order it is recommended that they be completed.
        • Robotics Series Head tag

          Robotics Series
        • Robotics Series

          • Artificial Intelligence
          • Cybersecurity: Radio Data tutorialCybersecurity
          • cyber:bot + Python
          • cyber:bot + MakeCode
          • Boe-Bot Tutorial SeriesBoe-Bot
          • Arduino Shield-Bot
          • ActivityBot with C TutorialsActivityBot + C
          • ActivityBot with BlocklyProp Tutorial SeriesActivityBot + BlocklyProp
          • Scribbler 3 Tutorial SeriesScribbler 3
        • Electronics & Programming Series Head tag

          Electronics & Programming Series
          • BS2 Board of Education Tutorial SeriesBS2 Board of Education
          • Propeller C-Language BasicsPropeller C Basics
          • FLiP Try-It Kit C Tutorial SeriesFLiP Try-It Kit + C
          • FLiP Try-It Kit BlocklyProp TutorialsFLiP Try-It Kit + BlocklyProp
          • Badge WX Tutorial SeriesBadge WX
          • Propeller BlocklyProp Basics and ProjectsPropeller BlocklyProp Basics
          • View All Tutorial Series »
        • Browse Tutorials
        • Browse Tutorials

          Individual tutorials sorted by robot or kit, and language.
        • By Robot or Kit
          • ActivityBot
          • SumoBot WX
          • Boe-Bot
          • Shield-Bot
          • cyber:bot
          • Badge WX
          • ELEV-8
          • ARLO
        • By Language
        • By Language

          • Propeller C
          • Arduino
          • BlocklyProp
          • PBASIC
          • Python
          • MakeCode
          • View All Tutorials »
  • Educators
  • Reference
  • Downloads
  • Home
  • All Courses

LED Lights

Curriculum

  • 1 Section
  • 41 Lessons
  • Lifetime
Expand all sectionsCollapse all sections
  • LED Lights
    41
    • 1.0
      Connect and Blink a Light
    • 1.1
      Script and Tests
    • 1.2
      How it Works
    • 1.3
      On-Off Signals
    • 1.4
      Review and Practice
    • 1.5
      Solutions
    • 1.6
      Set Brightness with a Script
    • 1.7
      Script and Tests
    • 1.8
      How it Works
    • 1.9
      More About A/D
    • 1.10
      Review and Practice
    • 1.11
      Solutions
    • 1.12
      Add a Light
    • 1.13
      Script and Tests
    • 1.14
      How it Works
    • 1.15
      Sequential Blinks
    • 1.16
      Review and Practice
    • 1.17
      Solutions
    • 1.18
      Intro to Lists
    • 1.19
      How it Works
    • 1.20
      Other Data Types in Lists
    • 1.21
      Review and Practice
    • 1.22
      Solutions
    • 1.23
      Blink Sequencing
    • 1.24
      Script and Tests
    • 1.25
      How it Works
    • 1.26
      Zip Lists Together
    • 1.27
      Review and Practice
    • 1.28
      Solutions
    • 1.29
      Measure Blinking Light with a Voltmeter
    • 1.30
      Script and Tests
    • 1.31
      How it Works
    • 1.32
      Change the Resistance
    • 1.33
      Review and Practice
    • 1.34
      Solutions
    • 1.35
      Measure Light with an Oscilloscope
    • 1.36
      Script and Tests
    • 1.37
      How it Works
    • 1.38
      Setting a Trigger
    • 1.39
      Review and Practice
    • 1.40
      Solutions

Blink Sequencing

In Add a Light you built a second LED and wrote scripts to control both of them.  In Intro to Lists, you got to see how to create and access lists.  In this activity, you will add a third LED, and then use lists to set up custom LED on/off sequences.  You will even use a list of LED pins and a list of on times in the same for loop to fully customize the light sequence.

Parts

(1) Setup from Add a Light
(1) LED – Red
(1) Resistor – 220 Ω (red-red-brown-gold)
(1) Jumper wire (black)
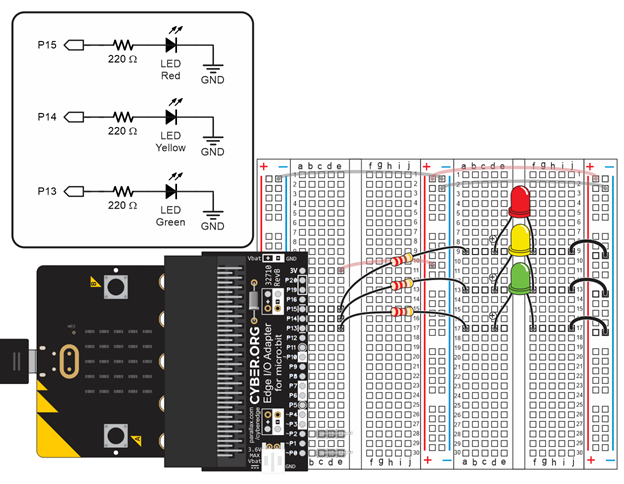
Circuit

  • Disconnect USB.
  • Connect a red LED to P15.  Build it above the yellow and green LEDs so that it looks like a stop light (red above yellow above green).
  • Reconnect USB.


Printer-friendly version
Solutions
Prev
Script and Tests
Next

DISCUSSION FORUMS | PARALLAX INC. STORE

About | Terms of Use | Feedback: learn@parallax.com | Copyright©Parallax Inc. 2024

© 2026 Parallax Learn • Built with GeneratePress