Skip to content
Parallax Learn

Parallax Learn

  • Welcome
  • Tutorials
        • Tutorial Series head tag

          Tutorial Series
        • Tutorial Series

          The special, classroom-ready series pages are organized collections of tutorials for our most popular hardware and/or languages. The tutorials for each topic are conveniently accessible from a single page, shown in the order it is recommended that they be completed.
        • Robotics Series Head tag

          Robotics Series
        • Robotics Series

          • Artificial Intelligence
          • Cybersecurity: Radio Data tutorialCybersecurity
          • cyber:bot + Python
          • cyber:bot + MakeCode
          • Boe-Bot Tutorial SeriesBoe-Bot
          • Arduino Shield-Bot
          • ActivityBot with C TutorialsActivityBot + C
          • ActivityBot with BlocklyProp Tutorial SeriesActivityBot + BlocklyProp
          • Scribbler 3 Tutorial SeriesScribbler 3
        • Electronics & Programming Series Head tag

          Electronics & Programming Series
          • BS2 Board of Education Tutorial SeriesBS2 Board of Education
          • Propeller C-Language BasicsPropeller C Basics
          • FLiP Try-It Kit C Tutorial SeriesFLiP Try-It Kit + C
          • FLiP Try-It Kit BlocklyProp TutorialsFLiP Try-It Kit + BlocklyProp
          • Badge WX Tutorial SeriesBadge WX
          • Propeller BlocklyProp Basics and ProjectsPropeller BlocklyProp Basics
          • View All Tutorial Series »
        • Browse Tutorials
        • Browse Tutorials

          Individual tutorials sorted by robot or kit, and language.
        • By Robot or Kit
          • ActivityBot
          • SumoBot WX
          • Boe-Bot
          • Shield-Bot
          • cyber:bot
          • Badge WX
          • ELEV-8
          • ARLO
        • By Language
        • By Language

          • Propeller C
          • Arduino
          • BlocklyProp
          • PBASIC
          • Python
          • MakeCode
          • View All Tutorials »
  • Educators
  • Reference
  • Downloads
  • Home
  • All Courses
  • LED Lights

LED Lights

How it Works

How the led_blink Script Controls the LED Circuit

This animation shows how the led_blink script causes the micro:bit to alternate between connecting P14 to the 3.3 V (+) and GND (-) power connections.  

(View full-size: blink-light-script-circuit-how.mp4)
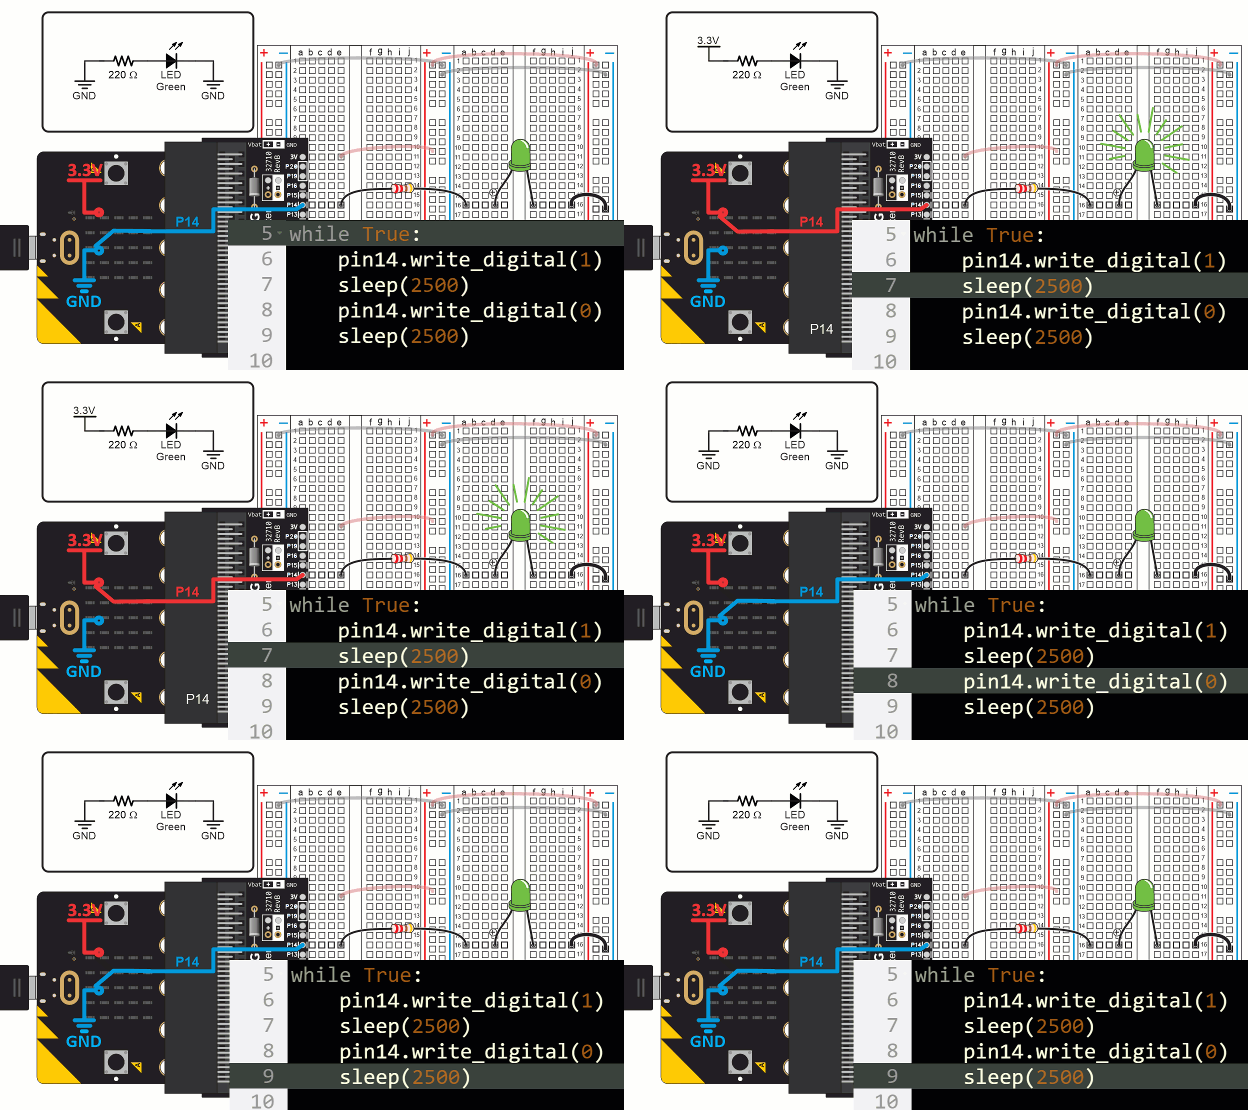
The first statement in the led_blink script’s while True loop is pin14. write_digital(1).  This causes the micro:bit to connect P14 to its 3.3 V supply.  Since the LED circuit on the breadboard is connected to P14, it turns the light on, just like when you connected it to a socket by the red (+) line in the bus strip. Then, sleep(2500) tells the micro:bit to wait for 2.5 s before continuing.  The effect is that the light stays on during that time.  

When the script reaches pin14.write_digital(0), it causes the micro:bit to connect P14 to its GND (0 V) supply.  This is the same as if you were to connect the LED’s resistor to a socket by the blue (-) line on the bus strip.  Since the other end of the LED circuit is also connected to GND, it means there’s no electrical pressure across the LED circuit, so no current flows through it and the LED does not emit light.  After that, sleep(2500) leaves the light off for 2.5 s before the while True loop repeats.

Try This: Blink Timing

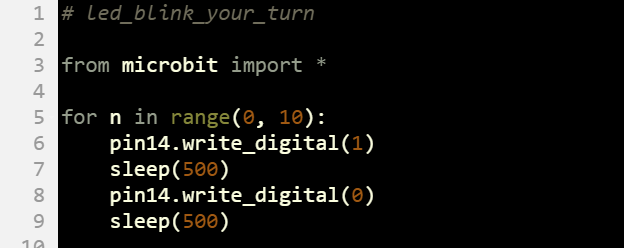
The for …in range(…) loop isn’t just for counting.  You can also use it to repeat statements a certain number of times without making use of the value of the counting variable.  Here is an example where for n in range(0, 10): makes the light blink 10 times.    

  • Change the project name to led_blink_your_turn.  
  • Update your script to match the one below, then click Save.
  • Click Send to micro:bit.
  • Verify that the light blinks 10 times.


Printer-friendly version
Script and Tests
Prev
On-Off Signals
Next

DISCUSSION FORUMS | PARALLAX INC. STORE

About | Terms of Use | Feedback: learn@parallax.com | Copyright©Parallax Inc. 2024

© 2025 Parallax Learn • Built with GeneratePress