Skip to content
Parallax Learn

Parallax Learn

  • Welcome
  • Tutorials
        • Tutorial Series head tag

          Tutorial Series
        • Tutorial Series

          The special, classroom-ready series pages are organized collections of tutorials for our most popular hardware and/or languages. The tutorials for each topic are conveniently accessible from a single page, shown in the order it is recommended that they be completed.
        • Robotics Series Head tag

          Robotics Series
        • Robotics Series

          • Artificial Intelligence
          • Cybersecurity: Radio Data tutorialCybersecurity
          • cyber:bot + Python
          • cyber:bot + MakeCode
          • Boe-Bot Tutorial SeriesBoe-Bot
          • Arduino Shield-Bot
          • ActivityBot with C TutorialsActivityBot + C
          • ActivityBot with BlocklyProp Tutorial SeriesActivityBot + BlocklyProp
          • Scribbler 3 Tutorial SeriesScribbler 3
        • Electronics & Programming Series Head tag

          Electronics & Programming Series
          • BS2 Board of Education Tutorial SeriesBS2 Board of Education
          • Propeller C-Language BasicsPropeller C Basics
          • FLiP Try-It Kit C Tutorial SeriesFLiP Try-It Kit + C
          • FLiP Try-It Kit BlocklyProp TutorialsFLiP Try-It Kit + BlocklyProp
          • Badge WX Tutorial SeriesBadge WX
          • Propeller BlocklyProp Basics and ProjectsPropeller BlocklyProp Basics
          • View All Tutorial Series »
        • Browse Tutorials
        • Browse Tutorials

          Individual tutorials sorted by robot or kit, and language.
        • By Robot or Kit
          • ActivityBot
          • SumoBot WX
          • Boe-Bot
          • Shield-Bot
          • cyber:bot
          • Badge WX
          • ELEV-8
          • ARLO
        • By Language
        • By Language

          • Propeller C
          • Arduino
          • BlocklyProp
          • PBASIC
          • Python
          • MakeCode
          • View All Tutorials »
  • Educators
  • Reference
  • Downloads
  • Home
  • All Courses
  • LED Lights

LED Lights

Other Data Types in Lists


Did You Know: Other Data Types in Lists

Even though you have been working with lists of strings, lists can contain other data types, like int, and a microbit.pin object.  Different types can even appear in the same list.  

my_list = ['yellow', 1000, pin14]

Lists can be changed after they are created.  In Python-speak, the term is mutable.  Here are some ways to change lists in a script:

clist[1] = 'blue'         # replaces 'yellow' to 'blue'

clist.append('yellow')    # adds 'yellow' as the last item in the list

clist.index('red')        # finds the first instance of 'red' in the
                          # list and returns the index

Your application can even use both list items and their index values in a list; here is an example that uses a for loop.  Note how it uses len(clist) instead of 3.  The len(clist) call returns the length of the list.  It is currently 3, but if you added items to the list, the result of a call to len(clist)would automatically increase.  

   for index in range(len(clist)):
        color = clist[index]
        print('index:', index, ', color:', color)
        sleep(1000)
    print()

Here is another example that uses enumerate instead of in range.  Enumerate returns 2 values (a tuple) that contains the index number in the list and the item.  In this example, the index number gets copied to the variable named index, and the color string (’green’, ’yellow’, or ’red’) gets copied to the variable named color.

       for index, color in enumerate(clist):
        print('index:', index, ', color:', color)
        sleep(1000)
    print()    

Your Turn

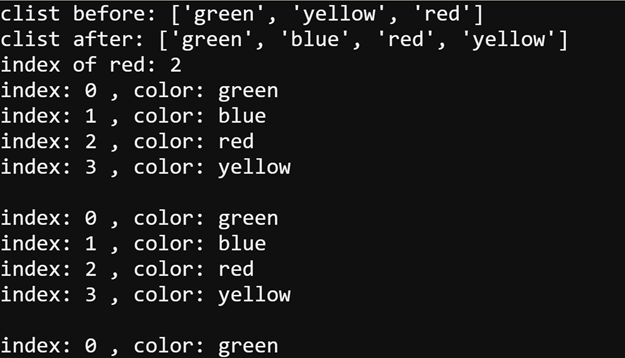
Here is the script from the Try This section on the previous page  with statements from the Did You Know section above added.  It replaces ’yellow’ with ’blue’, adds ’yellow’ after ’red’, and gets the index of ’red’.

  • Change the project name and line 1 comment to first_list_your_turn.
  • Modify the script as shown below, and then click Save.
  • Click Send to micro:bit.


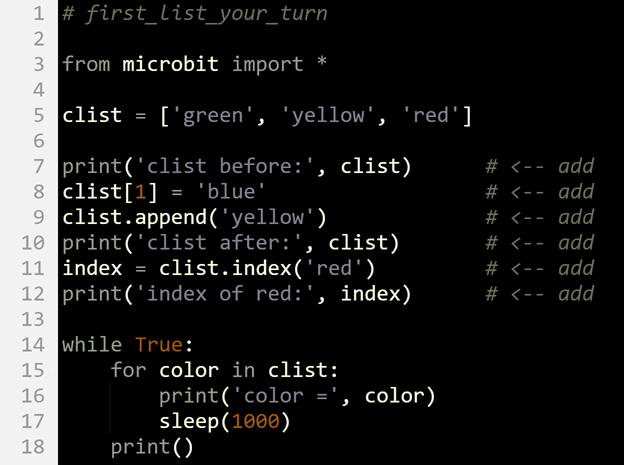
  • If the serial monitor isn’t already open, click Show serial.  
  • Verify that the output matches the example below.

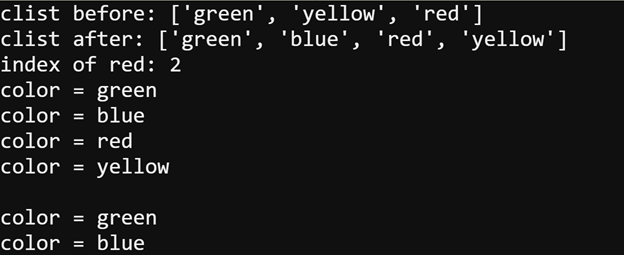
  • Set the project name and line 1 comment to first_list_your_turn_with_index.
  • Use the tips in the Try This section at the bottom of the previous page to modify your script so that it displays both the index and the color.
  • Verify your solution by making sure the serial monitor displays this.
  • Sfter debugging to get it to work, click Save.


Printer-friendly version
How it Works
Prev
Review and Practice
Next

DISCUSSION FORUMS | PARALLAX INC. STORE

About | Terms of Use | Feedback: learn@parallax.com | Copyright©Parallax Inc. 2024

© 2025 Parallax Learn • Built with GeneratePress