Skip to content
Parallax Learn

Parallax Learn

  • Welcome
  • Tutorials
        • Tutorial Series head tag

          Tutorial Series
        • Tutorial Series

          The special, classroom-ready series pages are organized collections of tutorials for our most popular hardware and/or languages. The tutorials for each topic are conveniently accessible from a single page, shown in the order it is recommended that they be completed.
        • Robotics Series Head tag

          Robotics Series
        • Robotics Series

          • Artificial Intelligence
          • Cybersecurity: Radio Data tutorialCybersecurity
          • cyber:bot + Python
          • cyber:bot + MakeCode
          • Boe-Bot Tutorial SeriesBoe-Bot
          • Arduino Shield-Bot
          • ActivityBot with C TutorialsActivityBot + C
          • ActivityBot with BlocklyProp Tutorial SeriesActivityBot + BlocklyProp
          • Scribbler 3 Tutorial SeriesScribbler 3
        • Electronics & Programming Series Head tag

          Electronics & Programming Series
          • BS2 Board of Education Tutorial SeriesBS2 Board of Education
          • Propeller C-Language BasicsPropeller C Basics
          • FLiP Try-It Kit C Tutorial SeriesFLiP Try-It Kit + C
          • FLiP Try-It Kit BlocklyProp TutorialsFLiP Try-It Kit + BlocklyProp
          • Badge WX Tutorial SeriesBadge WX
          • Propeller BlocklyProp Basics and ProjectsPropeller BlocklyProp Basics
          • View All Tutorial Series »
        • Browse Tutorials
        • Browse Tutorials

          Individual tutorials sorted by robot or kit, and language.
        • By Robot or Kit
          • ActivityBot
          • SumoBot WX
          • Boe-Bot
          • Shield-Bot
          • cyber:bot
          • Badge WX
          • ELEV-8
          • ARLO
        • By Language
        • By Language

          • Propeller C
          • Arduino
          • BlocklyProp
          • PBASIC
          • Python
          • MakeCode
          • View All Tutorials »
  • Educators
  • Reference
  • Downloads
  • Home
  • All Courses
  • LED Lights

LED Lights

Setting a Trigger


Did You Know: Oscilloscope Triggers

Oscilloscopes have a trigger feature that allows you to position the entire plot on the screen relative to a certain trigger time and trigger voltage.  The trigger event can be rising or falling.  If the trigger event is rising, it means that the voltage rose above the trigger voltage.  Falling means the voltage fell below the trigger voltage.  The oscilloscope takes the entire plot and aligns that rise or fall event with the vertical trigger time.

When binary on/off signals are plotted, they are described as having rising and falling edges.  The rising edges are the lines that connect 0 V to 2.65 V, and the falling edges are the ones that connect 2.65 V to 0 V.


Your Turn: Set a Trigger

  • In the CYBERscope, set the Trigger dropdown to rise.
  • Wait for 5-10 seconds for the plot to align the signal’s rising edge with the vertical crosshair at 500 ms.

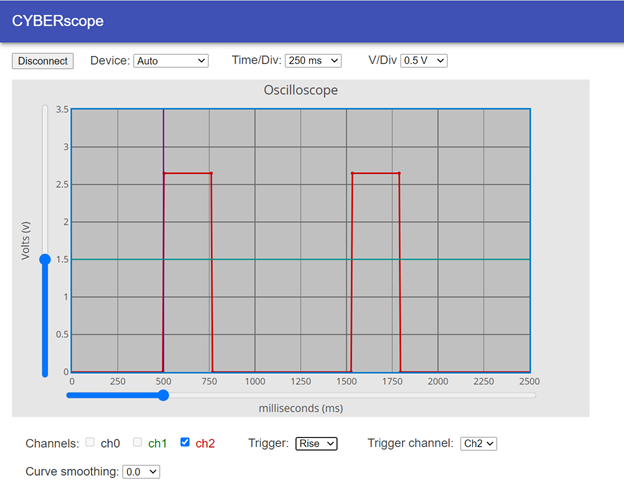
  • Try sliding the trigger time control (blue slider below the plot) right from 500 to 1250.
  • Wait another 5-10 seconds for the plot to snap to the new trigger time.
  • Try setting the Trigger dropdown to Fall.  Describe what happens.


Printer-friendly version
How it Works
Prev
Review and Practice
Next

DISCUSSION FORUMS | PARALLAX INC. STORE

About | Terms of Use | Feedback: learn@parallax.com | Copyright©Parallax Inc. 2024

© 2025 Parallax Learn • Built with GeneratePress