Skip to content
Parallax Learn

Parallax Learn

  • Welcome
  • Tutorials
        • Tutorial Series head tag

          Tutorial Series
        • Tutorial Series

          The special, classroom-ready series pages are organized collections of tutorials for our most popular hardware and/or languages. The tutorials for each topic are conveniently accessible from a single page, shown in the order it is recommended that they be completed.
        • Robotics Series Head tag

          Robotics Series
        • Robotics Series

          • Artificial Intelligence
          • Cybersecurity: Radio Data tutorialCybersecurity
          • cyber:bot + Python
          • cyber:bot + MakeCode
          • Boe-Bot Tutorial SeriesBoe-Bot
          • Arduino Shield-Bot
          • ActivityBot with C TutorialsActivityBot + C
          • ActivityBot with BlocklyProp Tutorial SeriesActivityBot + BlocklyProp
          • Scribbler 3 Tutorial SeriesScribbler 3
        • Electronics & Programming Series Head tag

          Electronics & Programming Series
          • BS2 Board of Education Tutorial SeriesBS2 Board of Education
          • Propeller C-Language BasicsPropeller C Basics
          • FLiP Try-It Kit C Tutorial SeriesFLiP Try-It Kit + C
          • FLiP Try-It Kit BlocklyProp TutorialsFLiP Try-It Kit + BlocklyProp
          • Badge WX Tutorial SeriesBadge WX
          • Propeller BlocklyProp Basics and ProjectsPropeller BlocklyProp Basics
          • View All Tutorial Series »
        • Browse Tutorials
        • Browse Tutorials

          Individual tutorials sorted by robot or kit, and language.
        • By Robot or Kit
          • ActivityBot
          • SumoBot WX
          • Boe-Bot
          • Shield-Bot
          • cyber:bot
          • Badge WX
          • ELEV-8
          • ARLO
        • By Language
        • By Language

          • Propeller C
          • Arduino
          • BlocklyProp
          • PBASIC
          • Python
          • MakeCode
          • View All Tutorials »
  • Educators
  • Reference
  • Downloads
  • Home
  • All Courses

Machine Learning: Train the HUSKYLENS to Recognize (Python)

Curriculum

  • 1 Section
  • 4 Lessons
  • 10 Weeks
Expand all sectionsCollapse all sections
  • Recognition Modes (Python)
    4
    • 1.0
      Recognize Different Colors (Python)
    • 1.1
      Create the Color Training Script (Python)
    • 1.2
      Test the Color Training Script (Python)
    • 1.3
      Other Recognition Modes: Faces, Tags (Python)

Create the Color Training Script (Python)

Script: learn_colors

Now it’s your turn to program the micro:bit. This program will let you change IDs, teach the HUSKYLENS to recognize colors, and erase learned data using the micro:bit buttons and logo touch.

  • If you don’t already have a copy, download microbit_huskylens_proejct.hex.
  • Enter the script below into the micro:bit Python Editor.
  • Update the project name field to learn_colors, then click Save.
  • Use the Send to micro:bit button to load the program into the micro:bit.
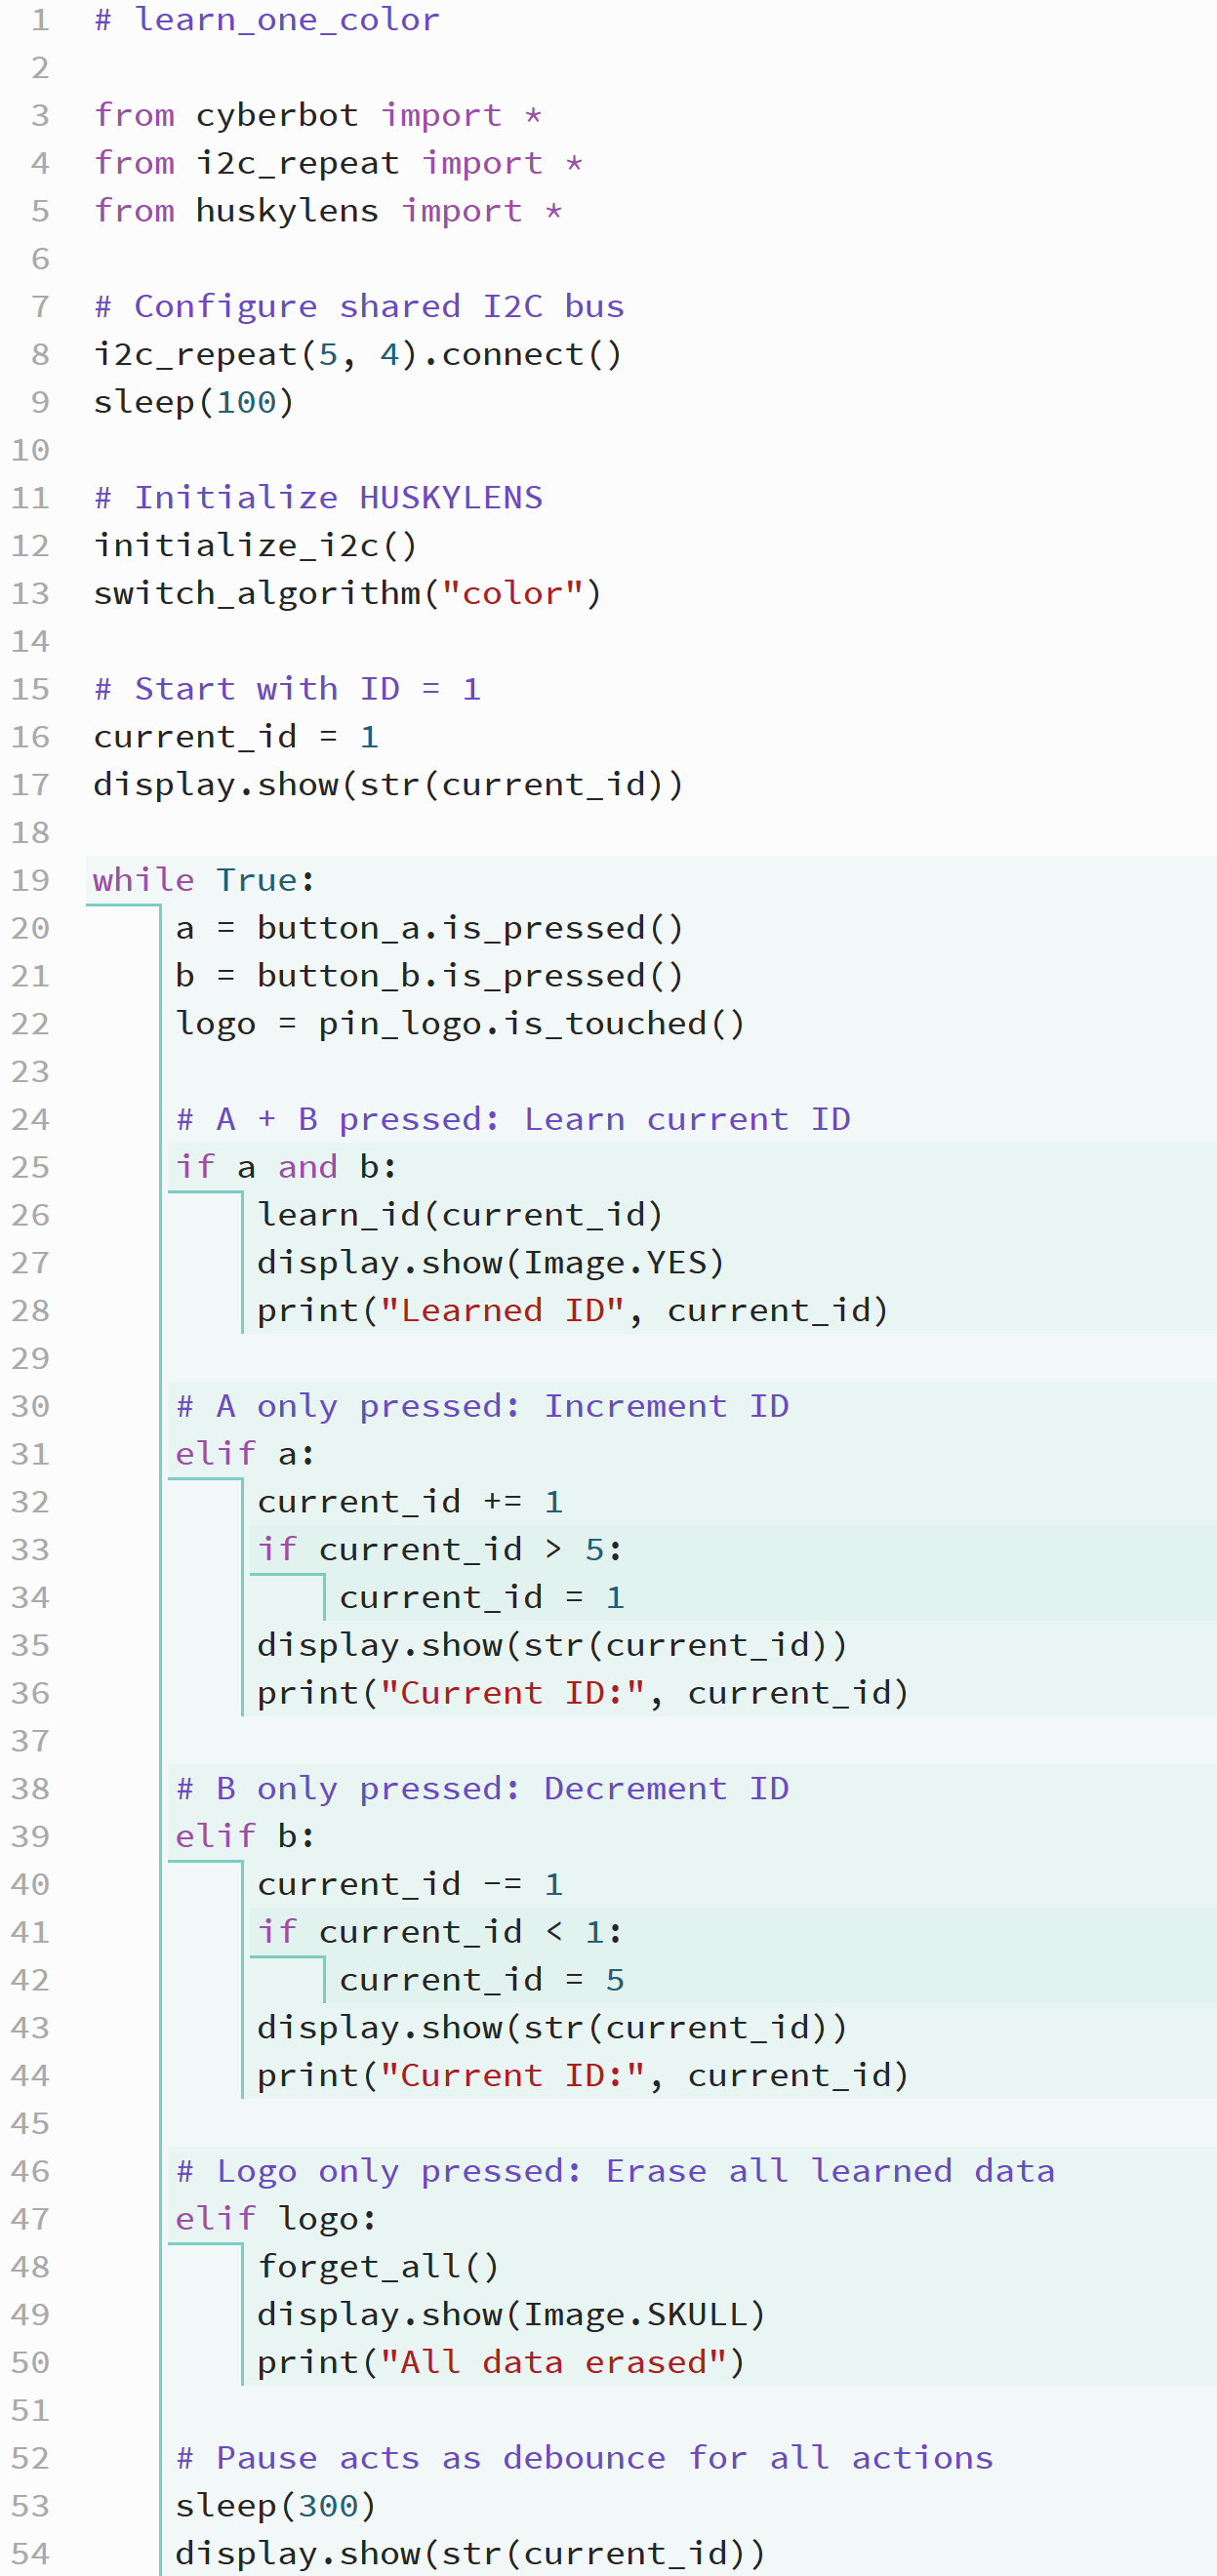
How it Works

The script begins by importing the cyberbot, i2c_repeat, and huskylens modules. These modules let the micro:bit share its I²C bus with the cyber:bot and HUSKYLENS, communicate with the camera, and send commands to learn or forget color data.

The line i2c_repeat(5, 4).connect() configures shared I²C communication between the micro:bit and the cyber:bot board, using pin 5 for the clock (SCL) signal and pin 4 for the data (SDA) signal. The short sleep(100) delay gives both devices time to initialize.

Next, initialize_i2c() starts communication with the HUSKYLENS, and switch_algorithm("color") sets it to color recognition mode. These steps prepare the HUSKYLENS to learn and identify colors.

The variable current_id = 1 starts the system with color ID 1. This ID determines which “slot” in the HUSKYLENS memory will be used when learning or recalling a color. The display immediately shows the current ID so the user knows which color slot is active.

Inside the while True loop, the program continually checks for button and logo inputs:

  • If both Button A and Button B are pressed at the same time, the statement learn_id(current_id) instructs the HUSKYLENS to learn the color it currently sees. The display shows Image.YES, and the current ID is printed to confirm learning.
  • If only Button A is pressed, the program increments the ID by 1. When the number passes 5, it wraps back to 1. The updated ID is shown on the display.
  • If only Button B is pressed, the ID decreases by 1, wrapping back to 5 when it goes below 1. The display updates to reflect the new ID.
  • If the logo is touched, forget_all() erases all learned color data from the HUSKYLENS. The Image.SKULL icon confirms that the memory has been cleared.

Finally, the sleep(300) statement adds a short delay between button checks. This acts as a debounce, ensuring that each press registers only once before the display returns to showing the current ID.

Through these steps, the script allows the user to move between color IDs, train the HUSKYLENS to recognize each one, and clear all stored data—all through simple inputs on the micro:bit.


Printer-friendly version
Recognize Different Colors (Python)
Prev
Test the Color Training Script (Python)
Next

DISCUSSION FORUMS | PARALLAX INC. STORE

About | Terms of Use | Feedback: learn@parallax.com | Copyright©Parallax Inc. 2024

© 2026 Parallax Learn • Built with GeneratePress