Skip to content
Parallax Learn

Parallax Learn

  • Welcome
  • Tutorials
        • Tutorial Series head tag

          Tutorial Series
        • Tutorial Series

          The special, classroom-ready series pages are organized collections of tutorials for our most popular hardware and/or languages. The tutorials for each topic are conveniently accessible from a single page, shown in the order it is recommended that they be completed.
        • Robotics Series Head tag

          Robotics Series
        • Robotics Series

          • Artificial Intelligence
          • Cybersecurity: Radio Data tutorialCybersecurity
          • cyber:bot + Python
          • cyber:bot + MakeCode
          • Boe-Bot Tutorial SeriesBoe-Bot
          • Arduino Shield-Bot
          • ActivityBot with C TutorialsActivityBot + C
          • ActivityBot with BlocklyProp Tutorial SeriesActivityBot + BlocklyProp
          • Scribbler 3 Tutorial SeriesScribbler 3
        • Electronics & Programming Series Head tag

          Electronics & Programming Series
          • BS2 Board of Education Tutorial SeriesBS2 Board of Education
          • Propeller C-Language BasicsPropeller C Basics
          • FLiP Try-It Kit C Tutorial SeriesFLiP Try-It Kit + C
          • FLiP Try-It Kit BlocklyProp TutorialsFLiP Try-It Kit + BlocklyProp
          • Badge WX Tutorial SeriesBadge WX
          • Propeller BlocklyProp Basics and ProjectsPropeller BlocklyProp Basics
          • View All Tutorial Series »
        • Browse Tutorials
        • Browse Tutorials

          Individual tutorials sorted by robot or kit, and language.
        • By Robot or Kit
          • ActivityBot
          • SumoBot WX
          • Boe-Bot
          • Shield-Bot
          • cyber:bot
          • Badge WX
          • ELEV-8
          • ARLO
        • By Language
        • By Language

          • Propeller C
          • Arduino
          • BlocklyProp
          • PBASIC
          • Python
          • MakeCode
          • View All Tutorials »
  • Educators
  • Reference
  • Downloads
  • Home
  • All Courses
  • Machine Learning: Train the HUSKYLENS to Recognize

Machine Learning: Train the HUSKYLENS to Recognize

Create the Color Training Script

Entering the Script

Now it’s your turn to program the micro:bit. Open the MakeCode editor.  It’s usually best to start by opening an earlier project where the HUSKYLENS and cyber:bot extensions have already been added.

This program will let you change IDs, teach the HUSKYLENS to recognize colors, and erase learned data using the micro:bit buttons and logo touch.

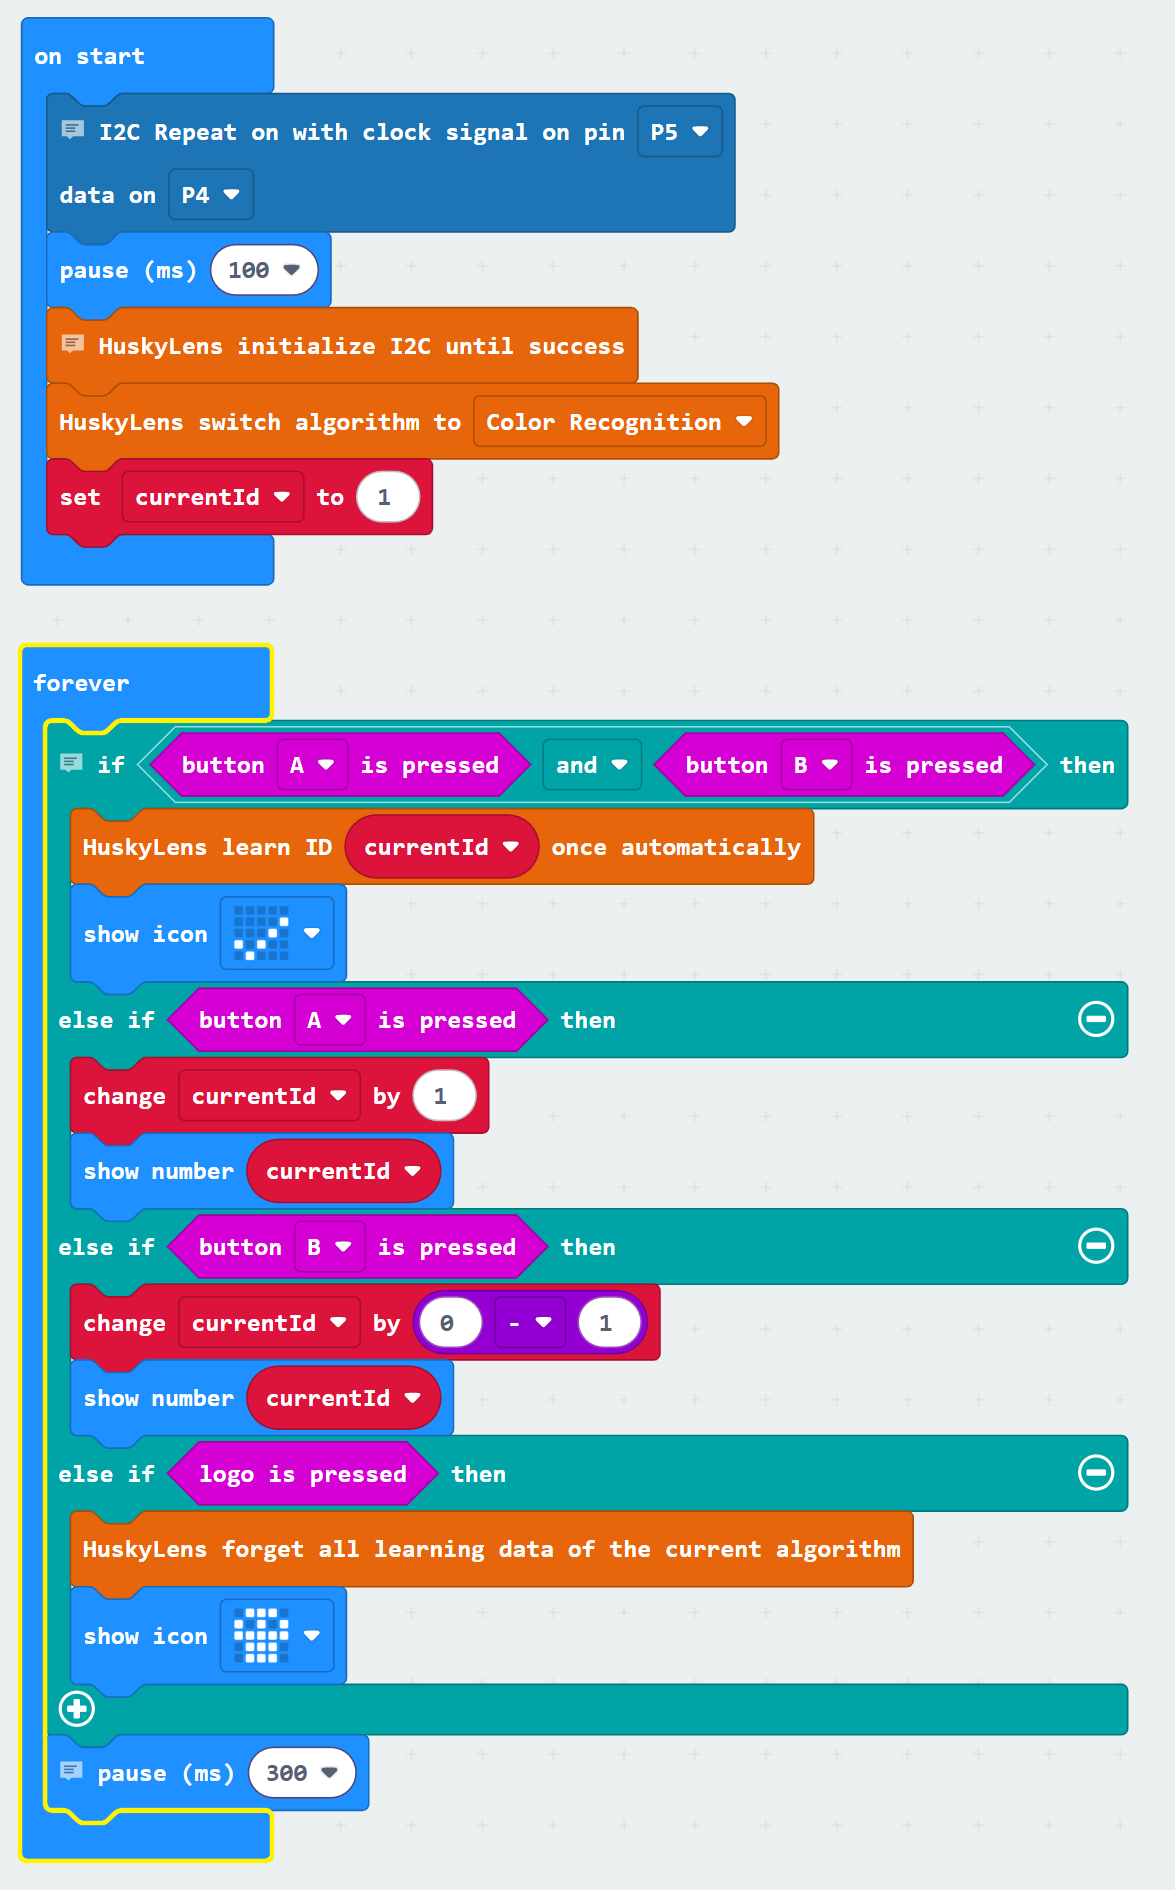
  • In the MakeCode editor, build the blocks program with the picture below as your guide.
  • Use the name field to the right of the Download button to name the project Learn Colors.
  • Click the floppy disk Save icon to the right of the name filed to save your work.
  • Use the Download button to load the program into the micro:bit.

How it Works

  1. Share I²C between micro:bit and cyber:bot
    The block I2C Repeat on with clock signal on pin P5 data on P4) has the cyber:bot board’s Propeller microcontroller share the micro:bit I²C bus with the HUSKYLENS connection. The pause (ms) (100) block gives everything time to get ready.

  2. Start the HUSKYLENS
    The block HuskyLens initialize I2C until success starts communication between the micro:bit and HUSKYLENS camera. Then HuskyLens switch algorithm to (color recognition)sets it to look for colors.

  3. Keep track of the current ID
    A variable set (currentId) to (1) starts the currentId variable at 1. This number tells HUSKYLENS which memory slot it’s working with.

  4. Forever loop 
    Inside the forever block, the program responds to button presses by configuring the HUSKYLENS with if…else if…else if… decisions:

    • if <button (A) is pressed> and <button (B) is pressed> then
      This means both buttons have to be pressed at about the same time.
      → The block HuskyLens learn ID (currentId) once automatically tells HUSKYLENS to remember the current item in this ID slot. The block show icon (Yes) confirms learning worked.

    • else if <button (A) is pressed> then
      → The block change (currentId) by (1) increases the ID number. The block show number (currentId) shows the new ID on the micro:bit module’s LED matrix screen.

    • else if <button (A) is pressed> then
      → The block change currentId by (0–1) decreases the ID number by 1. The block show number (currentId) shows the updated ID.

    • else if <logo is pressed> then
      → The block huskylens forget all learning data of the current algorithm clears all the learned items. The block show icon (Skull) shows that memory has been erased.

    • One pause for everything
      The block pause (300 ms) slows down the loop just enough to act like a button “debounce,” so one press only counts once.


Printer-friendly version
Recognize Different Colors
Prev
Test the Color Training Script
Next

DISCUSSION FORUMS | PARALLAX INC. STORE

About | Terms of Use | Feedback: learn@parallax.com | Copyright©Parallax Inc. 2024

© 2026 Parallax Learn • Built with GeneratePress