Pushbuttons
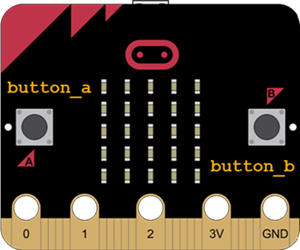
The micro:bit module has two pushbuttons labeled A and B, to the left and right side of the LED display. This kind of button is sometimes called a tactile switch, or tact switch for short. The micro:bit module can be programmed to respond to these buttons being pressed. In your projects, each button already exists as an object, and they can be referred to as button_a and button_b.

For example, if you want something to turn on only when button A is being pressed, you can use button A is pressed. The same can be done for button B or both A and B.
Example: is_pressed
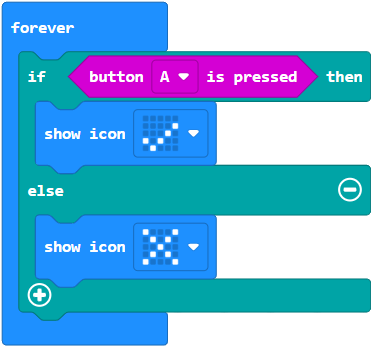
You can make a block for each button to tell if it is pressed. The button A is pressed method will return either True or False depending on whether or not button A is currently pressed. These methods often work well with conditionals. For example, the following program displays a check mark if button A is pressed. Otherwise, it will display an X.
- Enter, name, and flash the project is_pressed to your micro:bit.
- Press button A to see the display change.


Try This
- Use the display to show the letter A when the A button is pressed.
- Use the display to show the letter B when the B button is pressed.
Example project: on_pressed
Another commonly used method of the buttons is to run a set of blocks as soon as the button is pressed. This is what we call an interrupt because it interrupts the program to run its own blocks.
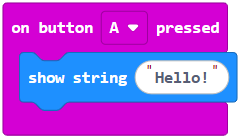
For example, the project on_pressed will display a scrolling hello when button A is pressed. If nothing is pressed, then nothing will be shown.
- Enter, name, and flash the project on_pressed to your micro:bit.

Your Turn
- Make a project to show a custom image for 10 seconds if button A was pressed and then disappears after.
- Make a project to show a flash B 10 times when button B is pressed instead of button A.
