Are the Servos Centered?
The cyber:bot robot’s drive motors are called Continuous Rotation Servos. If you received your robot preassembled, these servos might need to be re-centered before moving on to navigation activities.
- If you just followed the directions in the Build your cyber:bot tutorial, you will have already centered your servos, and you can skip to the next page: Servo Direction
- If you were just given an assembled cyber:bot to use, the servos might need to be re-centered. Use the test below to find out.
Test if the servos are centered
Before running this test, double check the battery and servo connections.
- Set the cyber:bot board’s power (PWR) switch to Position 0.
- Make sure the battery holder is loaded with 5 AA batteries.
- Make sure the battery holder’s barrel plug is firmly plugged into the cyber:bot board’s barrel jack.
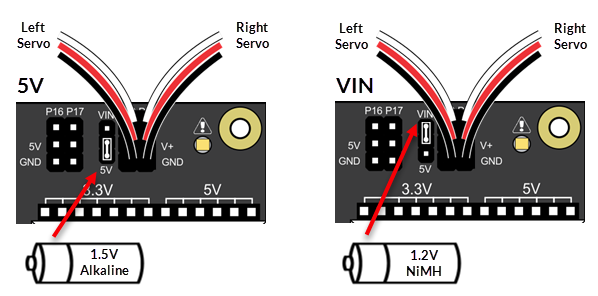
- Use the image below to verify that the servo supply jumper is set properly for the kind of AA batteries you are using.
- Connect your micro:bit module to your computer with a USB cable.
Example Script: both_servos_stay_still
- In a Google Chrome or Microsoft Edge browser, go to python.microbit.org to open the micro:bit Python Editor.
- Make sure the cyberbot.py module is added to the Project Files.
(See Add modules to your micro:bit). - Make sure to include the line from cyberbot import *.
- Enter, name, and save the example script both_servos_stay_still.
(See Save & Edit Scripts.) - Click the Send to micro:bit button.
(See Flash Scripts with Python Editor.)
# both_servos_stay_still

from cyberbot import *

bot(18).servo_speed(0)
bot(19).servo_speed(0)
If a servo has not yet been centered, or if its center setting has drifted, it might turn, vibrate, or make a humming noise when your script tells it to stay still.
- Set the cyber:bot robot’s PWR switch to 2, to provide power to the servos.
- If both servos stay still, it means they are both centered, and you can skip to the next page: Servo Direction.
- Any servo that hums, vibrates, or turns in response to this test will need to be re-centered by following the instructions below.
If one or both servos need to be re-centered:
Tools You Might Need
If the Procedure checklist says to remove the servo from the cassis, use these tools that come in the cyber:bot Robot kit:
(1) Parallax screwdriver, or a different Phillips #1 point screwdriver with a 1/8″ (3.18 mm) or smaller shaft.

(1) Parallax Combination Wrench (#700-10025), or a 1/4″ combination wrench.
Procedure
- Check the part of the servo case where the 3-wire cable comes out. There should be a small round access hole very close to it.
- If that access hole is close to the battery pack, the servo will need to be disconnected from the chassis.
- Unscrew the screw in the center of the wheel.
- Pull the wheel away from the servo to pull it off the output shaft.
- Unscrew the four screws/nuts that hold the servo to the chassis.
- If the access hole is instead closer to the front of the cyber:bot, the servo will not need to be disconnected.
- Go to Center the Servos First activity, and start with the Test and Center the Servo Connected to P18 section.
- Reattach the servo to the cyber:bot chassis, and reattach the wheel to the servo.