Servo Direction
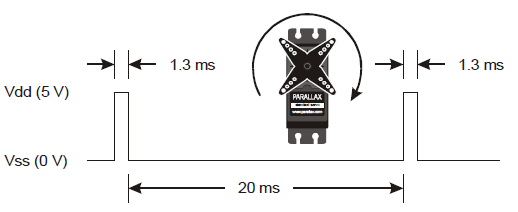
Your cyber:bot servos need to receive a high (5 volt) signal pulse every 20 milliseconds to keep rotating smoothly. The speed and direction of rotation are determined by how long that high pulse lasts. Take a look at the timing diagrams below.
Servo Direction
Full speed clockwise requires 1.3 ms high pulses. To do this, use servo_speed(-75).
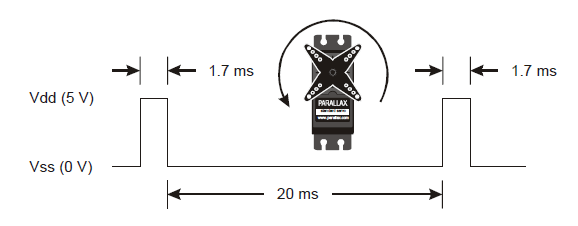
Full speed counter-clockwise requires 1.7 ms high pulses. To do this, use servo_speed(75).
Full speed typically falls in the 50 to 60 RPM range.
To center the servos, we used servo_speed(0). This generates high signals that last 1.5 ms — halfway in between — that not only make the servo stay still, also but resist being twisted. This is useful for stopping on slopes, or pausing in the middle of a series of maneuvers.
To stop sending signals to the servos entirely, use servo_speed(None). This will also make the servos stay still, but they will not resist being twisted.
What’s RPM? Revolutions Per Minute—the number of full rotations turned in one minute.
What’s a pulse train? Just as a railroad train is a series of cars, a pulse train is a series of pulses (brief high signals).
Hardware Setup
- Set the cyber:bot board’s power (PWR) switch to Position 0.
- Make sure the battery holder is loaded with 5 AA batteries.
- Make sure the battery holder’s barrel plug is firmly plugged into the cyber:bot board’s barrel jack.
- Connect your micro:bit module to your computer with a USB cable.
Example Script: left_servo_clockwise
- In a Google Chrome or Microsoft Edge browser, go to python.microbit.org to open the micro:bit Python Editor.
- Make sure the cyberbot.py module is added to the Project Files.
(See Add modules to your micro:bit). - Set the project’s name to left_servo_clockwise, enter the script below, and then click Save.
(See Save & Edit Scripts and Flash Scripts with Python Editor.) - Click Send to micro:bit.
(See Flash Scripts with Python Editor.) - Set the power (PWR) switch to position 2.
- Verify that the left servo (connected to P18) is rotating between 50 and 60 RPM clockwise.
- Set the PWR switch to 0.
# left_servo_clockwise

from cyberbot import *

bot(18).servo_speed(-75)        # 1.3 ms full speed clockwise
Try This: Left Servo Counterclockwise
Now, try turning the left servo the other direction.
- Change the project name from left_servo_clockwise to left_servo_counterclockwise.
- In the servo_speed function call, change (-75) to (75).
- Save your modified script.
- Flash the script with the Send to micro:bit button.
- Set the PWR switch to 2.
- Verify that the servo connected to pin 18 now rotates the other direction, which should be counterclockwise, at about 50 to 60 RPM.
- Set the PWR switch to 0.
Your turn: Left Servo Stay Still
Now, try making the left servo stop, two different ways.
- Change the project name from left_servo_clockwise to left_servo_stay_still.
- In the servo_speed function, change (-75) to (0).
- Save the modified script and flash it with the Send to micro:bit button.
- Set the PWR switch to 2.
- Verify that the left servo is not rotating in any direction, but gently resists being twisted.
- Change (0) to (None) and Save your modified script.
- Flash the script with the Send to micro:bit button.
- Verify that the left servo neither turns nor resists being turned.
- Set the PWR switch to 0.
Example script: right_servo_clockwise
- Open the script left_servo_clockwise.
- Rename the project to right_servo_clockwise, and don’t forget to update the name in the comment!
- Replace bot(18)with bot(19).
- Flash the script into the micro:bit with the Send to micro:bit button.
- Set PWR to 2.
- Verify that the right servo (connected to P19) is rotating between 50 and 60 RPM clockwise.
- Set PWR to 0.
# right_servo_clockwise

from cyberbot import *

bot(19).servo_speed(-75)        # 1.3 ms full speed clockwise
Try This: Right Servo Counterclockwise
- Change the project name from right_servo_clockwise to right_servo_counterclockwise.
- In bot(19).servo_speed(-75) change (-75) to (75).
- Update the code comments!
- Save the script and flash it with the Send to micro:bit button.
- Set PWR to 2.
- Verify that the servo connected to P19 turns full-speed counterclockwise, about 50 to 60 RPM.
- Set PWR to 0.
Your Turn: Right Servo Stay Still
- Change the project name from right_servo_clockwise to right_servo_stay_still.
- In the servo_speed function, change (-75) to (0).
- Save the modified script and flash it with the Send to micro:bit button.
- Set PWR to 2.
- Verify that the right servo is not rotating in any direction, but gently resists being twisted.
- Change (0) to (None)
- Save the modified script and flash it with the Send to micro:bit button.
- Verify that the right servo neither turns nor resists being turned.
- Set PWR to 0.