Skip to content
Parallax Learn

Parallax Learn

  • Welcome
  • Tutorials
        • Tutorial Series head tag

          Tutorial Series
        • Tutorial Series

          The special, classroom-ready series pages are organized collections of tutorials for our most popular hardware and/or languages. The tutorials for each topic are conveniently accessible from a single page, shown in the order it is recommended that they be completed.
        • Robotics Series Head tag

          Robotics Series
        • Robotics Series

          • Artificial Intelligence
          • Cybersecurity: Radio Data tutorialCybersecurity
          • cyber:bot + Python
          • cyber:bot + MakeCode
          • Boe-Bot Tutorial SeriesBoe-Bot
          • Arduino Shield-Bot
          • ActivityBot with C TutorialsActivityBot + C
          • ActivityBot with BlocklyProp Tutorial SeriesActivityBot + BlocklyProp
          • Scribbler 3 Tutorial SeriesScribbler 3
        • Electronics & Programming Series Head tag

          Electronics & Programming Series
          • BS2 Board of Education Tutorial SeriesBS2 Board of Education
          • Propeller C-Language BasicsPropeller C Basics
          • FLiP Try-It Kit C Tutorial SeriesFLiP Try-It Kit + C
          • FLiP Try-It Kit BlocklyProp TutorialsFLiP Try-It Kit + BlocklyProp
          • Badge WX Tutorial SeriesBadge WX
          • Propeller BlocklyProp Basics and ProjectsPropeller BlocklyProp Basics
          • View All Tutorial Series »
        • Browse Tutorials
        • Browse Tutorials

          Individual tutorials sorted by robot or kit, and language.
        • By Robot or Kit
          • ActivityBot
          • SumoBot WX
          • Boe-Bot
          • Shield-Bot
          • cyber:bot
          • Badge WX
          • ELEV-8
          • ARLO
        • By Language
        • By Language

          • Propeller C
          • Arduino
          • BlocklyProp
          • PBASIC
          • Python
          • MakeCode
          • View All Tutorials »
  • Educators
  • Reference
  • Downloads
  • Home
  • All Courses
  • OLED Display with BlocklyProp

OLED Display with BlocklyProp

Connect and Test the OLED

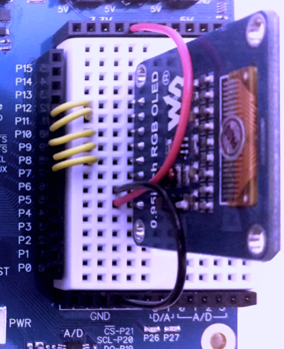
The Color OLED module needs 7 connections to do its job.  GND on the module must be connected to GND on the Activity Board, VCC should be connected to 3.3V, and every other pin (except the one marked N/C – which is an abbreviation for “no connection”), must be connected to an I/O pin.

Pin Connections

The OLED initialize block is used to set up the Color OLED display module. The DIN, CLK, CS, D/C, and RES pins on the module must be matched to the Propeller Activity Board pins they are connected to:

  • Plug the Color OLED module into the breadboard. 
  • Connect:
    • GND on the module to GND on the Propeller Activity Board
    • VCC on the module to 3.3V on the Activity Board
    • DIN on the module to P7 on the Activity Board
    • CLK on the module to P8 on the Activity Board
    • CS on the module to P9 on the Activity Board
    • D/C on the module to P10 on the Activity Board
    • RES on the module to P11 on the Activity Board
Test Program

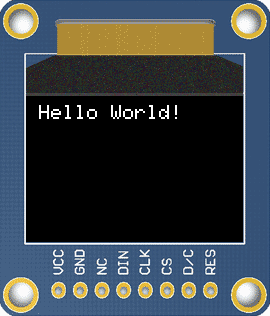
The test project is the classic “Hello World!” text often used to prove that a communication program is working.

  • Make sure that you are logged into BlocklyProp.
  • Make sure that the BlocklyProp Client is running.
  • Select your board in the device menu.
  • Build the program shown below using the COMMUNICATE > OLED blocks: OLED initialize and OLED print text.
  • Click in the blue text string block and update the text to say “Hello World!”

  • Click the Load RAM & Run button.

The Color OLED will display the information sent to it by the Propeller:
How it Works

The OLED initialize block sets up the connections between numbered Propeller I/O used to connect to each specific signal lines on the OLED display.  The OLED print text block passes the characters in its text string block to the display for rendering.

  • If you are stopping now, turn off power to the OLED. Otherwise, you are ready to go to the next page – just follow the link below.

CAUTION: Don’t leave the Color OLED on for long periods of time.  OLEDs can burn out if they are left on and displaying the same image for more than an hour at a time.  Use the OLED command block to “sleep” and “wake” your screen.


Did you Know?

It is possible to use more than one OLED at a time in a project.  The Tiny Tutorial video below uses two displays at once. Something to keep in mind for future projects after going through this tutorial!

]


Printer-friendly version
Installing OLED Fonts
Next

DISCUSSION FORUMS | PARALLAX INC. STORE

About | Terms of Use | Feedback: learn@parallax.com | Copyright©Parallax Inc. 2024

© 2025 Parallax Learn • Built with GeneratePress