Skip to content
Parallax Learn

Parallax Learn

  • Welcome
  • Tutorials
        • Tutorial Series head tag

          Tutorial Series
        • Tutorial Series

          The special, classroom-ready series pages are organized collections of tutorials for our most popular hardware and/or languages. The tutorials for each topic are conveniently accessible from a single page, shown in the order it is recommended that they be completed.
        • Robotics Series Head tag

          Robotics Series
        • Robotics Series

          • Artificial Intelligence
          • Cybersecurity: Radio Data tutorialCybersecurity
          • cyber:bot + Python
          • cyber:bot + MakeCode
          • Boe-Bot Tutorial SeriesBoe-Bot
          • Arduino Shield-Bot
          • ActivityBot with C TutorialsActivityBot + C
          • ActivityBot with BlocklyProp Tutorial SeriesActivityBot + BlocklyProp
          • Scribbler 3 Tutorial SeriesScribbler 3
        • Electronics & Programming Series Head tag

          Electronics & Programming Series
          • BS2 Board of Education Tutorial SeriesBS2 Board of Education
          • Propeller C-Language BasicsPropeller C Basics
          • FLiP Try-It Kit C Tutorial SeriesFLiP Try-It Kit + C
          • FLiP Try-It Kit BlocklyProp TutorialsFLiP Try-It Kit + BlocklyProp
          • Badge WX Tutorial SeriesBadge WX
          • Propeller BlocklyProp Basics and ProjectsPropeller BlocklyProp Basics
          • View All Tutorial Series »
        • Browse Tutorials
        • Browse Tutorials

          Individual tutorials sorted by robot or kit, and language.
        • By Robot or Kit
          • ActivityBot
          • SumoBot WX
          • Boe-Bot
          • Shield-Bot
          • cyber:bot
          • Badge WX
          • ELEV-8
          • ARLO
        • By Language
        • By Language

          • Propeller C
          • Arduino
          • BlocklyProp
          • PBASIC
          • Python
          • MakeCode
          • View All Tutorials »
  • Educators
  • Reference
  • Downloads
  • Home
  • All Courses

Parallax WX Wi-Fi Module for Prop C

Curriculum

  • 1 Section
  • 19 Lessons
  • Lifetime
Expand all sectionsCollapse all sections
  • Parallax WX Wi-Fi Module for Prop C
    19
    • 1.0
      Wi-Fi Module Firmware
    • 1.1
      Connect WX Wi-Fi Module to Your Propeller
    • 1.2
      Join the Module’s Wi-Fi
    • 1.3
      Update the Module Firmware
    • 1.4
      Configure Module Communication
    • 1.5
      Load and View a Test Page
    • 1.6
      Test the Propeller to Webpage Connection
    • 1.7
      Join Another Wi-Fi Network
    • 1.8
      Get Started With HTML
    • 1.9
      Get Started With JavaScript
    • 1.10
      Relay Information with JavaScript
    • 1.11
      Send Web Page Event Info to the Propeller
    • 1.12
      Motor Control with Sliders
    • 1.13
      Page Requests Info from Propeller
    • 1.14
      Display Pushbutton States
    • 1.15
      Program the Propeller over Wi-Fi
    • 1.16
      Print and Scan Function Review
    • 1.17
      Web Page Controlled LED Lights
    • 1.18
      Display Light Levels with Canvas

Get Started With HTML

This primer introduces just enough HTML to help get you started with creating web pages that can interact with your Propeller + Wi-Fi Module. To help keep the focus on the code, we’ll only include the parts you’ll need to make the web page communicate with a microcontroller, and leave out any additional features. 

The recommended software for these exercises includes the Google Chrome web browser and the text editor provided by your operating system: Windows Notepad, Mac TextEdit, Ubuntu (Linux) gedit.  If you have a Chromebook, find the Caret app in the Chrome Web Store and add to Chrome.

Here is HTML code that displays text in a web page. 

  • Open your text editor program.
  • Click the File menu and select New.
  • Enter the three lines of HTML code below.
<html>
Hello, this is a web page.
</html>
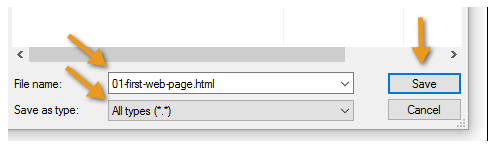
  • Click the File menu and select Save as…
  • Setting the file type will vary with your editor.  In Windows notepad, set the File type to All files (*.*) or All Files.  Other OS text editors typically offer an HTML file type.
  • Set the File name to 01-first-web-page.html.
  • Click Save.

Now that your HTML file has been saved, let’s view it in Chrome.    

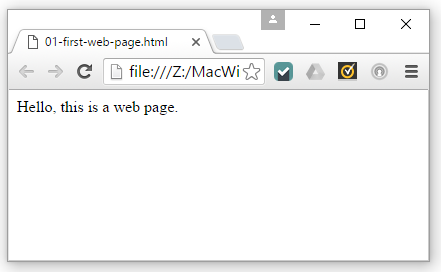
  • Open your Chrome browser, press the CTRL + O keys (that’s O as in Open), browse to your file and double-click it.  Note: In Mac, it’s Command + O.
  • Verify that the text message you typed between <html> and </html> is displayed.


Try This

  • Click the text editor’s file menu, and select Save As…
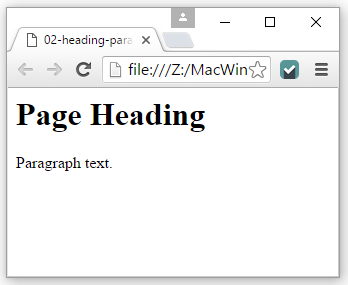
  • This time, name your file 02-heading-and-paragraph.html.
  • Open it with your Chrome browser (CTRL+O again).
<html>
  <h1>Page Heading</h1>
  <p>Paragraph text.</p>
</html>


How it Works

This is an opening html tag <html>.  This is a closing html tag </html>.  The content between those two tags can be in hypertext markup language, which is abbreviated html.  In html, the <h1>…</h1> opening and closing tags make the browser display text between them as a level 1 heading.  For paragraph text, you can use <p>…</p>.

You can do lots of great things with HTML, and here are some tutorials that start simple and cover the topics you’ll need to make your pages awesome:  

  • w3schools.com HTML(5) Tutorial
  • Tutorialspoint.com HTML5 Tutorial

Printer-friendly version
Join Another Wi-Fi Network
Prev
Get Started With JavaScript
Next

DISCUSSION FORUMS | PARALLAX INC. STORE

About | Terms of Use | Feedback: learn@parallax.com | Copyright©Parallax Inc. 2024

© 2026 Parallax Learn • Built with GeneratePress