Motor Control with Sliders
With just a few small tweaks to the JavaScript and Propeller C code, that light control with checkboxes app can be transformed into slider control of servo position.
Keep in mind: If you followed the instructions in the Join Another Wi-Fi Network section, you’ll have to replace 192.168.4.1 with your IP address.
- Go to the Standard Servo, and follow its instructions for connecting and testing a standard servo.
- Go to your Wi-Fi module’s Files page at http://192.168.4.1/update-ffs.html.
- Use the Choose file button to upload page-controls-servo.html to your Wi-Fi module.
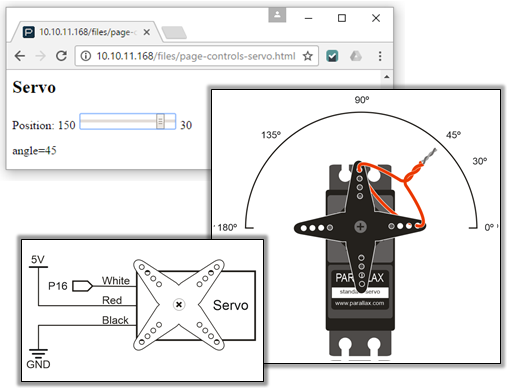
- In your web browser, open 192.168.4.1/files/page-controls-servo.html.
- Use SimpleIDE to open Page Controls Servo Host.bs2.
- Run Page Controls Servo Host.bs2.
- Verify that the SimpleIDE Terminal displays servoId = 1.
- Try dragging and releasing the slider control on the web page to various positions, and verify that the servo turns to and holds the corresponding angle.
How it Works – The JavaScript
This is the HTML that displays the slider and the angle. When the slider is adjusted, the onchage=”servoPosition(id)” passes the id of the slider to the servoPosition function’s sliderID parameter.
  <H2>Servo</H2>

  Position: 150
    <input type="range" id="position"
    min="30" max="150" value="90"
    onchange="servoPosition(id)">
  30
The servoAngle variable gets the slider’s value with document.getElementById(sliderId).value. The slider actually counts from 30 to 150, so servoAngle = (150 – servoAngle) + 30 calculates what the angle we really want is. For example, when the slider is ⅓ of the way from left to right, the range type returns 70, but we really want that to be 110. With servoAngle = (150 – servoAngle) + 30 we get 110 = 150 – 70 + 30. After that, nameVal = “angle=” + servoAngle creates the name value pair parameter to send to the httpPost function. For example, with the slider set to ⅓ of the way from left to right, it might send “angle=110”. The Propeller C program has a listener set up to monitor HTTP POST requests with the “/servo” path, so the httpPost call is httpPost(“/servo”, nameVal).
  function servoPosition(sliderId)
  {
    var servoAngle = document.getElementById(sliderId).value;
    servoAngle = (150 - servoAngle) + 30;
    var nameVal = "angle=" + servoAngle;
    document.getElementById("servoval").innerHTML = nameVal;
    httpPost("/servo", nameVal);
  }
How it Works – The Propeller C
As with the text message and LED light control examples, the information about where the web page wants to position the servo will come through as HTTP POST requests. The main changes are:
- #include servo.h added for controlling the servo
- The variable for holding the listener ID has been changed to servoId
- The listener is set up with a different path –”/servo”.
#include "simpletools.h"
#include "servo.h"
#include "wifi.h"

int event, id, handle;
int servoId, angle;

int main()
{
  wifi_start(31, 30, 115200, WX_ALL_COM);
  servoId = wifi_listen(HTTP, "/servo");
  print("ledId = %d\n", servoId);
The main loop checks if there are any POST requests coming from with the “/servo” path. When one comes through, event should store ‘P’, id should match servoId, and handle will have a reference . When these conditions are met, handle will contain the identifier wifi_scan needs to retrieve the POST body’s value.
  while(1)
  {
    wifi_poll(&event, &id, &handle);
    print("event = %c, id = %d, handle = %d\r", event, id, handle);

    if(event == 'P')
    {
      if(id == servoId)
      {
        print("Incoming POST request\r");
        wifi_scan(POST, handle, "angle%d\r", &angle);
        print("servoAngle: %d\n", angle);
        servo_angle(16, angle * 10);
      }
    }
    pause(500);
  }
}
The name in the name/value pair is “angle”, so if the angle is 45 degrees, we expect the POST body to contain “angle=45”. With that info, we can make the format string in our wifi_scan function be “angle%d”. Adding “angle” makes the Wi-Fi module only transmit the characters that represent the value, like the characters ‘4’ and ‘5’ in the case of 45 degrees. The %d in the format string makes the wifi_scan function put the value “45” corresponds to in the angle variable. So, our wifi_scan function should look like this: wifi_scan(POST, handle, “angle%d”, &angle).
The value wifi_scan stores in the angle variable is terms of degrees, but the servo_angle function needs 10ths of degrees. So, instead of servo_angle(16, 45), we’d need servo_angle(450). That’s why there’s a * 10 in servo_angle(16, angle * 10). It multiplies degrees in the angle variable by 10 to give it to servo_angle in terms of 10ths of degrees.